
3 weeks of jammed prints fixed with 30C and tape
Near the end of the Tricorder build, I started to experience some odd, intermittent print failures. One of the side panels printed with several layers missing, held together only by support material. I printed this monitored only by my new Octoprint setup, so I didn't notice the fault until the print was complete.
It was confusing, but the rest of the print did complete normally, so I decided to just reprint it and count my blessings. When the next print succeeded, I figured the problem was transient, and unlikely to recur.
Oh, how wrong I was.
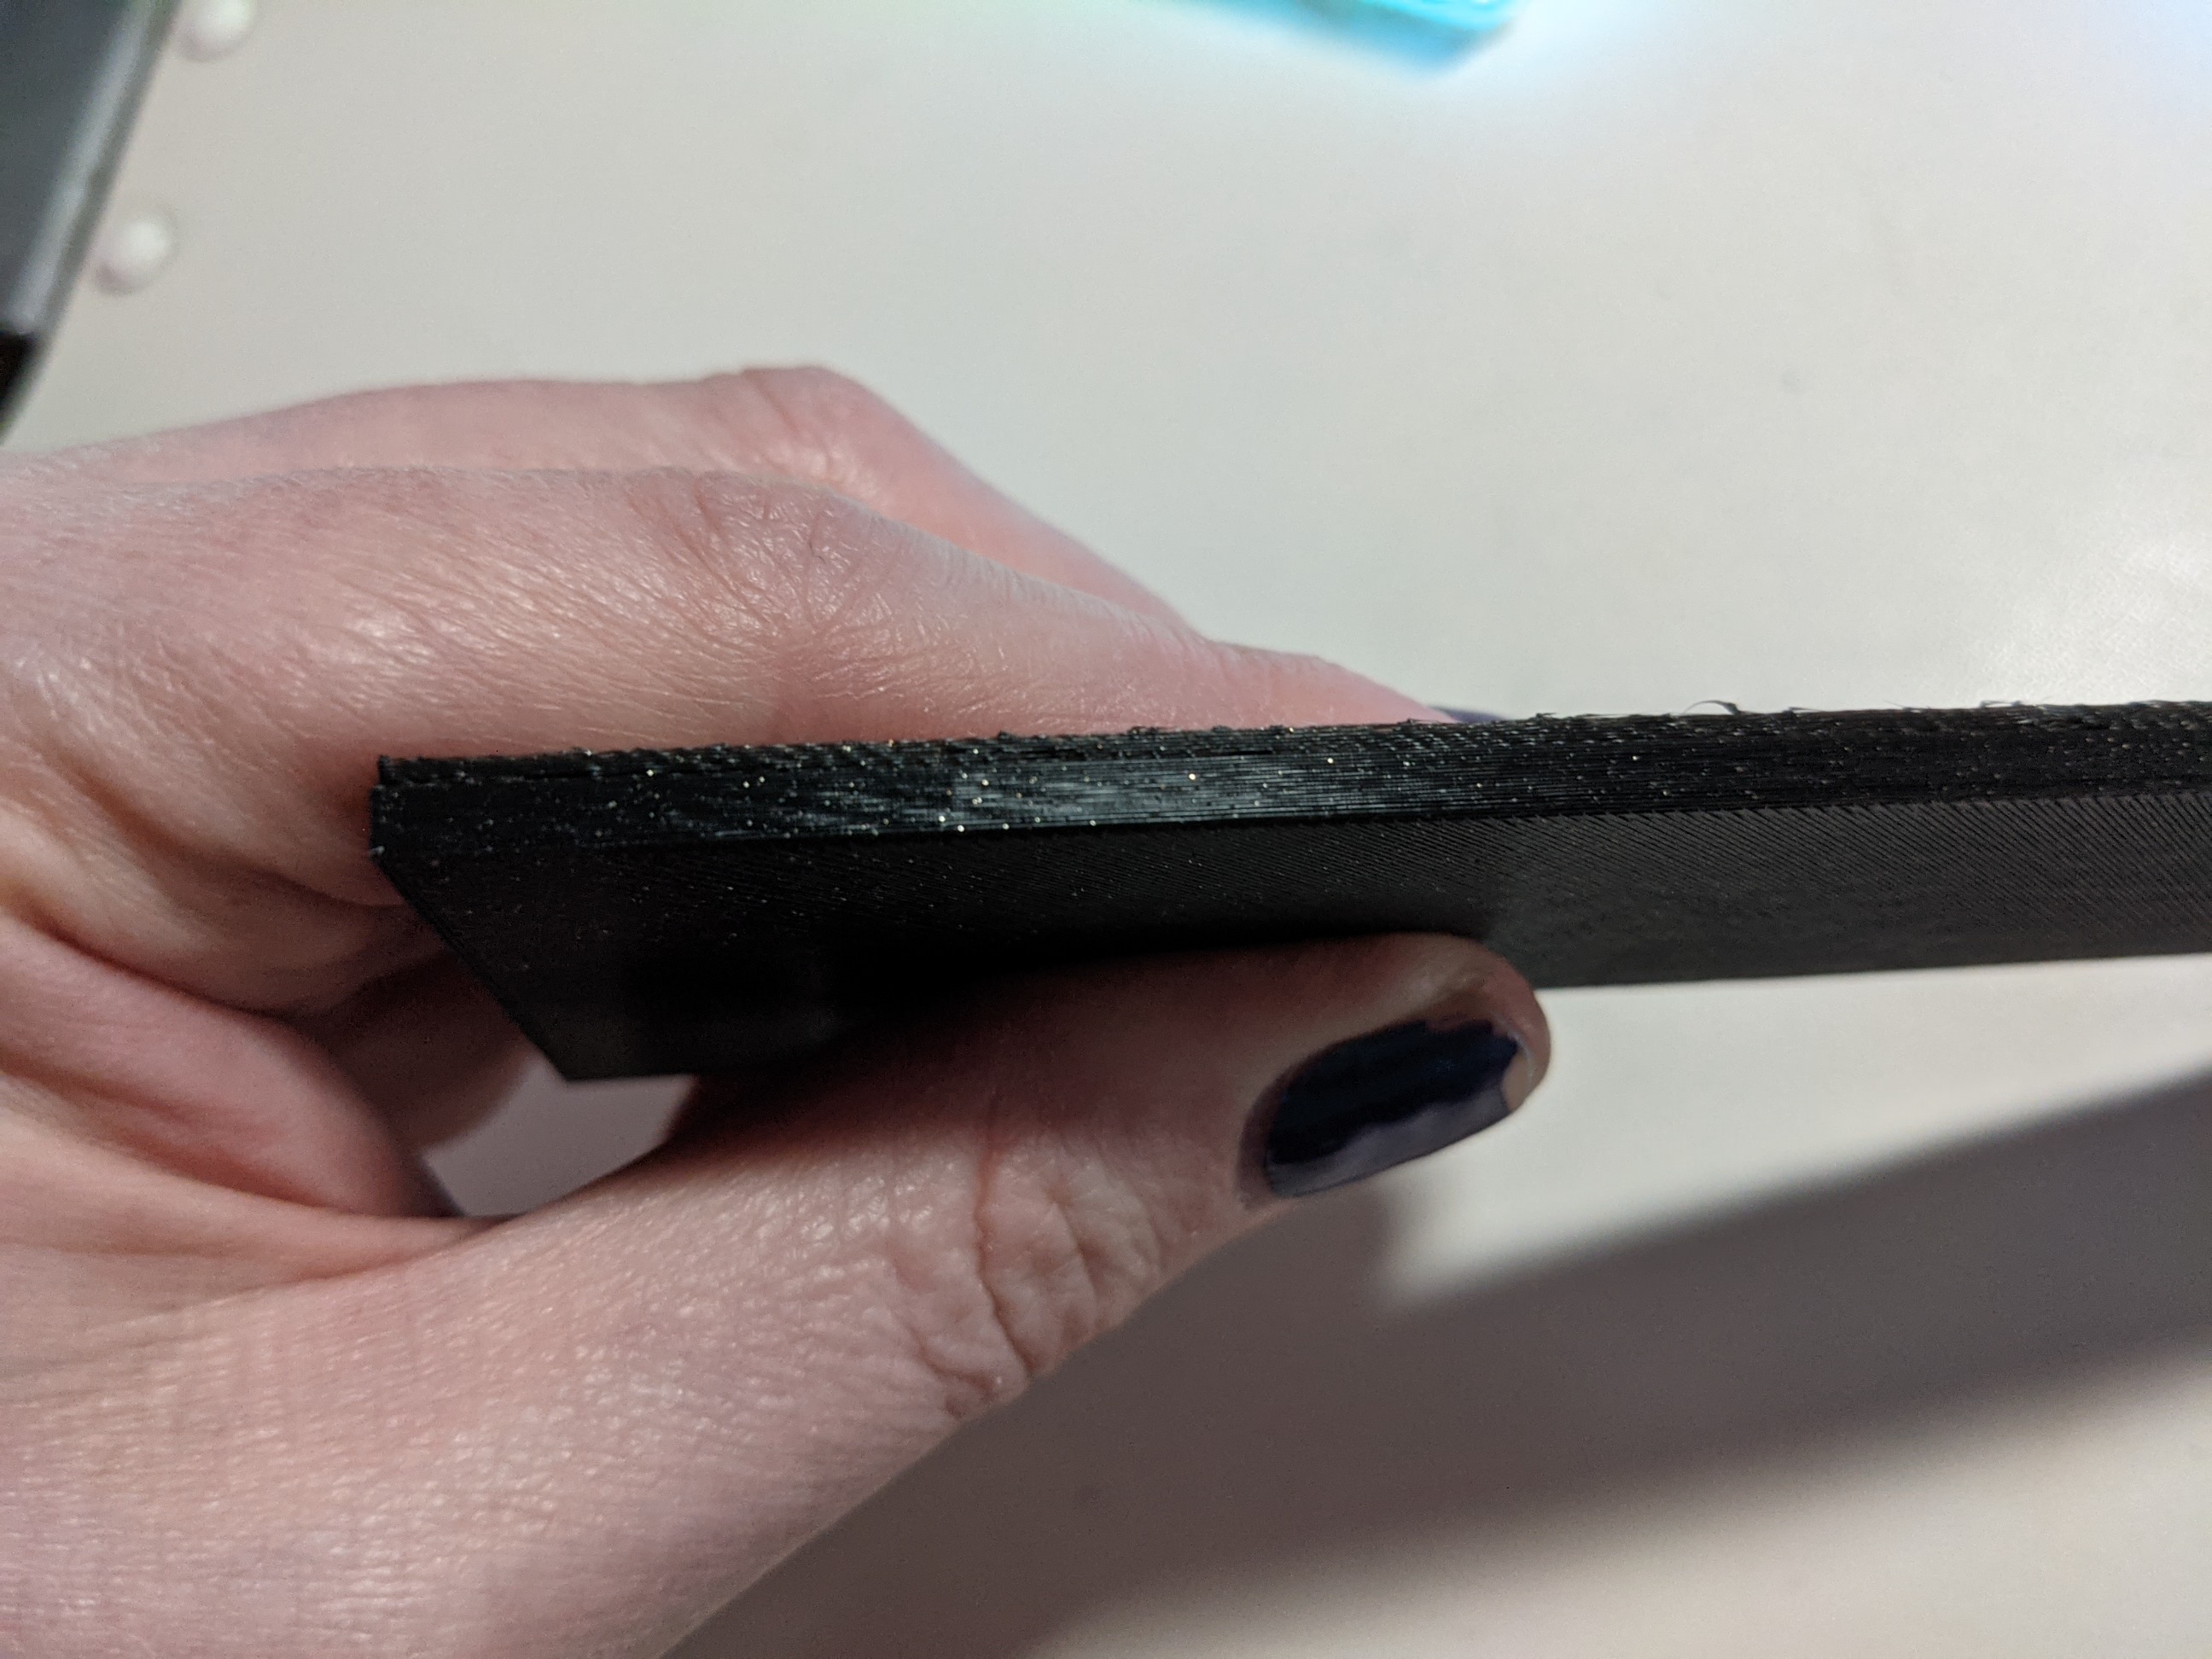

Shortly after the tricorder was complete, I tried to print something else. While the print looked like it was starting okay, within the first 20 or so layers it would start showing a familiar pattern of failure. The filament wasn't bonding well with the other layers, resulting in a weak print. Worse, now the printer wasn't "working it through', but completely jammed. The extruder gear would eventually wear through the filament and now nothing would print.
Again, I assumed the problem might just be transient. Ender 3s, such as mine, are prone to jamming issues and it's a surprise I hadn't encountered the problem before in previous year or so of printing. Since my printer has been modified from stock using Printermod's Modular Direct Drive (MDD) kit, there was little filament to grab a hold of to clear the jam. I had no choice but to take the hotend apart to clear it.
This wasn't the first time I had taken the hotend apart. I had to do so to install the MDD in the first place, and took the opportunity to replace the heatbreak and the nozzle.

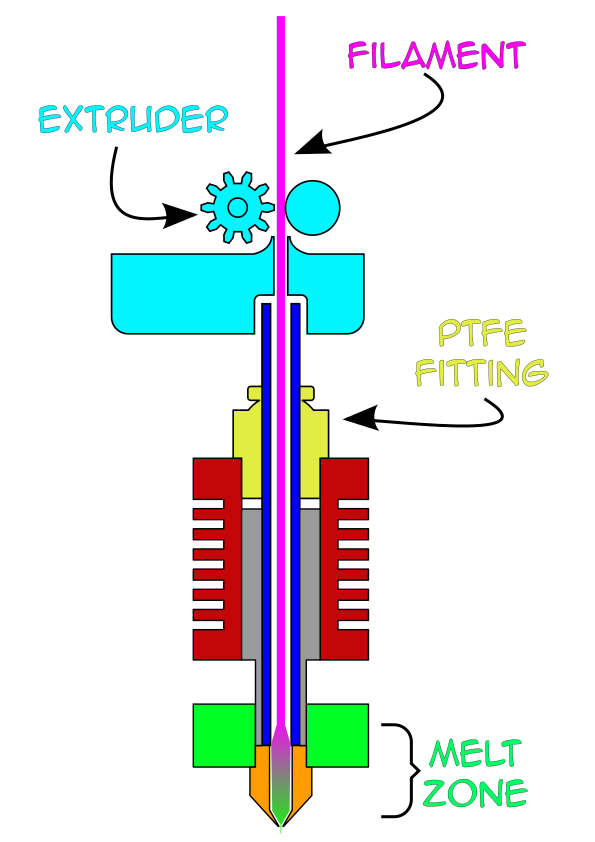
The Ender 3 uses an "MK 8" hotend. This hotend is fairly common and generally effective, but it does have a... Let's not say a "design flaw", but more of a design compromise. It requires a section of high-temperature PTFE tubing to extend all the way down the hotend to the tip of the nozzle. Depending on your printer set up, that PTFE tube can be fairly short -- as it is for my direct drive printer -- or longer in a "bowden tube" setup.
Of course, the nozzle and PTFE aren't just floating in air, there's an entire hotend assembly around it. Directly above the nozzle and surrounding the tube is the heatbreak, a rigid metal pipe. The goal of the heatbreak is to separate ("break") the very hot heater block from cooling heatsink.
When printing, the filament travels down the PTFE tube, through the heatsink, heatbreak, and into the nozzle. Toward the bottom of the heatbreak, the filament enters the melt zone in the heater block. Structurally, the nozzle and heat break are screwed into threads in the heater block. The heatbreak is retained in the heatsink via small screws which pin it in place.
As the extruder motor pushes filament into the hotend assembly, the plastic melts as near to the nozzle as possible, and is pushed out the aperture to the print. At least, that's how it's supposed to work, in theory.


The MK8 hotend is rather particular in how it likes to be reassembled, there are two very common failure modes for this hotend.
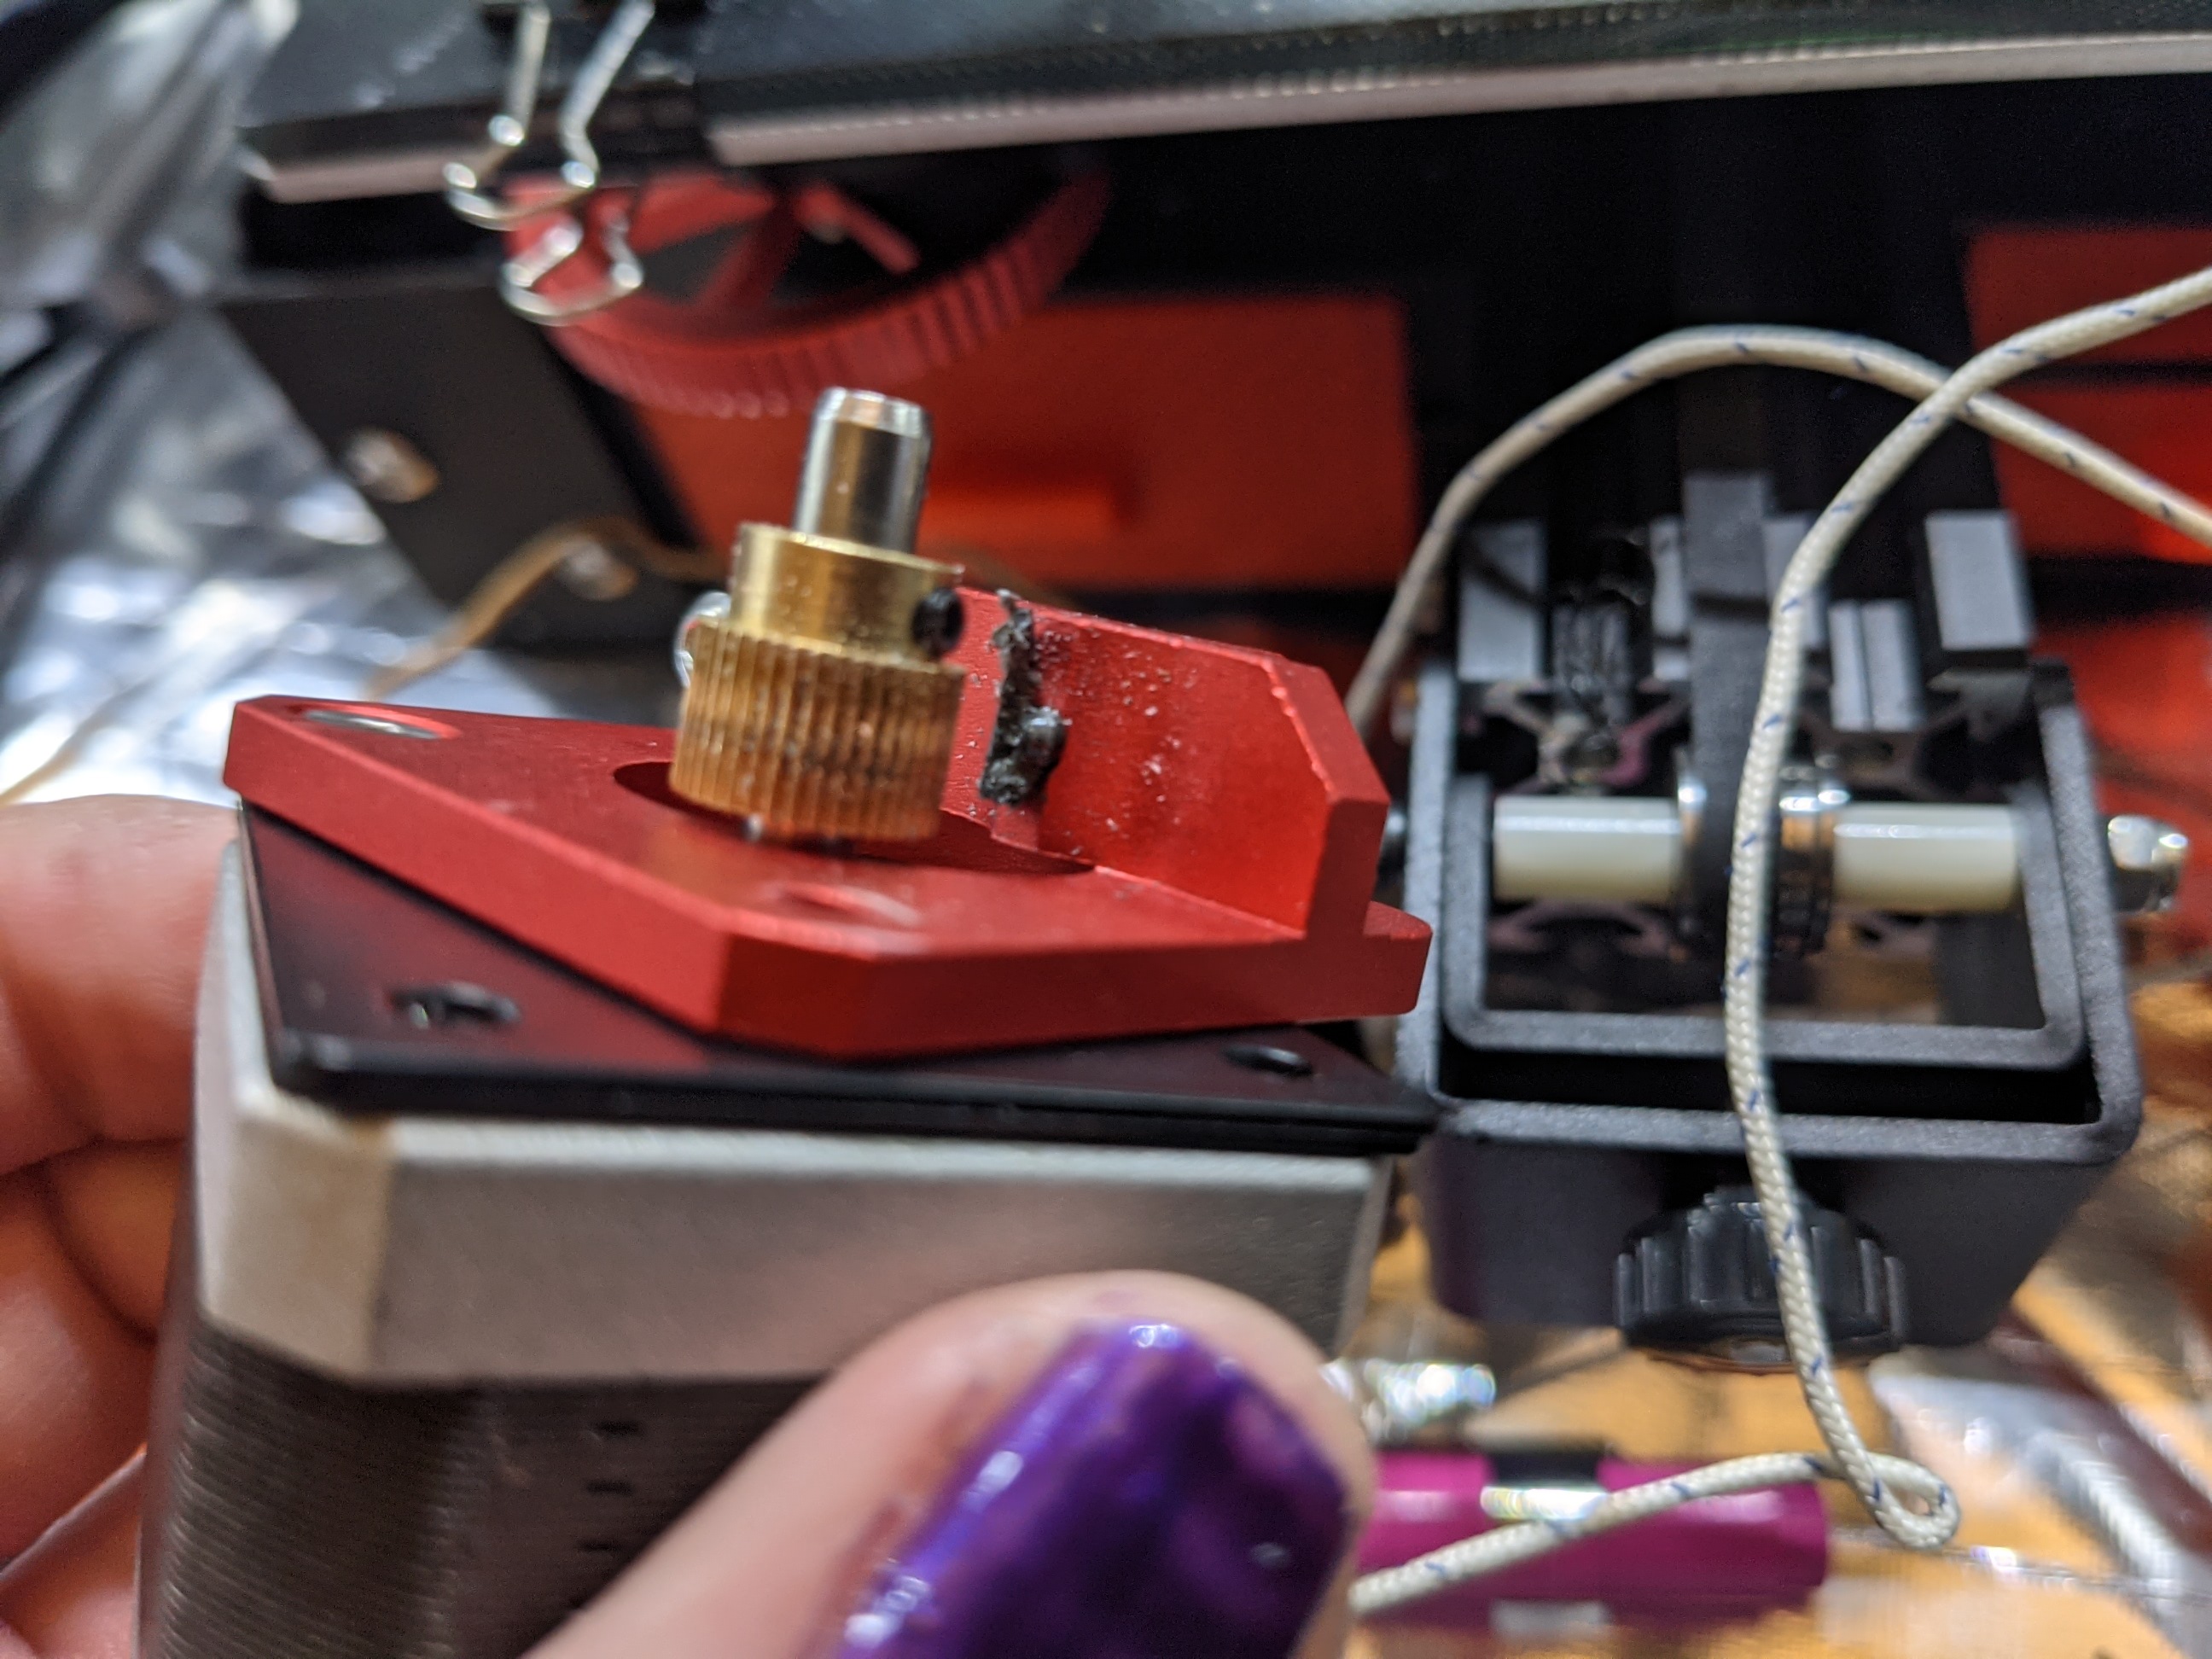
The first is that the nozzle and the heatbreak are not fully seated against each other. This creates a gap between the two in the melt zone in which plastic can get stuck. Typically, this results in the hotend leaking, as melted plastic will travel up the hotend threads, or down the nozzle threads creating a globby mess.
The other failure is a little more subtle. This time, the nozzle and heatbreak are firmly seated against each other. Yet, the PTFE tube is not seated fully against the nozzle. This creates another gap in which melted plastic can get stuck. This plastic may not escape the hotend, but are instead constantly rolled around inside out in a little donut shape. Since it's heated for so long, the plastic burns, chars, and creates additional resistance the extruder motor has to overcome. This is called filament drag, and it's very, very common for the original Ender 3, although less so for the Ender 3 Pro such as mine.
I was sure that filament drag was the problem, and at first, it was. I didn't know how to assemble the hotend properly, and only lucked out when I did the MDD mod. The second time was a leaky disaster due to improper seating of the nozzle and heatbreak. The third and fourth time I cleared and reassembled the hotend, I was working to mitigate the bowden gap.
Consider supporting us. It pays for equipment, materials, and keeping this site running!
After a lot of study, I eventually hit upon a reassembly procedure that seemed to close the gaps consistently:
- With the printer cool, remove the printer fan shroud around the hotend assembly.
- Remove the hotend assembly from the printer by undoing the two screws at the top of the heatsink. Do not electrically disconnect it from the printer.
- Undo the two screws on the bottom of the heater block, and the tiny grub screw in the heatsink to remove the heatsink from the heatbreak.
- Remove the silicone sock which insulates the heater block.
- Heat the printer to 200C.
- Grasp the heater block with a pliers, being careful not to grip it on the side with electrical wiring sticking out.
- Pull out the PTFE tube.
- Unscrew the heatbreak and the nozzle from the heater block. Clean them if reusing.
- Screw in the nozzle until snug, then back up half a turn. This back off is critical!
- Screw in the heatbreak tightly.
- Wait until both parts are warm again, then tighten down the nozzle. This jams the nozzle against the heatbreak.
That fixes the nozzle/heatbreak gap, but not the bowden gap.
There's a number of different solutions to fix the bowden gap in the MK8 extruder. Most advocate for pressing the PTFE tube in prior to securing it in the fitting using a small C clip. My problem was my printer was direct drive. The MDD mod made most of those techniques impossible due to the extruder motor was in the way, barely leaving a gap for fingers between the bottom of the motor and the fitting.
After two more failed prints, I went back and tried to research another solution. A popular method is to split the PTFE into two parts, and install a small printed washer just under the fitting. The fitting can then press against the washer and thus the short length of PTFE. This closes the boden gap, and allows for play in the PTFE tube leaving the hotend. This would probably work for my modified printer, but I was concerned about the washer melting if there was a cooling issue.
Since the PTFE is so short in my printer, a simpler idea came to mind. Instead of separating the PTFE into two pieces, I could do the same thing I did with the nozzle. I could install the fitting snugly into the heatsink, then back it off one whole turn. This done, I could then install the PTFE, add the retaining clip to hold the PTFE in place, and then tighten down the fitting.
This done, I hoped that finally the jamming issue was behind me.
While the first few calibration prints worked well and completed successfully, anything more jammed. I disassembled and reassembled the hotend at least six times, sure that there was still a gap in there I missed. Yet, by the end, I didn't find anything. Toward the end, the filament came out clean and with the expected melt pattern. There were no wads of blackened plastic to pull out.
I was completely at a loss.
I started wondering if I should just replace the entire gantry assembly. The Micro Swiss all metal hotend looked promising, but it was outside of my meager budget.
After a few days, I began to wonder, what if something else is wrong?
I started to look for other causes. A lot of the symptoms I was getting suggested a temperature problem, yet the printer's own readout seemed relatively stable. It "wobbled" a little when changing temperature, but eventually stabilized. Octoprint told a different story. There was significant oscillation in the temperature, but rarely larger than 1C.
There are two components in a 3D printer which control the hotend temperature. The first is the heater cartridge, the second is a thermistor. This last component monitors the temperature of the heater cartridge, allowing the printer's mainboard to control the temperature of the hotend. The thermistor in an Ender 3 is basically a temperature controlled resistor, if it returned inaccurate values, the printer would think it was up to temperature, but could be much hotter or colder.
I needed a second opinion, and luckily, I had one available.
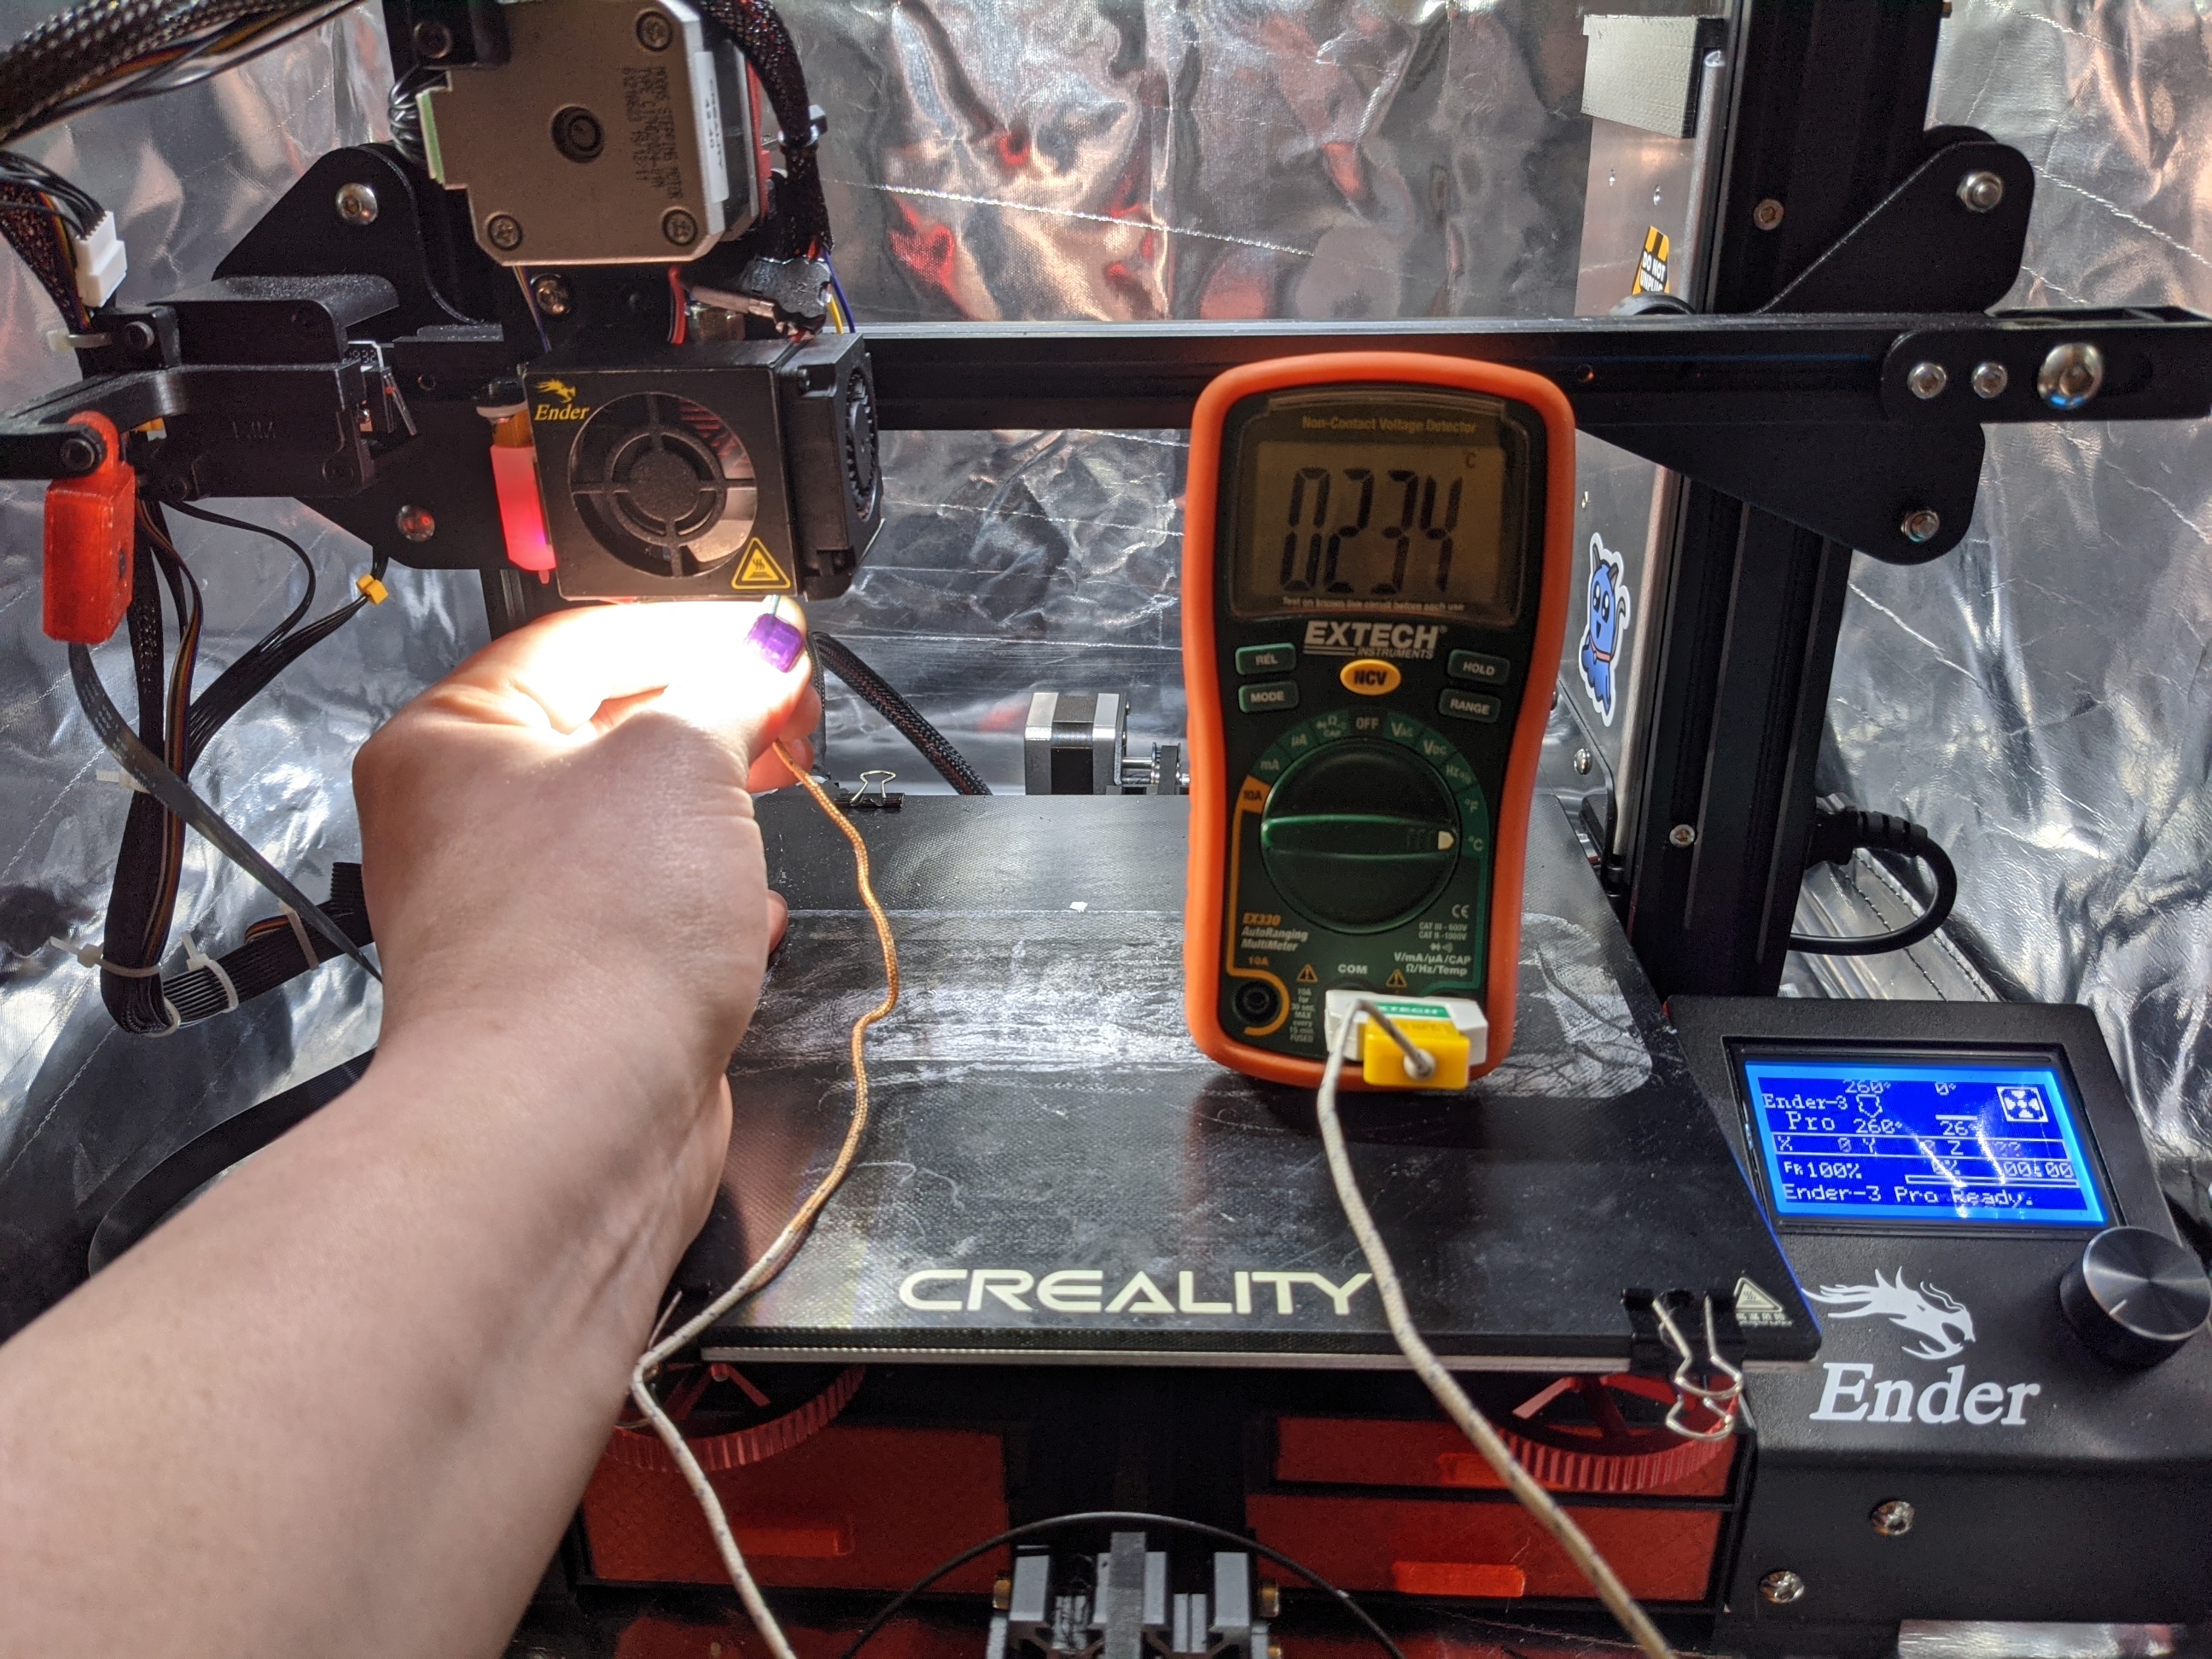
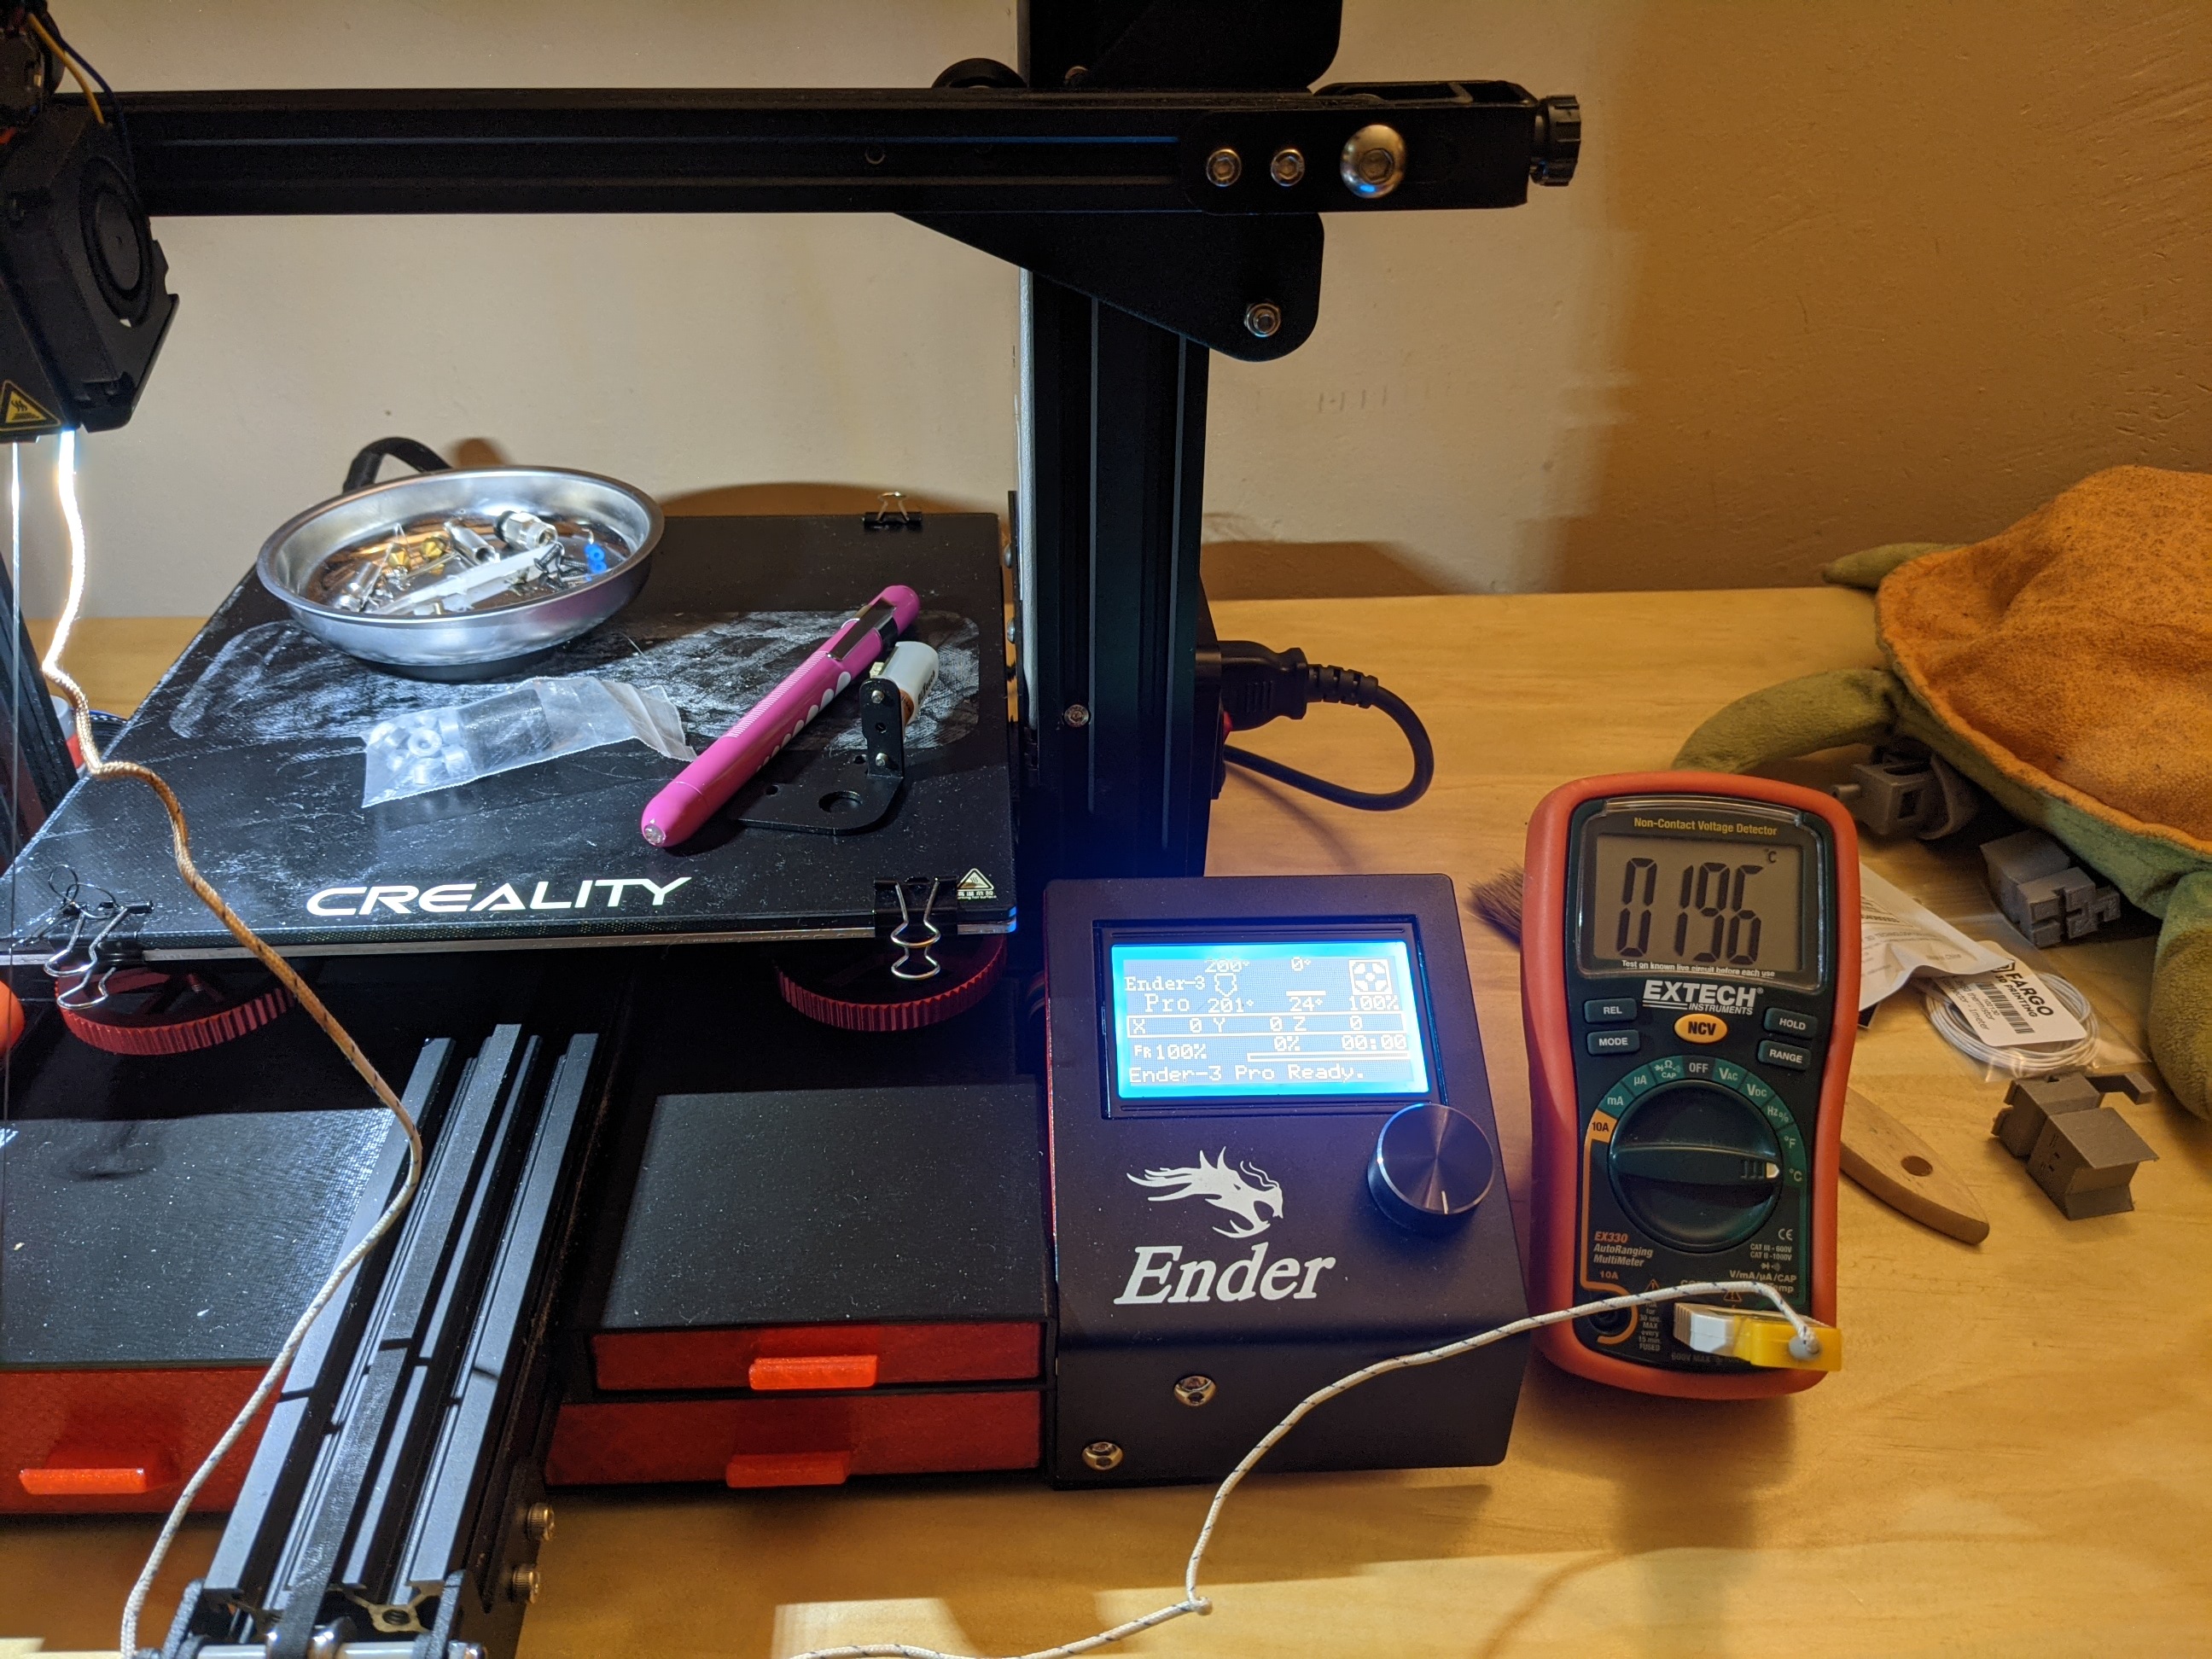
My multimeter came with a temperature probe, so I took it out and put it against the hotend. To my surprise, the readings were wrong; 20C at the lower operating temperature of the printer, 40C at the higher end, and 30C in the middle. A lower temperature would mean the filament wouldn't melt as easily or as quickly, forcing the extruder to work harder, eventually resulting in a jam.
"That's it!" I placed an order to replace both the heater cartridge and the thermistor and waited for several days.
But something nagged at me...
My knowledge of electronics is servicable, but it comes mostly from books and not experience. I can pass a test, but practical application is a little lacking. All my research suggested that a thermistor would fail all the way open, or all the way closed, and not in the half-way state that my readings were getting.
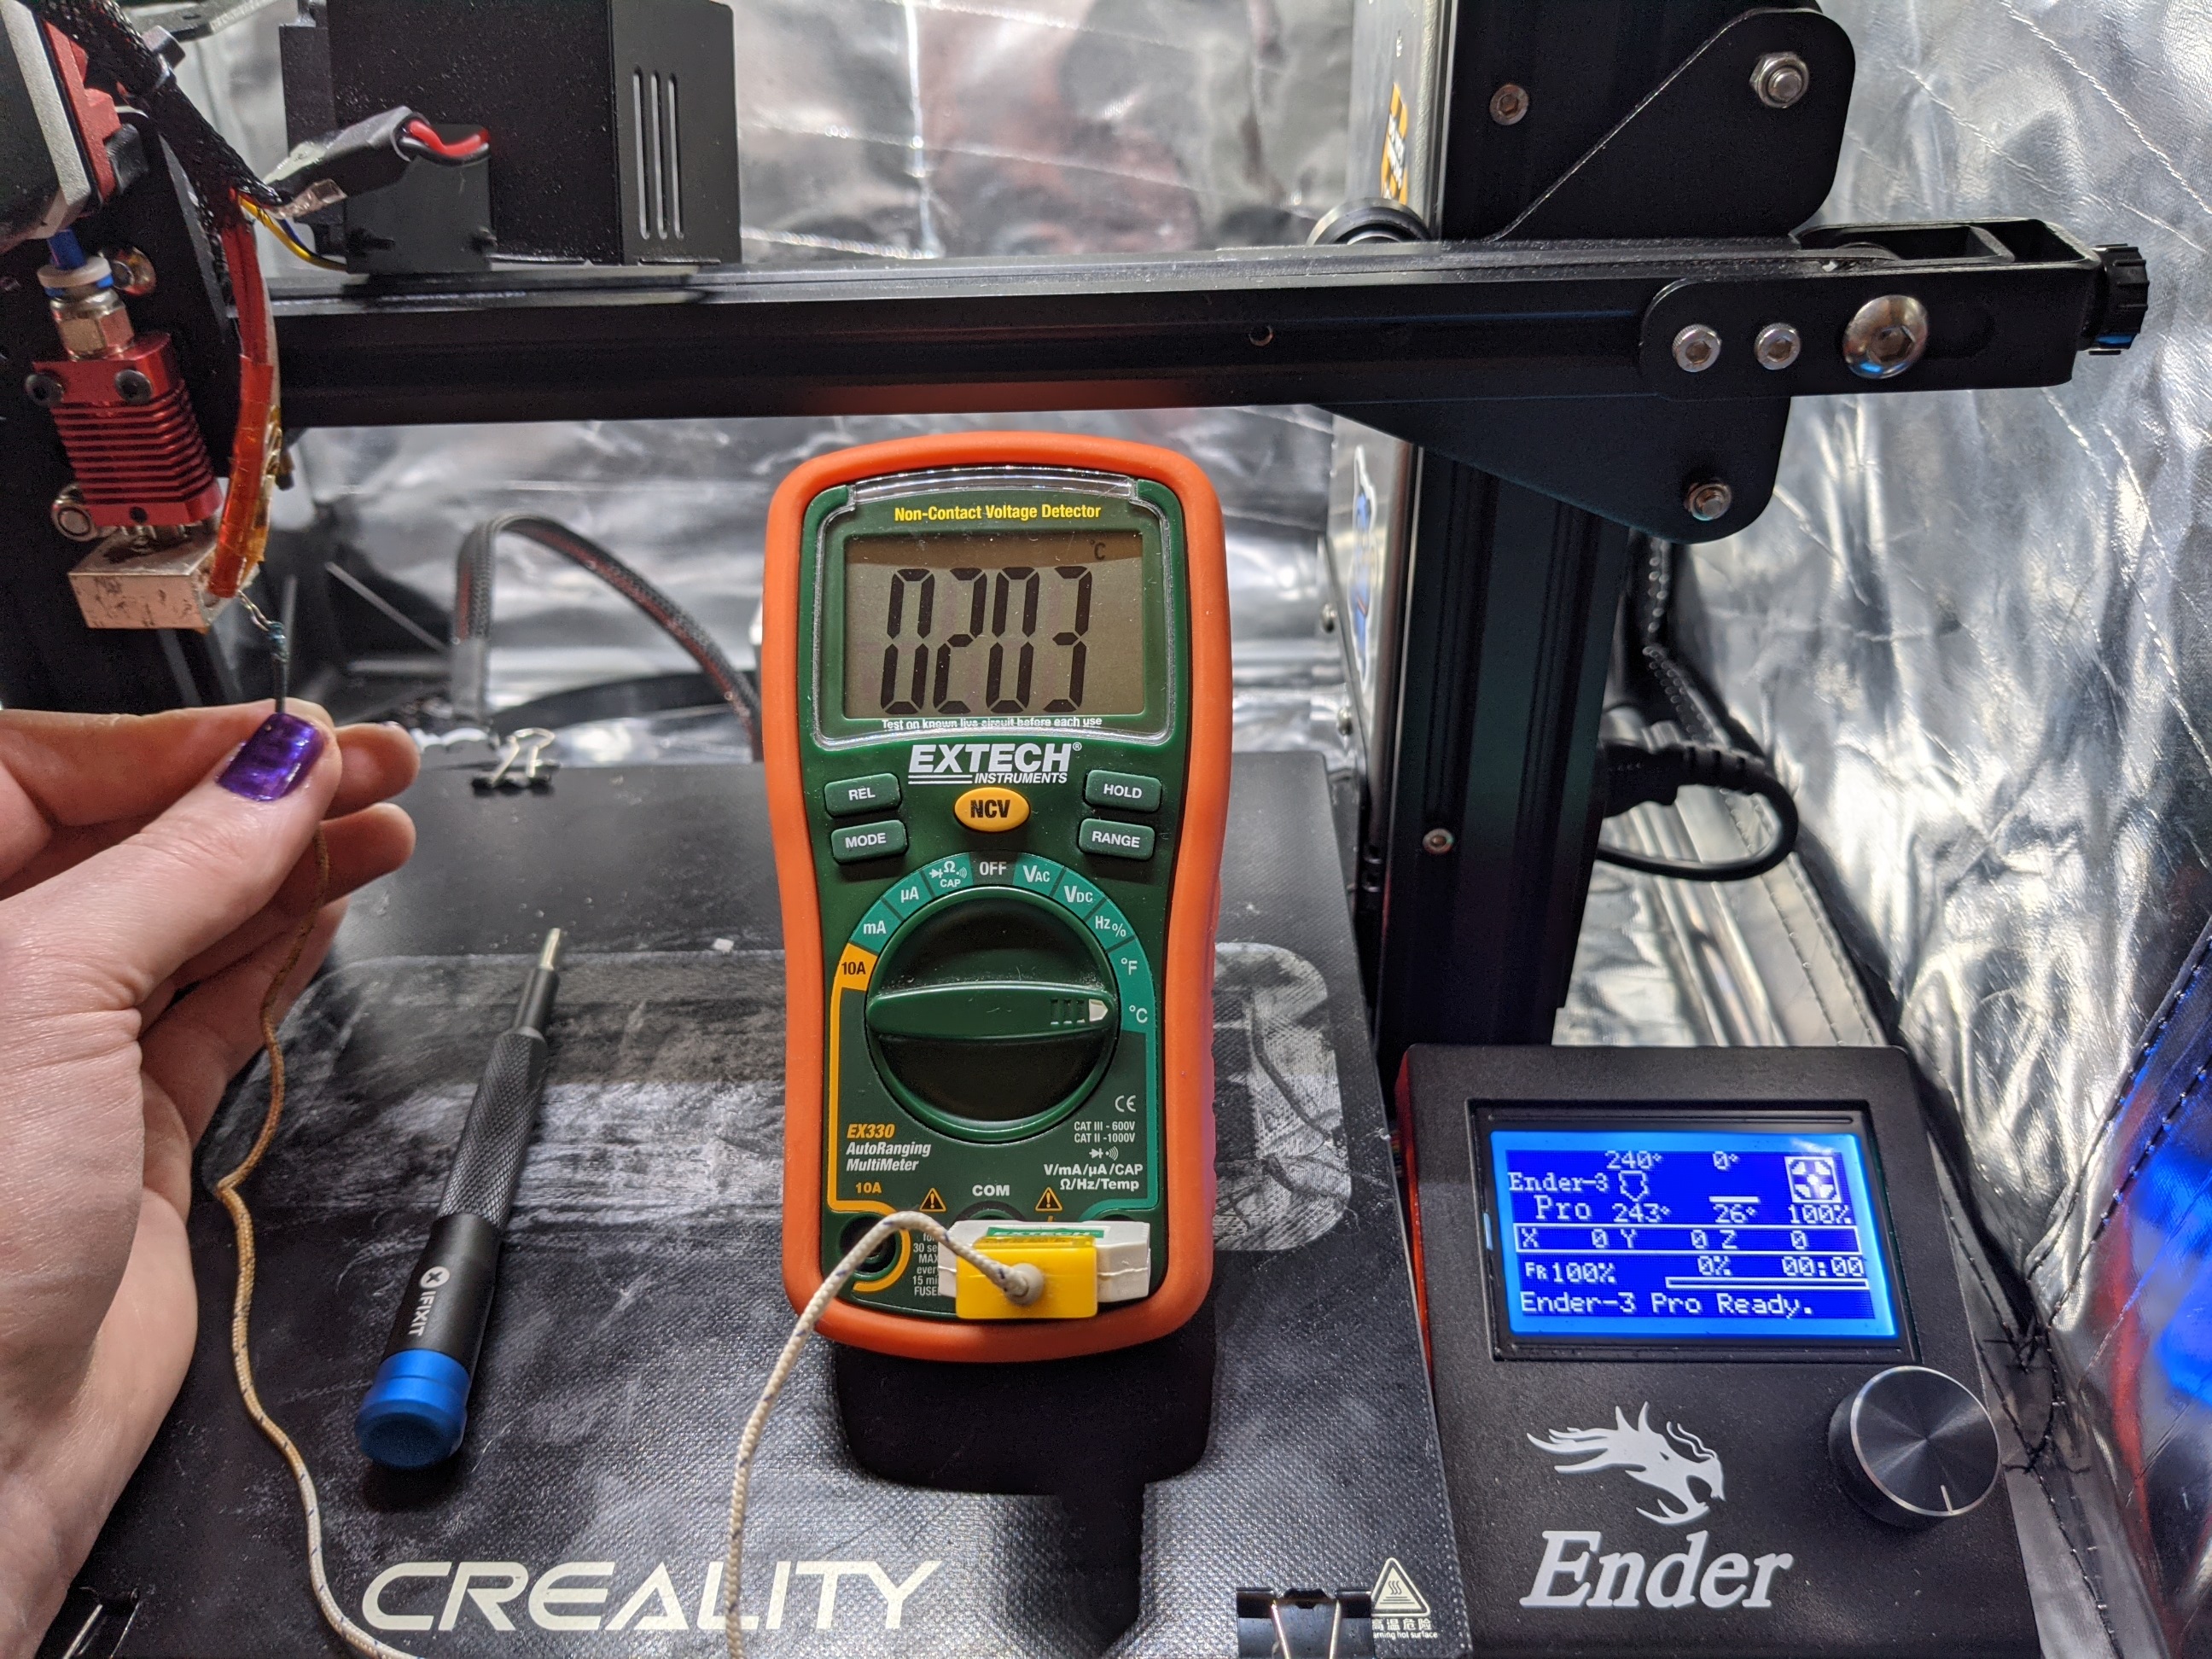
After a few days I decided to try again. I removed the silicone sock which insulates the heater block and removed the retaining screw which holds the thermistor in place. I put the multimeter's probe into the screw hole and waited.
The results were damning. Instead of 30C off, it was only 4C. The themistor was never the problem.


Like the MK8 hotend, Printermod's MDD is also a compromised design. It certainly works, but it comes with some drawbacks. The biggest of which is that the stepper motor for the extruder is facing away from you and toward the back of the printer. While you can check it with an inspection mirror -- and I did check it multiple times -- it's still easy to miss issues simply due to the motor's orientation. Furthermore, the orientation also discourages you from removing the extruder to service it, as the bolts which hold it on to the gantry are...you guessed it...facing away from you.
I pulled the printer out of the enclosure and began to remove the extruder assembly. As soon as I had a direct line of sight, I spotted two new problems I had missed again and again since the jamming began.

The MDD requires a short length of PTFE from the nozzle to the extruder assembly to guide the filament through to the nozzle. We already know the PTFE-nozzle junction is critical to avoid jamming. I had assumed the other side wasn't that picky at all.
It turns out, I was wrong.
The MDD reuses the stock extruder. The stock extruder typically expects a bowden tube set up with a fitting to hold a length of PFTE from the extruder assembly to the hotend. In a direct drive set up, this length is much, much shorter. Yet, the extruder still has a exit port with room for a PTFE fitting, rather than just a bit of PTFE. There's no room between the extruder assembly and the hotend to use both fittings, and the MDD's own installation instructions recommend leaving the fitting off of the extruder.
Because of this, it can create a secondary bowden gap between the PTFE and the extruder if the PTFE isn't long enough. Rather than melting, it's possible for the filament to kink up and twist within the gap, lodging itself in there and creating additional filament drag. Worse, this failure mode is completely undetectable without disassembling the extruder assembly completely.
A possible solution would be to use a different extruder more suited to direct drive, or modify a PTFE fitting to narrow the exit port of the extruder to eliminate the play. Either way, it doesn't solve the much more vexing issue that the extruder motor and gearing is facing the rear of the printer, making this an ongoing hazard.
Before reinstalling the extruder assembly, I validated that the inside of the hotend was perfectly clear. Again, the MDD doesn't help here since the extruder assembly is completely in the way. Once back together, I started another print and hoped it wouldn't jam this time.
As you can guess, my luck was poor, and soon the printer was jammed up once more.
I had been fighting this issue for weeks at this point, felt I covered nearly every possibility short of replacing the entire gantry assembly, and still the damn thing was jamming.
With no other options, I decided to sit in front of the printer and watch it print, maybe something would stand out. After an hour of watching the printer and hearing the extruder continue to struggle, I did begin to notice something. Every time the printer advanced, it would tug at the filament spool. I had replaced the spool holder from a fixed model which comes with the machine, to one with bearings to remove a possible source of drag.
And yes, it did remove the drag...and also uncovered another issue. The filament spool, no longer held back by the friction of the stationary roller, would advance considerably, and the filament would twist and curl around itself. Even if it didn't catch on any moving part, the twisting required more work on the part of the extruder. Worse, as I watched it print, I saw the filament twist get worse and worse. Since the filament was no longer under tension when coming off the roll, the twist never made it to the hotend and was melted away. Instead, it propagated up the roll to join any other twists which were already present in the filament as it came off the spool.
I removed the spool several time while the print continued, trying to undo the twist, but eventually I decided to just put a piece of tape over the roller bearings -- essentially changing it back to a stationary roller -- so that the filament would remain under tension. After a few tense layers, printing got easier. Progress!
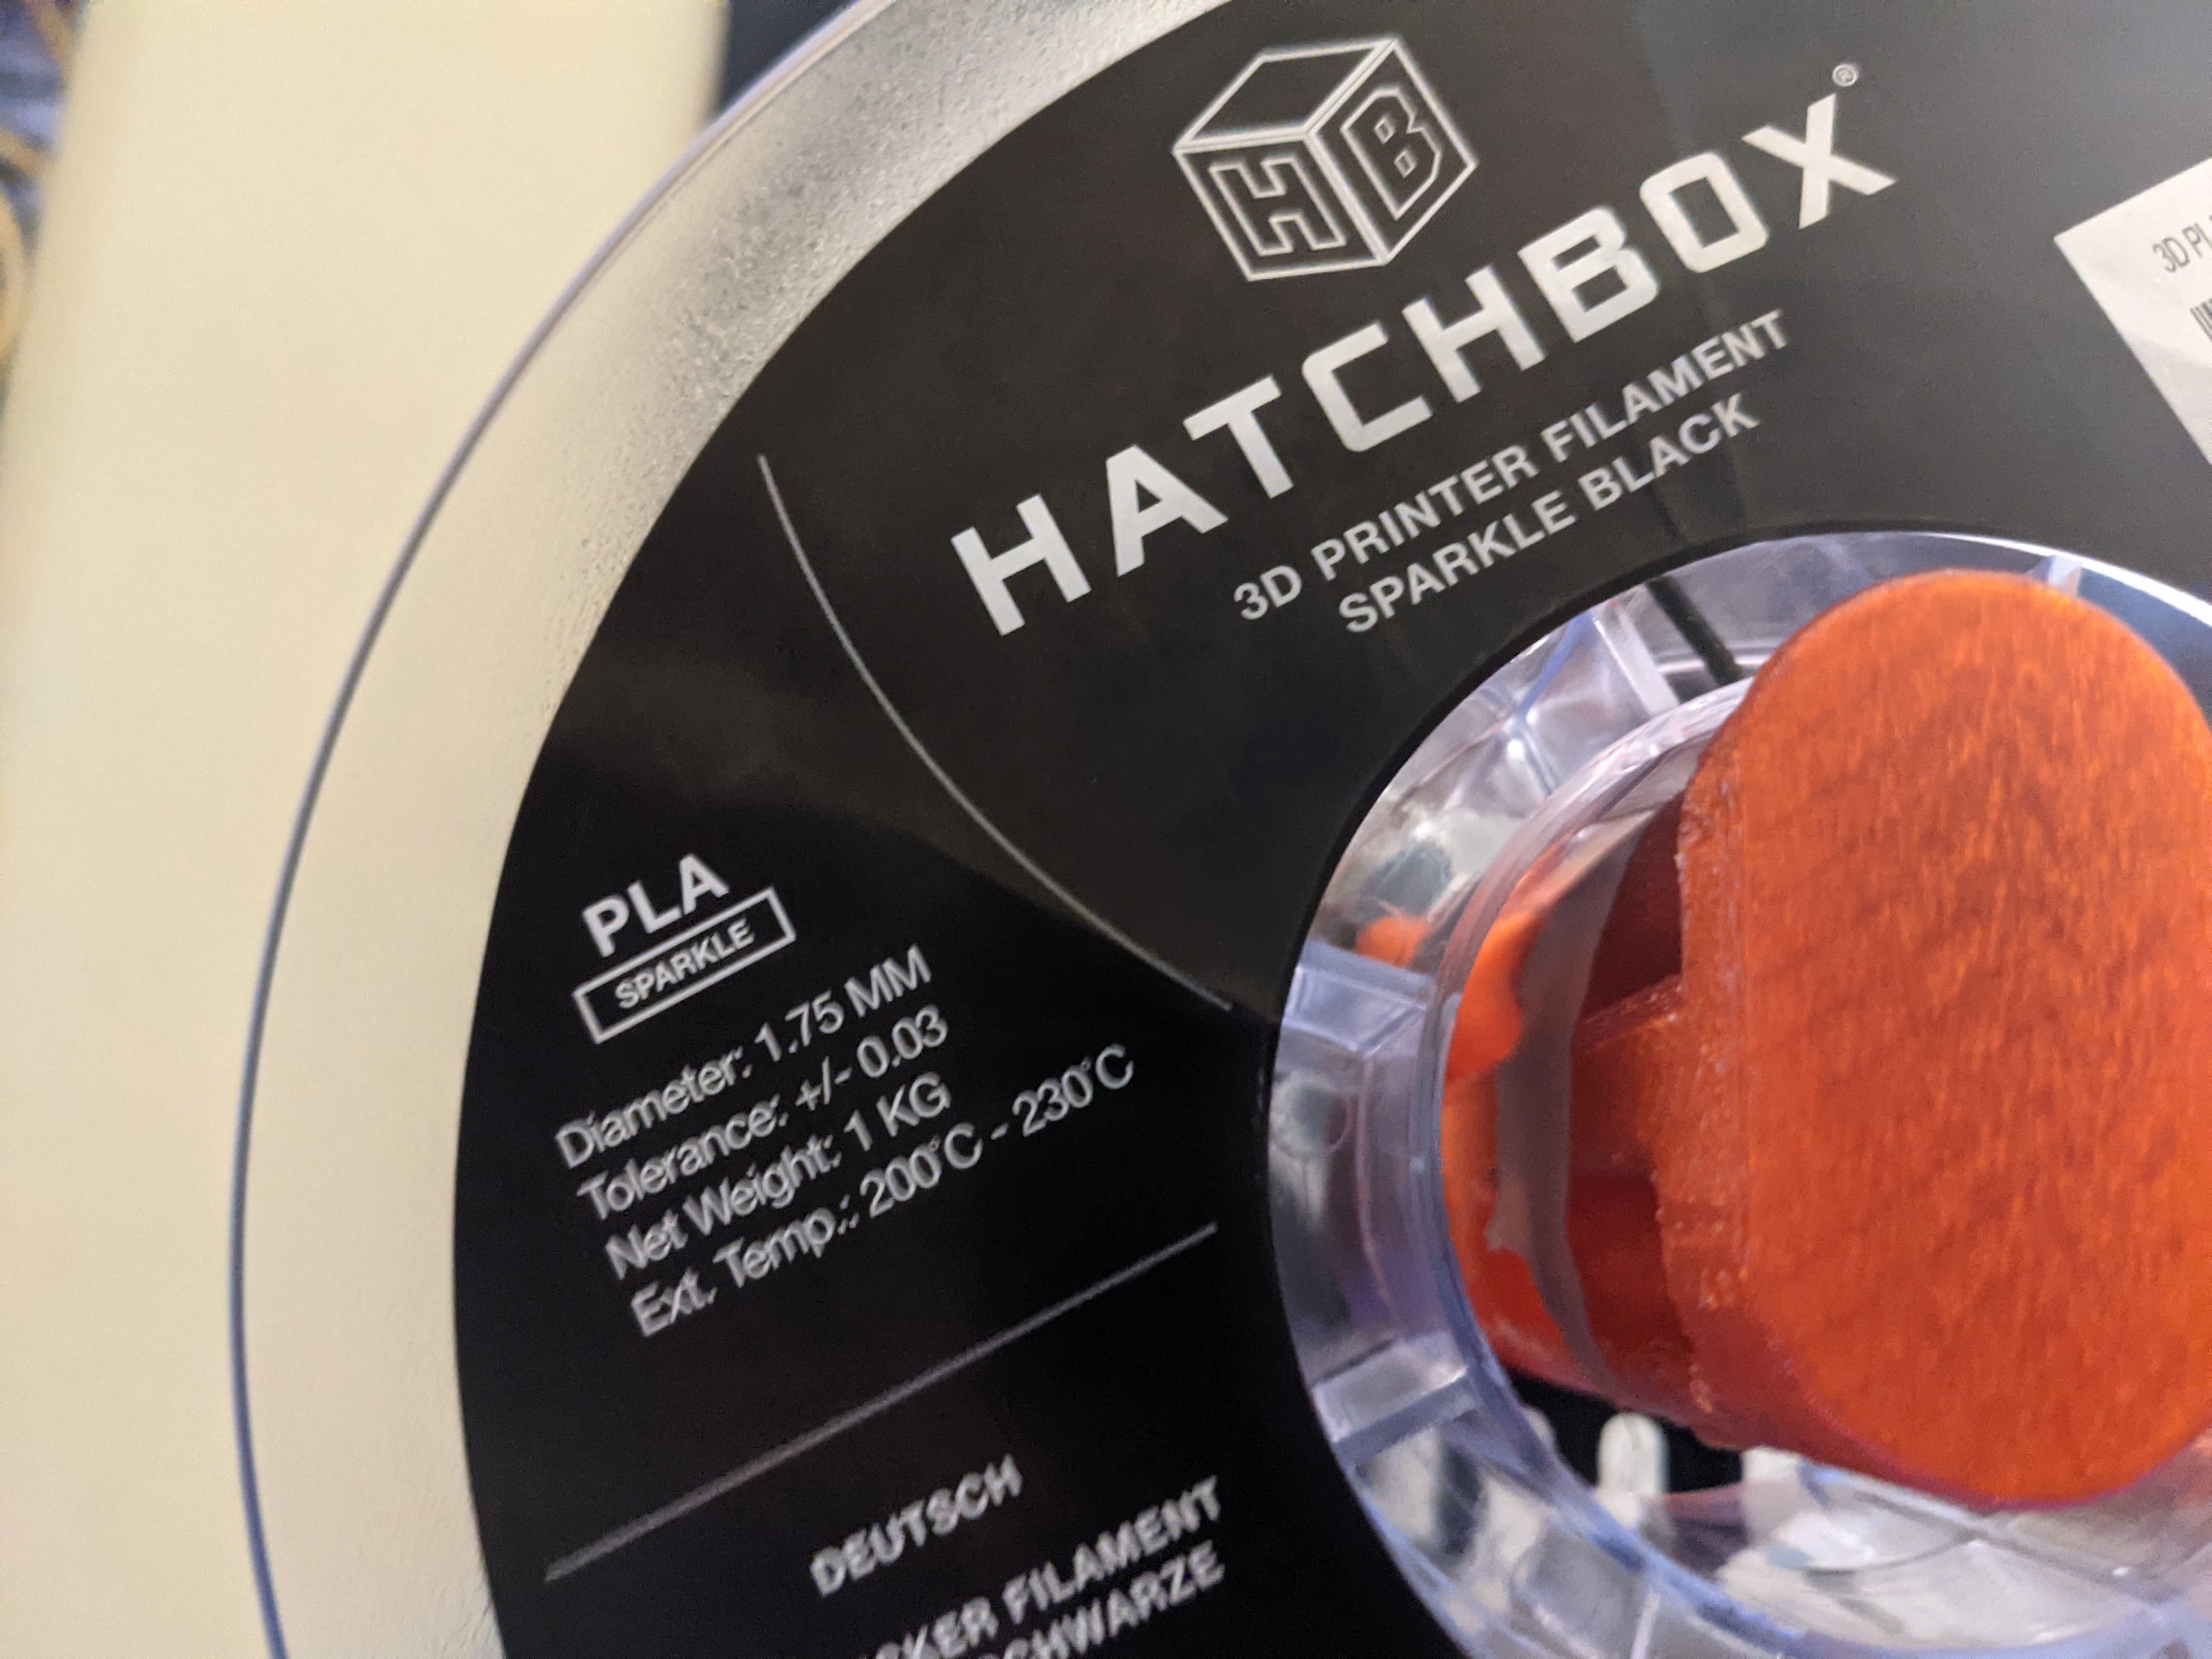
That's when I noticed my other, admittedly boneheaded mistake. The sparkle black filament I was printing was PLA, so I had assumed it had the same melt temperature as all the other PLA I had bought from the same manufacturer.
It wasn't. Instead, it was 20C higher. My typical PLA temperature of 200C was at the low limit of it's melt range, and with my printer's thermistor running 4C cold, it wasn't high enough. I increased the temperature another 30C to the upper limit of the filament's range.
Since then, no issues. An overnight print ran successfully, then another all day print. Then a week's worth. Since then, I still have occasional clicking from the extruder, but it hasn't resulted in any failed prints. My filament is in poor shape, however, and I have significant stringing in nearly all my prints now. That's a problem for another post.
The last few weeks were the most challenging I've had in my 3D Printing journey. Not only was the jamming issue vexing, but having the source of the jamming result from so. many. little. factors. was astonishing. A hotend gap, a dirty and jammed extruder, mods I made to the printer, combined with issues with the filament itself all contributed to the repeated print failures.
If I had the choice to make again, I would likely not want to use the MDD. It's a good mod, and certainly accomplishes the goal of making an Ender 3 direct drive on the cheap. Yet, it isn't working well for me due to my use of an enclosure. I may modify my printer again in the future to use a different gantry assembly which faces the front of the printer.
While the experience has been frustrating, I learned a astonishing amount about hotends, how they're built, serviced, and their failure modes. I have to remind myself that printing is merely a side benefit, and learning is what I'm here for.
This post was created with the support of my wonderful supporters on Patreon.
If you like this post, consider becoming a supporter at:
Thank you!!!


