
Dovetailed trays for the toolbox
When we last left off the toolbox project, things seemed...done. Panels were made and assembled, the lid was made, finish was applied, and the toolbox went on to be a box filled with tools.
Well, almost.
After taking a break from woodworking after completing the toolbox, I got back to it as winter set in making several small projects in succession. Throughout those projects, however, I grew more and more disappointed in the toolbox. It just...wasn't as useful I as I hoped. The biggest problem was because the box itself was, well, big. On the face of it, that seems like a positive as it could store a lot of tools. And indeed, it can, it can store a lot of tools unorganized.
A big box is great if you only need to lug your tools from place to place. That wasn't the problem I was trying to solve. I'd prefer for my workflow to be one where I can reach into the box, grab the tool I need, use it, then return it to its storage space effortlessly. I had hoped to build a series of internal racks to hold commonly used tools for quick access, leaving the very bottom of the box for storage of kanna (Japanese woodworking planes).
That plan quickly fell apart when I realized three things:
- When held upright, my chisels are actually taller than my toolbox.
- My (then) primary saw was longer than the toolbox is wide.
- Using trays would mean taking up valuable floor space I could otherwise use for kanna.
I was about to give up on the box when I ran across a book which gave me a solution to each.
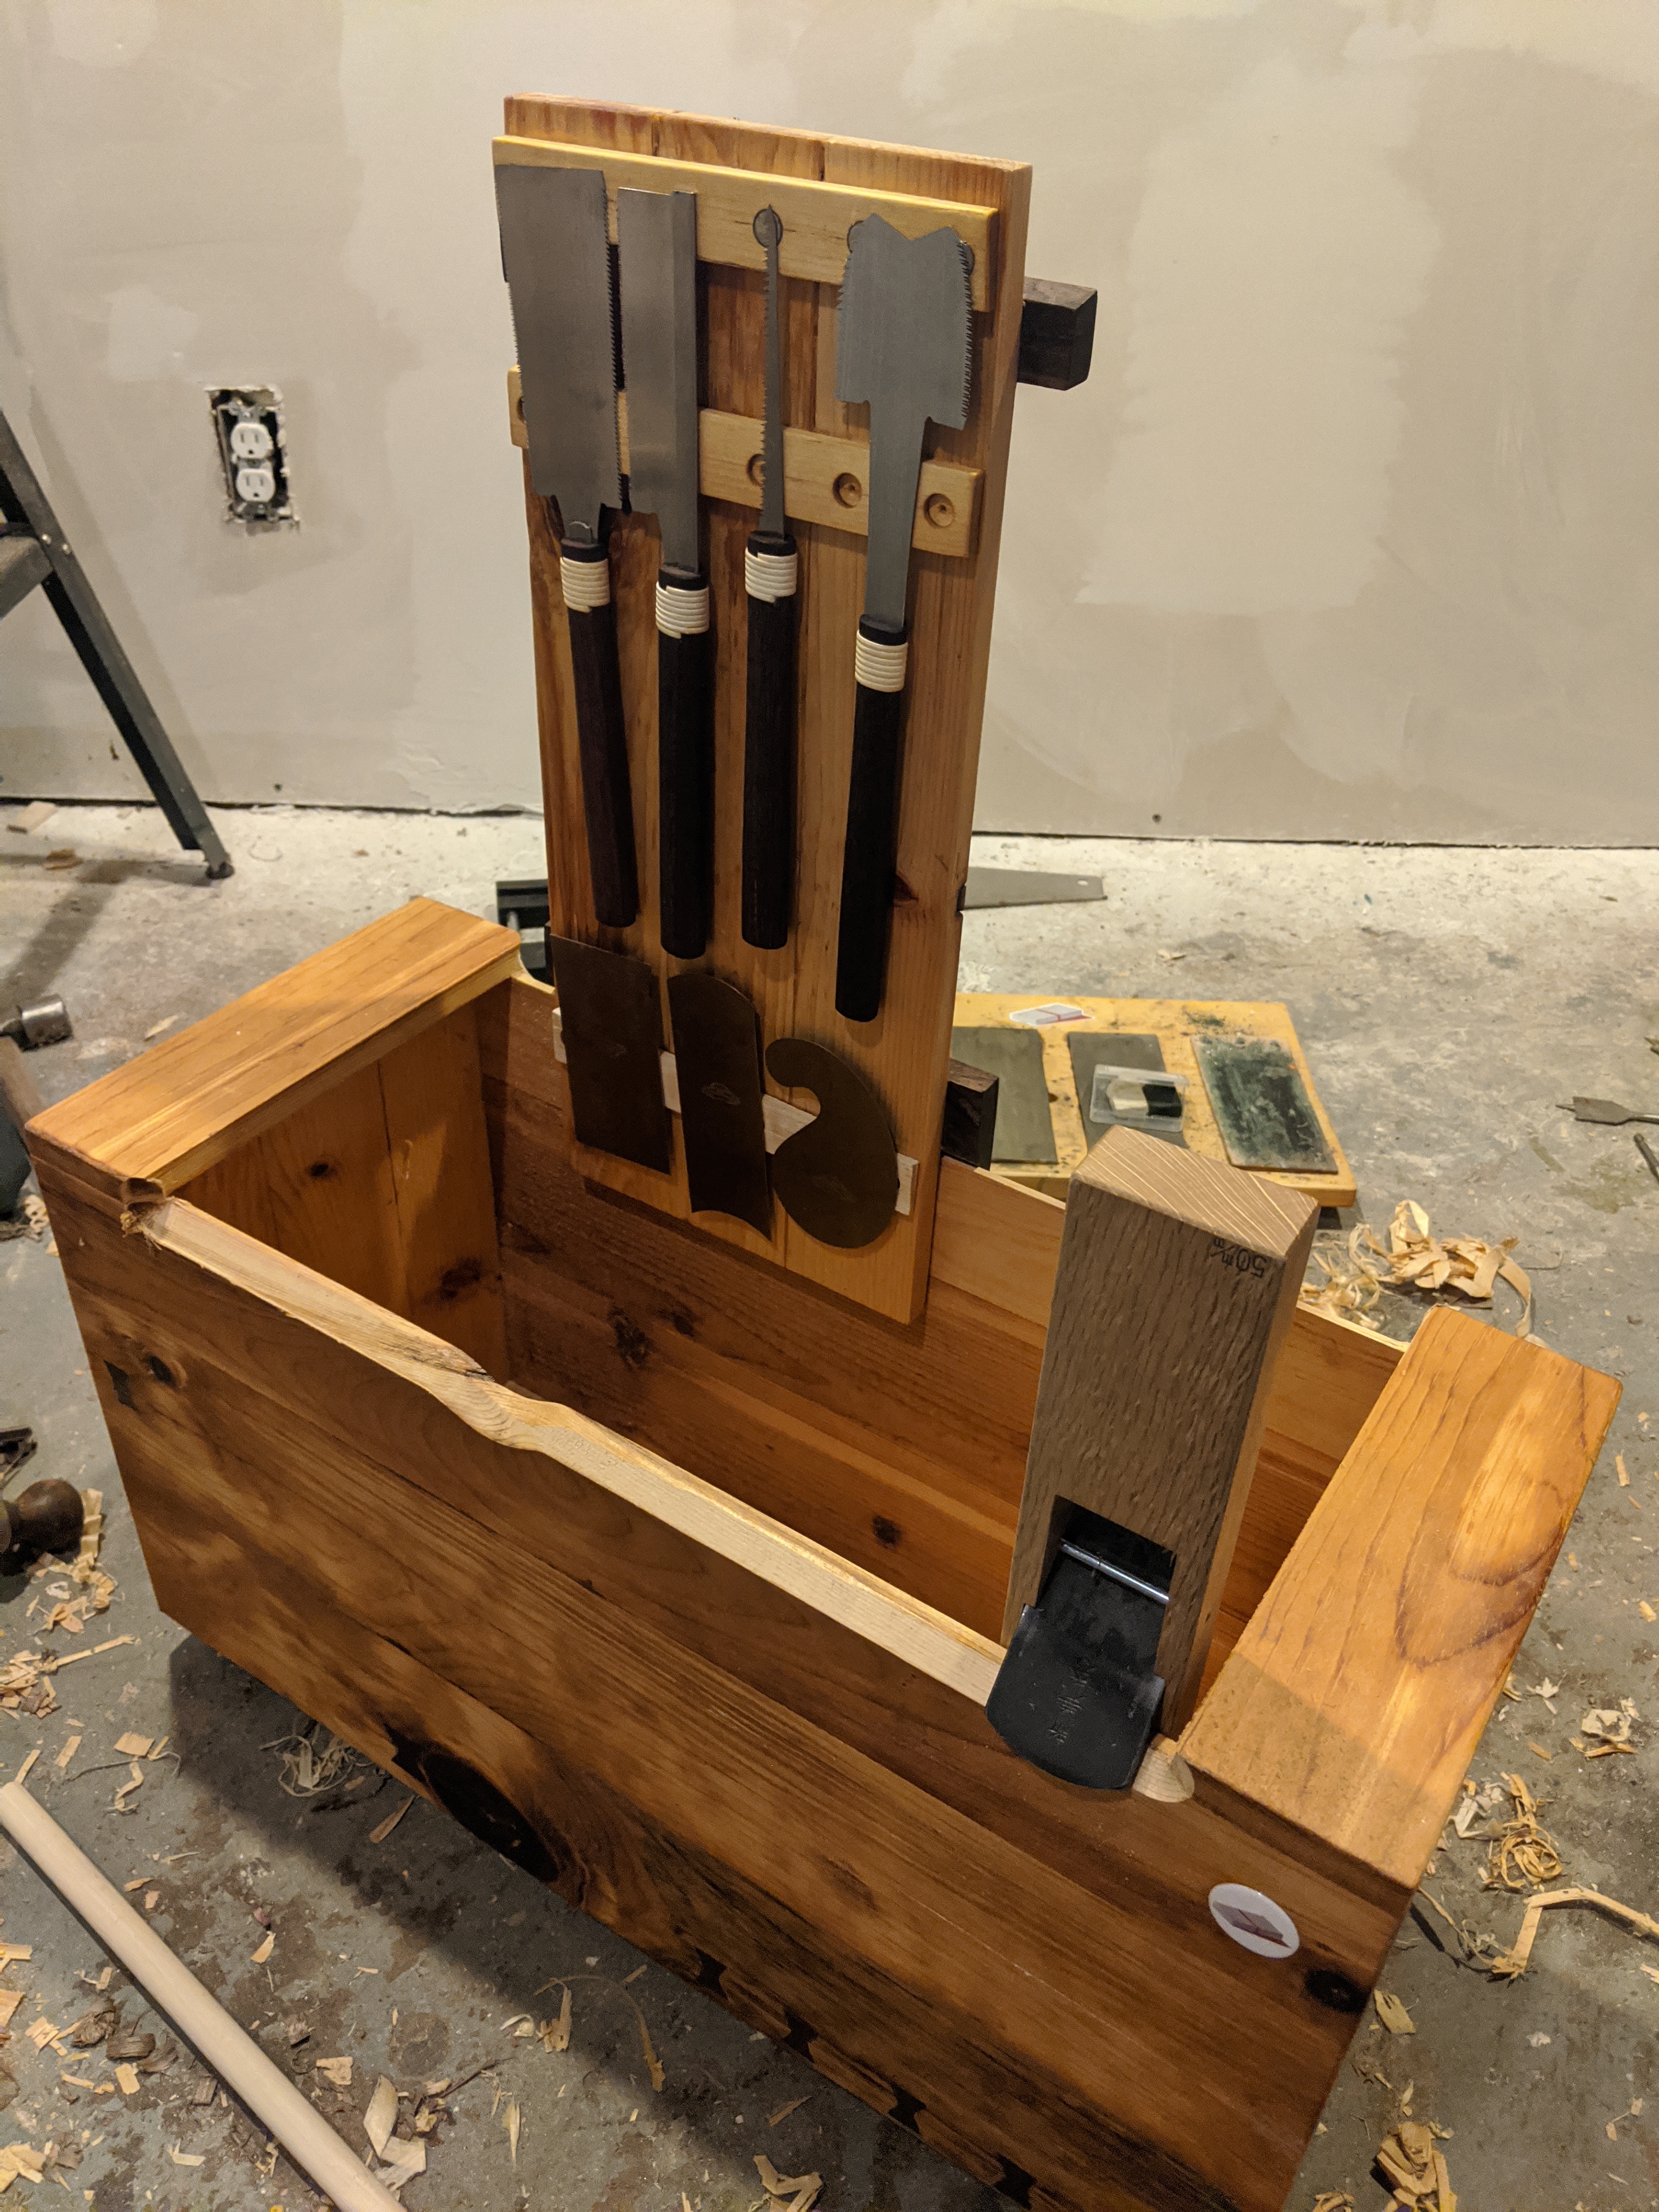
There were a few things I needed to fix first. Originally, I had designed the lid of the box to act as a kind of "mobile tool wall". How it works is that when acting as a lid, it rests on two batons which extend beyond either side of the lid. This allows the lid to slip just inside the toolbox, while the batons rest on the toolbox sides, preventing the lid from falling inside. The lid part worked great, the tool wall part, not so much.
The baton on one side was modified so it had an internal angle cut along its length. The edges of the toolbox sides were also cut to this angle. To use the lid as a tool wall, you would rest this angled baton side on the matching side of the toolbox. The angles are such that gravity forces the tool wall into the baton, rather than away. This is called a French Cleat.
The problem was....it didn't work. It never did. The angle was far too shallow, so that pressing the top of the tool wall could cause the entire thing to fall off with little effort. A French Cleat requires an angle of at least 45 degrees. I would need to cut that angle into both the sides of the toolbox, as well as on the modified baton.
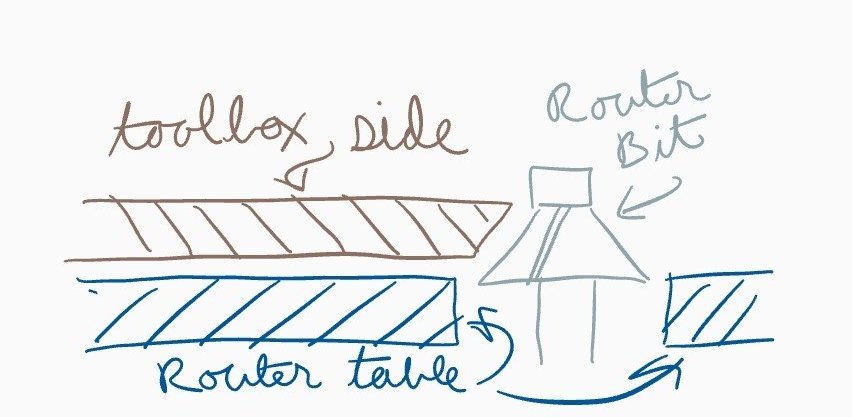
After spending a lot of time thinking about it, I decided cutting an accurate 45 degree angle was....beyond my hand tool abilities. Instead of giving up I fell back on the few power tools I had. I bought myself a chamfer bit for the router table and re-milled the sides to a perfect angle. Since the chamfer bit ascends to a point rather like a pine tree, I only needed to lay the box on the side and run the router bit along it to remill the edge.

Fixing the corresponding cleat in the lid itself was more difficult. After a lot of thinking, I decided the easiest would be to use my miter saw set to a 45 degree cut, but also with a stop to prevent it from cutting the lid all the way through.
This, frankly, can be a dangerous cut to make on a power tool. You need to position your hands carefully so they are away from the blade, while ensuring the lid is registered squarely against the saw fence. Power saws of nearly any kind make me nervous, so this was the most stressful part to fix. Fortunately, it went well. While it didn't cut completely through the baton as I had intended, it established the critical 45 degree cut. I finished the rest of it with careful use of hand saws.
The next problem was the lid's locking mechanism. The baton which wasn't used for the French Cleat was modified in a different way. A shallow double angle was cut in it to allow for a wedge to be inserted. This wedge nestled up to one of the "runners" on the top of the box which kept the lid inside on the left and right.
The idea was that when the wedge was inserted, the lid could not shift to either side, and thus, couldn't be removed.


The problem was, it never worked. The opposing side of the lid (let's say the left side) had sufficient travel under the runner to allow the right side of the lid to clear its own runner. I had tried to fix this when making the box months ago by moving one of the batons. This helped, but the problem ultimately remained.

At the time, this issue completely flummoxed me. I just couldn't visualize what I had done wrong. So, I decided to start playing with different ideas to sort out exactly what the issue was.
It turned out that the correct solution was to make the lid longer on one side. This would restrict the lid to being only removable by sliding it in one direction. Since the wedge was on the right baton, it would direct the lid to move to the left. If the left side of the lid were somehow longer, it would hit the side of the toolbox and would not be able to be opened.
Of course, it's no simple matter to add wood once it has been sawed away. That's where "measure twice, cut once" comes from.
Fortunately, there was another way to fix the problem.

I couldn't make the lid longer (easily), but I could make the distance on one side the lid could travel shorter! By adding a block under the runner of the left side, the amount of travel the lid could make in that direction was reduced. By carefully selecting the size of that block, I could make it so the right side of the lid cannot emerge from under its runner even when fully slid to the left.
When the wedge was removed, the travel toward the right was much longer, enough so that the lid's left side emerged from under its runner allowing the lid to be removed.

Even thought fixing those two problems did solve some of the major issues with the toolbox I had known about last summer, a new one developed over the winter.
When working with solid lumber, you need to take into account that wood moves or "breathes". It expands during the summer and then shrinks during the winter. I had assumed the process decayed over time until the wood stabilized. Given that this material sat nailed to the wall of a den for some 70 years, I had assumed it was well past stabilization.
Turns out, no, that is not the case. Over the dry, cold Minnesota winter, a crack developed along the entire width of the front panel, from the left to the right edge. Given that this was a load bearing part of the box, this was rather disastrous. When I discovered this, I had to stop what I was doing for the day and recollect myself.
How could this happen?
One thing I learned after doing research is that wood shrinks more perpendicularly to the grain. In the toolbox, the front, back, and bottom have grain that runs along the width (the gray arrow in the diagram). That is, from left to right. The sides, however, are made of panels in which the grain runs up and down (the blue arrow)
So how did the split occur? My best guess is that it got dryer, the front panel shrank from top to bottom. The side panels where not nailed or screwed in place, but glued. I must have done an excellent job with the gluing too, because those side panels were not shrinking from top to bottom, but front to back. Since the sides were not getting shorter, the side panel wasn't able to shrink gracefully, and instead, split along the the grain.
When I discovered the crack -- in some places over a millimeter -- I finally understood why the sides were never, ever supposed to be glued in place.
I couldn't really replace the front panel, so I tried to fill the crack instead. This...failed miserably. I had the wrong sort of glue, and it would provide little to no supporting strength for the damaged panel.
So instead, I returned to a classic fix. I had used butterfly keys to prevent cracking elsewhere in the toolbox, but obviously that wasn't anywhere near enough. Since the keys were two opposing wedges, whenever the crack tries to widen the key would pull the two sides tighter together. I did what I could to force the box back together using clamps, then inlaid several new keys to keep the panel together.

With those problems out of the way, I could return to the problem of all that unused, unorganized, vertical space. Racks and drawers were out, leaving only trays. Now...if I could just get them off of the toolbox floor...
The solution came from some later research. In the book, The Anarchist's Tool Chest, Schwarz describes how to build a large, floor dwelling toolbox capable of storing an entire shop's worth of hand tools. Overall, I was disappointed in the book. The prose felt too meandering for my tastes. The fact that the author also seemed to never expect anyone outside the area code of the male gender to be reading his book didn't help matters. Despite this, there were some valuable ideas in the book to be gleaned.

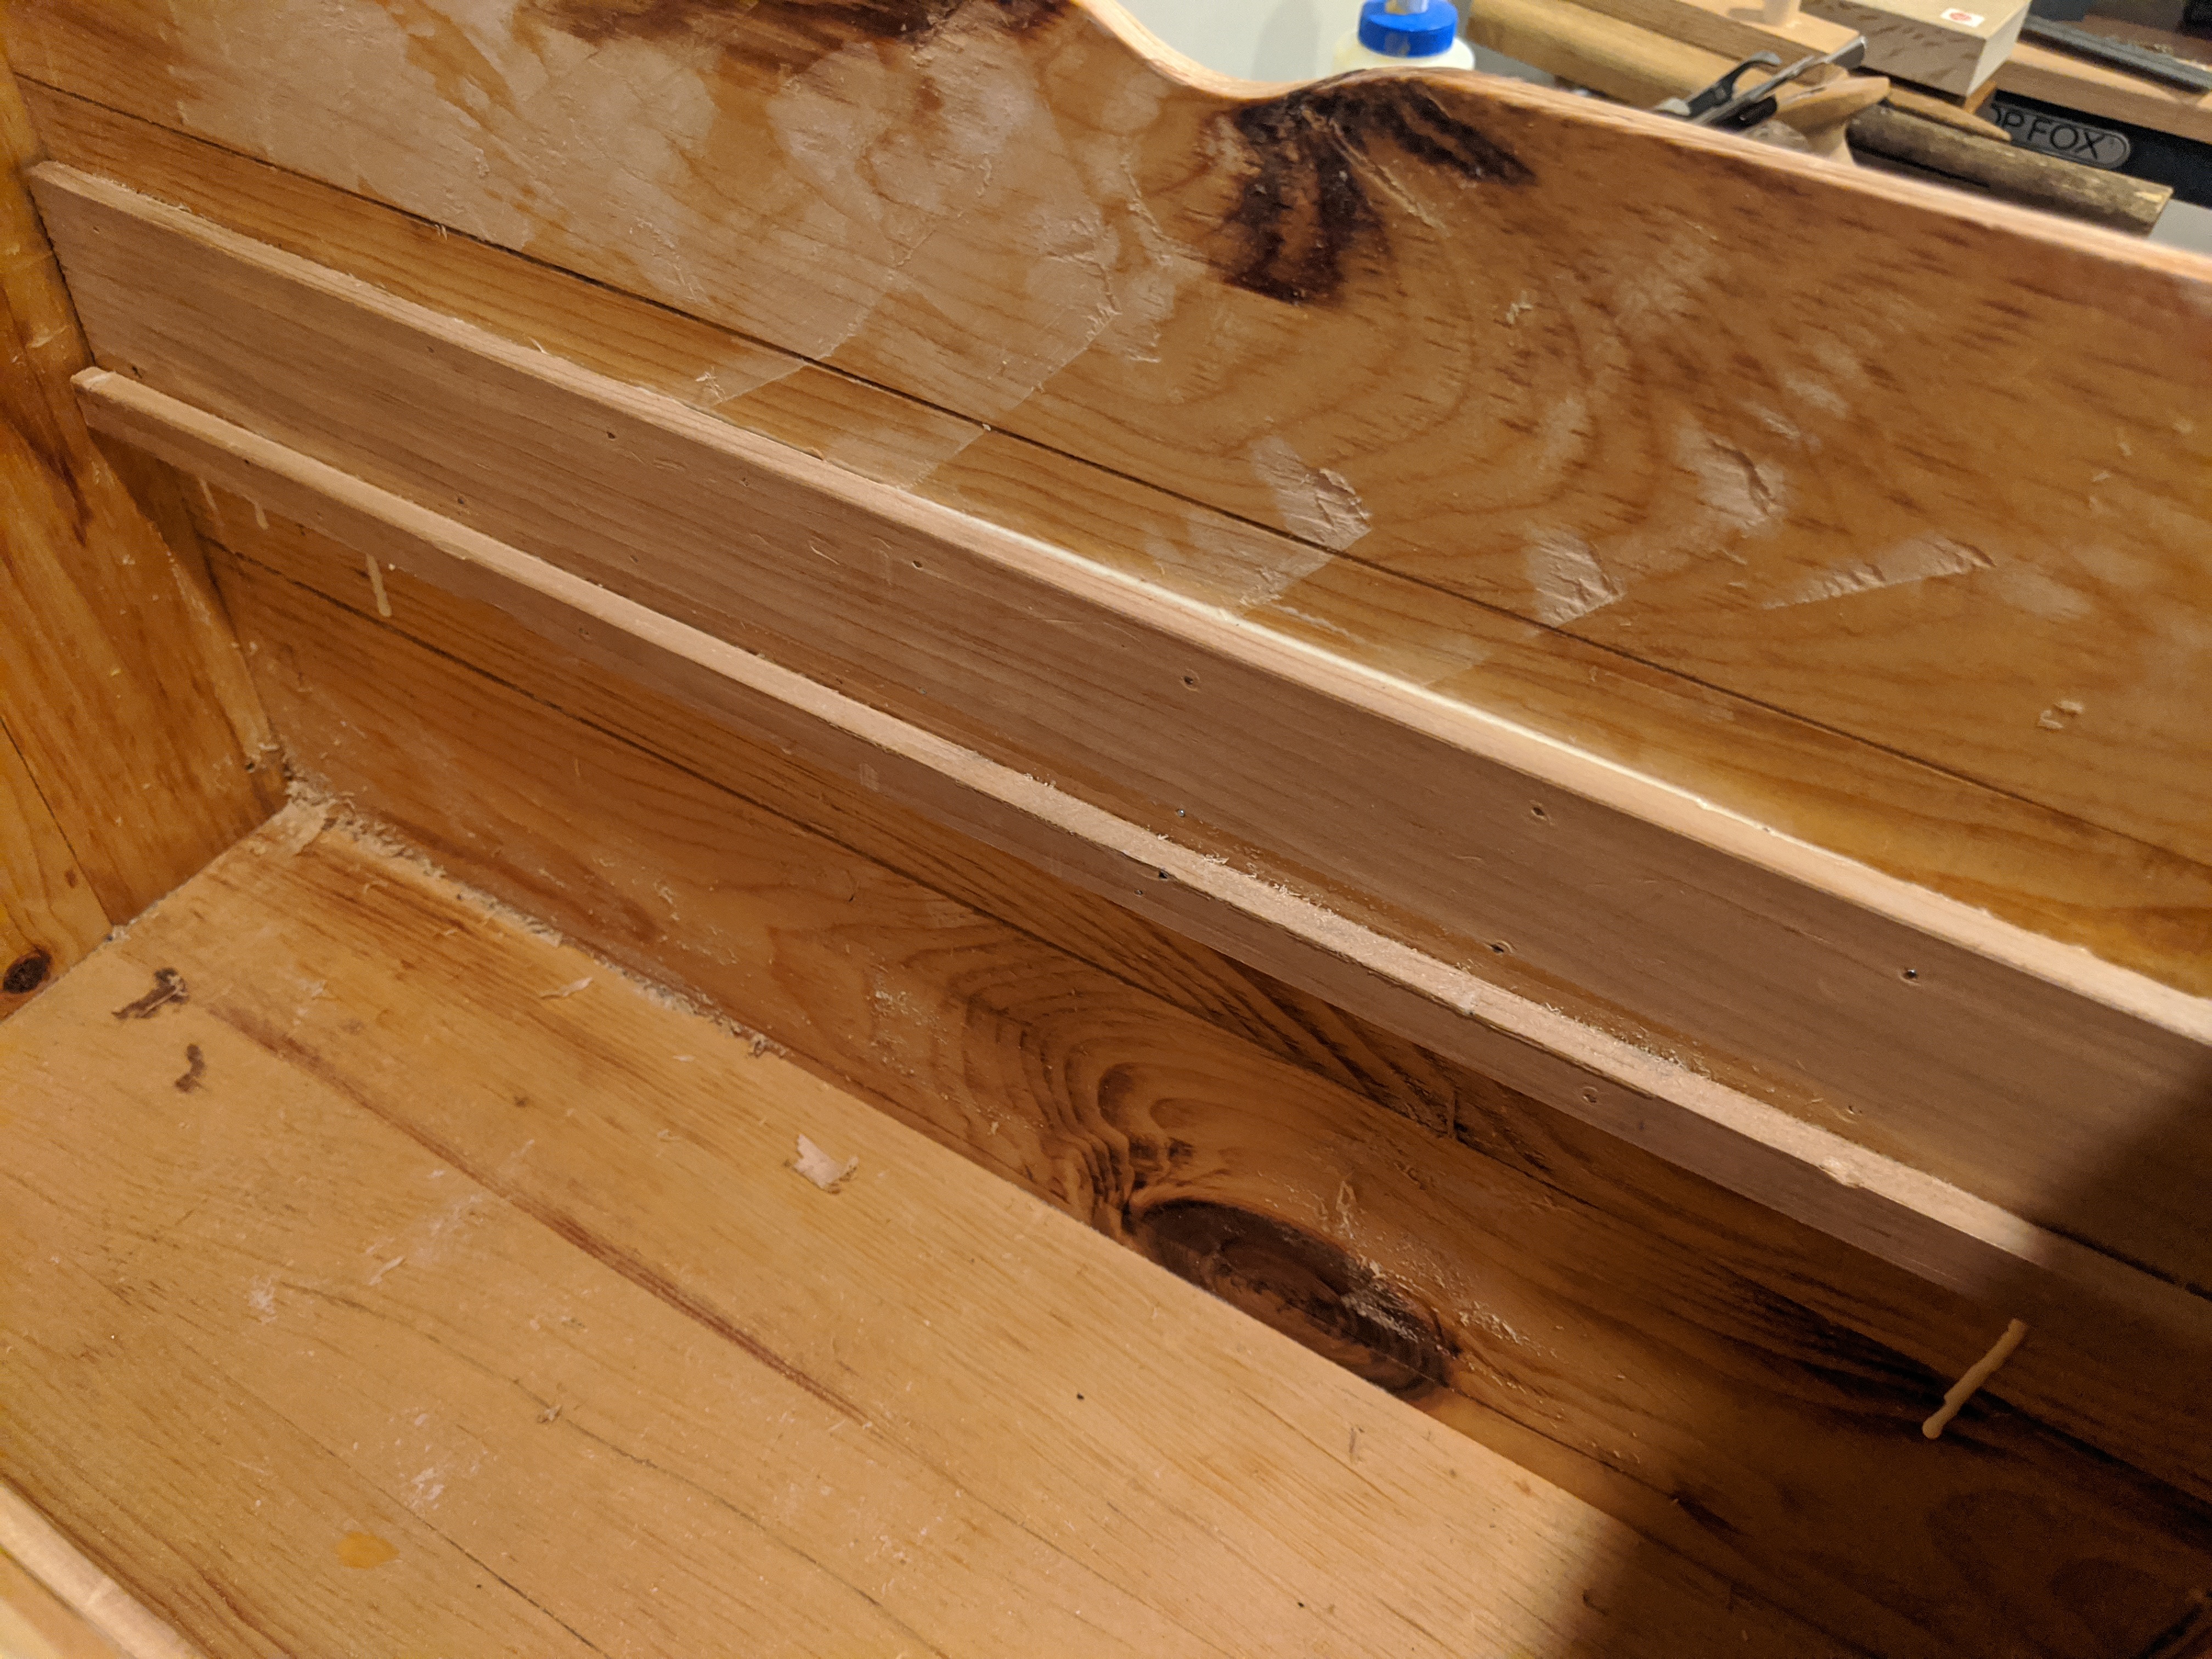
The big one for my project was how to keep the trays off of the tool chest/box floor: create a stacked series of rails inside the box for the trays to slide on.
The stacking is the key here. The top-most tray can be as big as the front-to-back interior space of the toolbox allows. It rests on top of a set of rails that run the entire width of the box on either side. Instead of a single stick for the rail, the rail is an L-spaced piece. The lip of the L creates the rail for the second tray to run along.
Note that this is different than in Schwarz' book. His trays are as wide (left to right) of the inside of the tool chest, but only half the depth (front to back). This wouldn't have worked for my toolbox as the runners for the inset lid would have prevented the trays from being removed. By making mine half the width of the tool box, I could remove them easily while keeping the inset lid design.
The first step in updating the toolbox was to make the pair of rails on which the trays will slide. As the rails run the width of the toolbox, they needed to be thin. Thick rails would last longer, but would make accessing the bottom of the toolbox clumsy, as the rails would get in the way. This is no doubt why in Schwarz' book, the rails ran front-to-back instead.
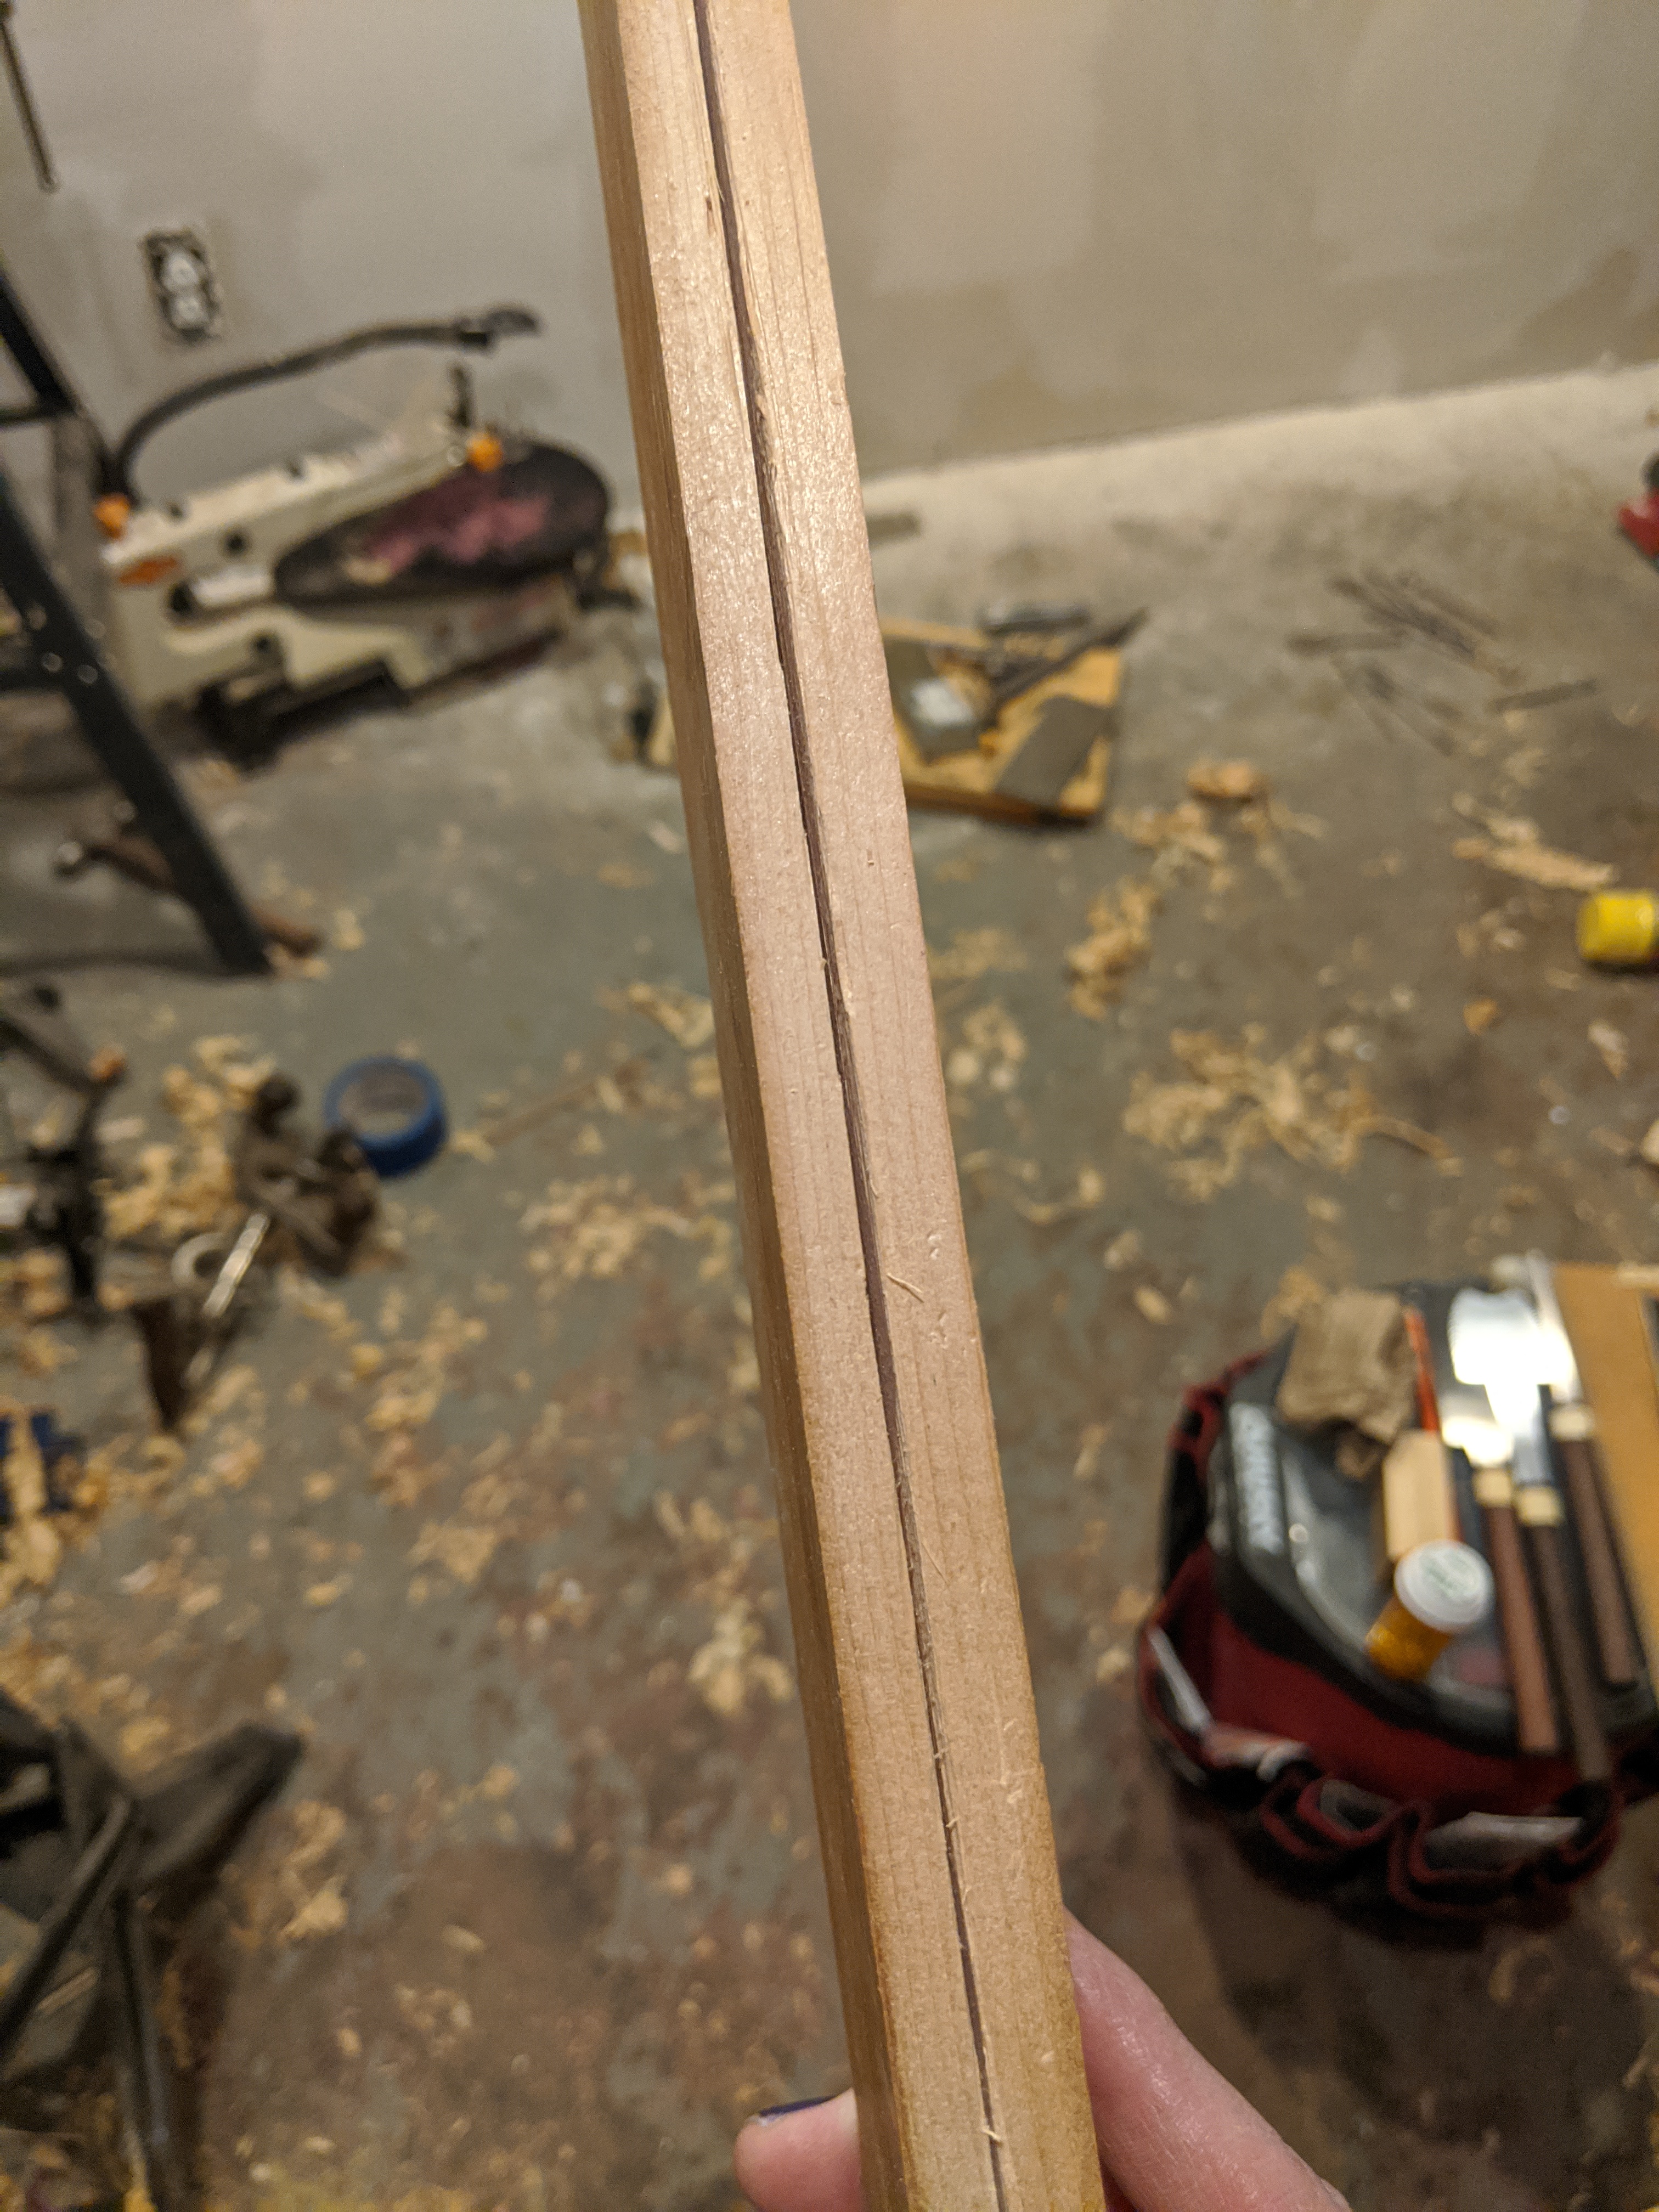
I decided to resaw apiece of my pile of reclaimed white pine to make the rails. When cut in half lengthwise, each piece was just wide enough to function as a rail. With a little gluing, I could laminate on a smaller piece to make the L. It sounded like a good plan, there was just one small problem.
I had never successfully resawn a piece of wood in my life. I've crosscut larger pieces into smaller ones, yes. And of course, I've ripped some pieces lengthwise before, but resawing a 2 cm x 60 cm x 8 cm piece into two 1 cm x 60 cm x 8 cm pieces is something I've never successfully done. I've read up on techniques, watched videos, did all kinds of study, and....never once did I manage to successfully do it without the saw wondering all over the place. Complicating this fact was I had a ryoba -- a Japanese pull saw -- rather than a western style push saw. Information was hard to come by in english on how to use one to resaw, as the blade was flexible and the handle isn't intended to allow for steering the saw.
After some more research, I hit upon the following process:
- Using a marking gauge, scribe a line around the entire circumference of the cut. That is, on the top, sides, and bottom.
- If so desired, darken the line with a pencil or pen. This can help with visibility during the cut.
- Deepen the line using a marking knife, chisel, or slitting gauge. You can omit this step when you skills improve with handling the saw, but it's really helpful at first.
- Using a fine hand saw, cut a tracking kerf in the marked lines. This kerf does not go all the way through the material, but rather is only a few millimeters deep. Ideally, as deep as your saw's teeth.
- Using the rip side of the ryoba, begin the cut at the corner of the material furthest away from you. This helps to keep the flexible blade under tension, keeping it straight.
- Often, you may find it useful to cut in 'triangles'. Angle the saw so that you're sawing one side more than the other. Check your work, then saw the opposing side.
- If the saw wanders off, stop. Remove the saw. Deepen the tracking kerf a little more for the remaining cut, then resume resawing. If the cut has wandered off significantly, resume resawing where the cut was last on track, and twist the handle slightly to establish a new kerf to get back on track. Be sure to stop applying this force to the handle as soon as the new kerf is established, or you will wander off in the other direction!
- Once you're about half way through the board, stop. Flip the board over and start resawing from the other end. This will help keep the cut more in line with your tracking kerf.
To my surprise, this formula worked well. And I was able to cut the rails with much less consternation. The ryoba isn't intended to be "steered" like a western saw. It's entirely in the set up.

With the piece resawn, I ripped it to size and used the scrap to create the lip of the L. While I did glue the pieces together, I didn't have a clamp with enough reach to hold it in place inside the toolbox. Instead, I borrowed a trick from power tool shops.
When you need to hold a piece in place while the glue dries, you can use small brad nails. In a power tool shop, these are usually applied using a pneumatic nailing gun. Unsurprisingly, I didn't have one of these. What I did have, however, is a lower tech tool: a brad pusher. A brad pusher looks like a screwdriver, but has a hollow shaft on a spring. Place the nail inside this shaft, position the tool, then push down on the handle. This sets the nail in place. Finish up with a hammer.
This approach worked very well, allowing me to get the rails installed quickly. As a bonus, the rail covered the massive crack in the front panel!
After some measuring, I settled on trays which were only 5cm deep. It may not sound like much, but it's enough to create two trays in the toolbox which still can house all my chisels. I initially made the trays just over half the width of the interior space of the toolbox. The idea was to make it so that when one tray was slid to the left, the other tray was fully accessible. This...didn't work out, and again because of the ridiculously long chisels I have. The lower tray was made longer to compensate.
Making the pieces was straightforward:
- Crosscut the pieces to the desired length plus 2-4mm extra.
- Rip the pieces down to the desired 5cm height.
- Plane the stock square.
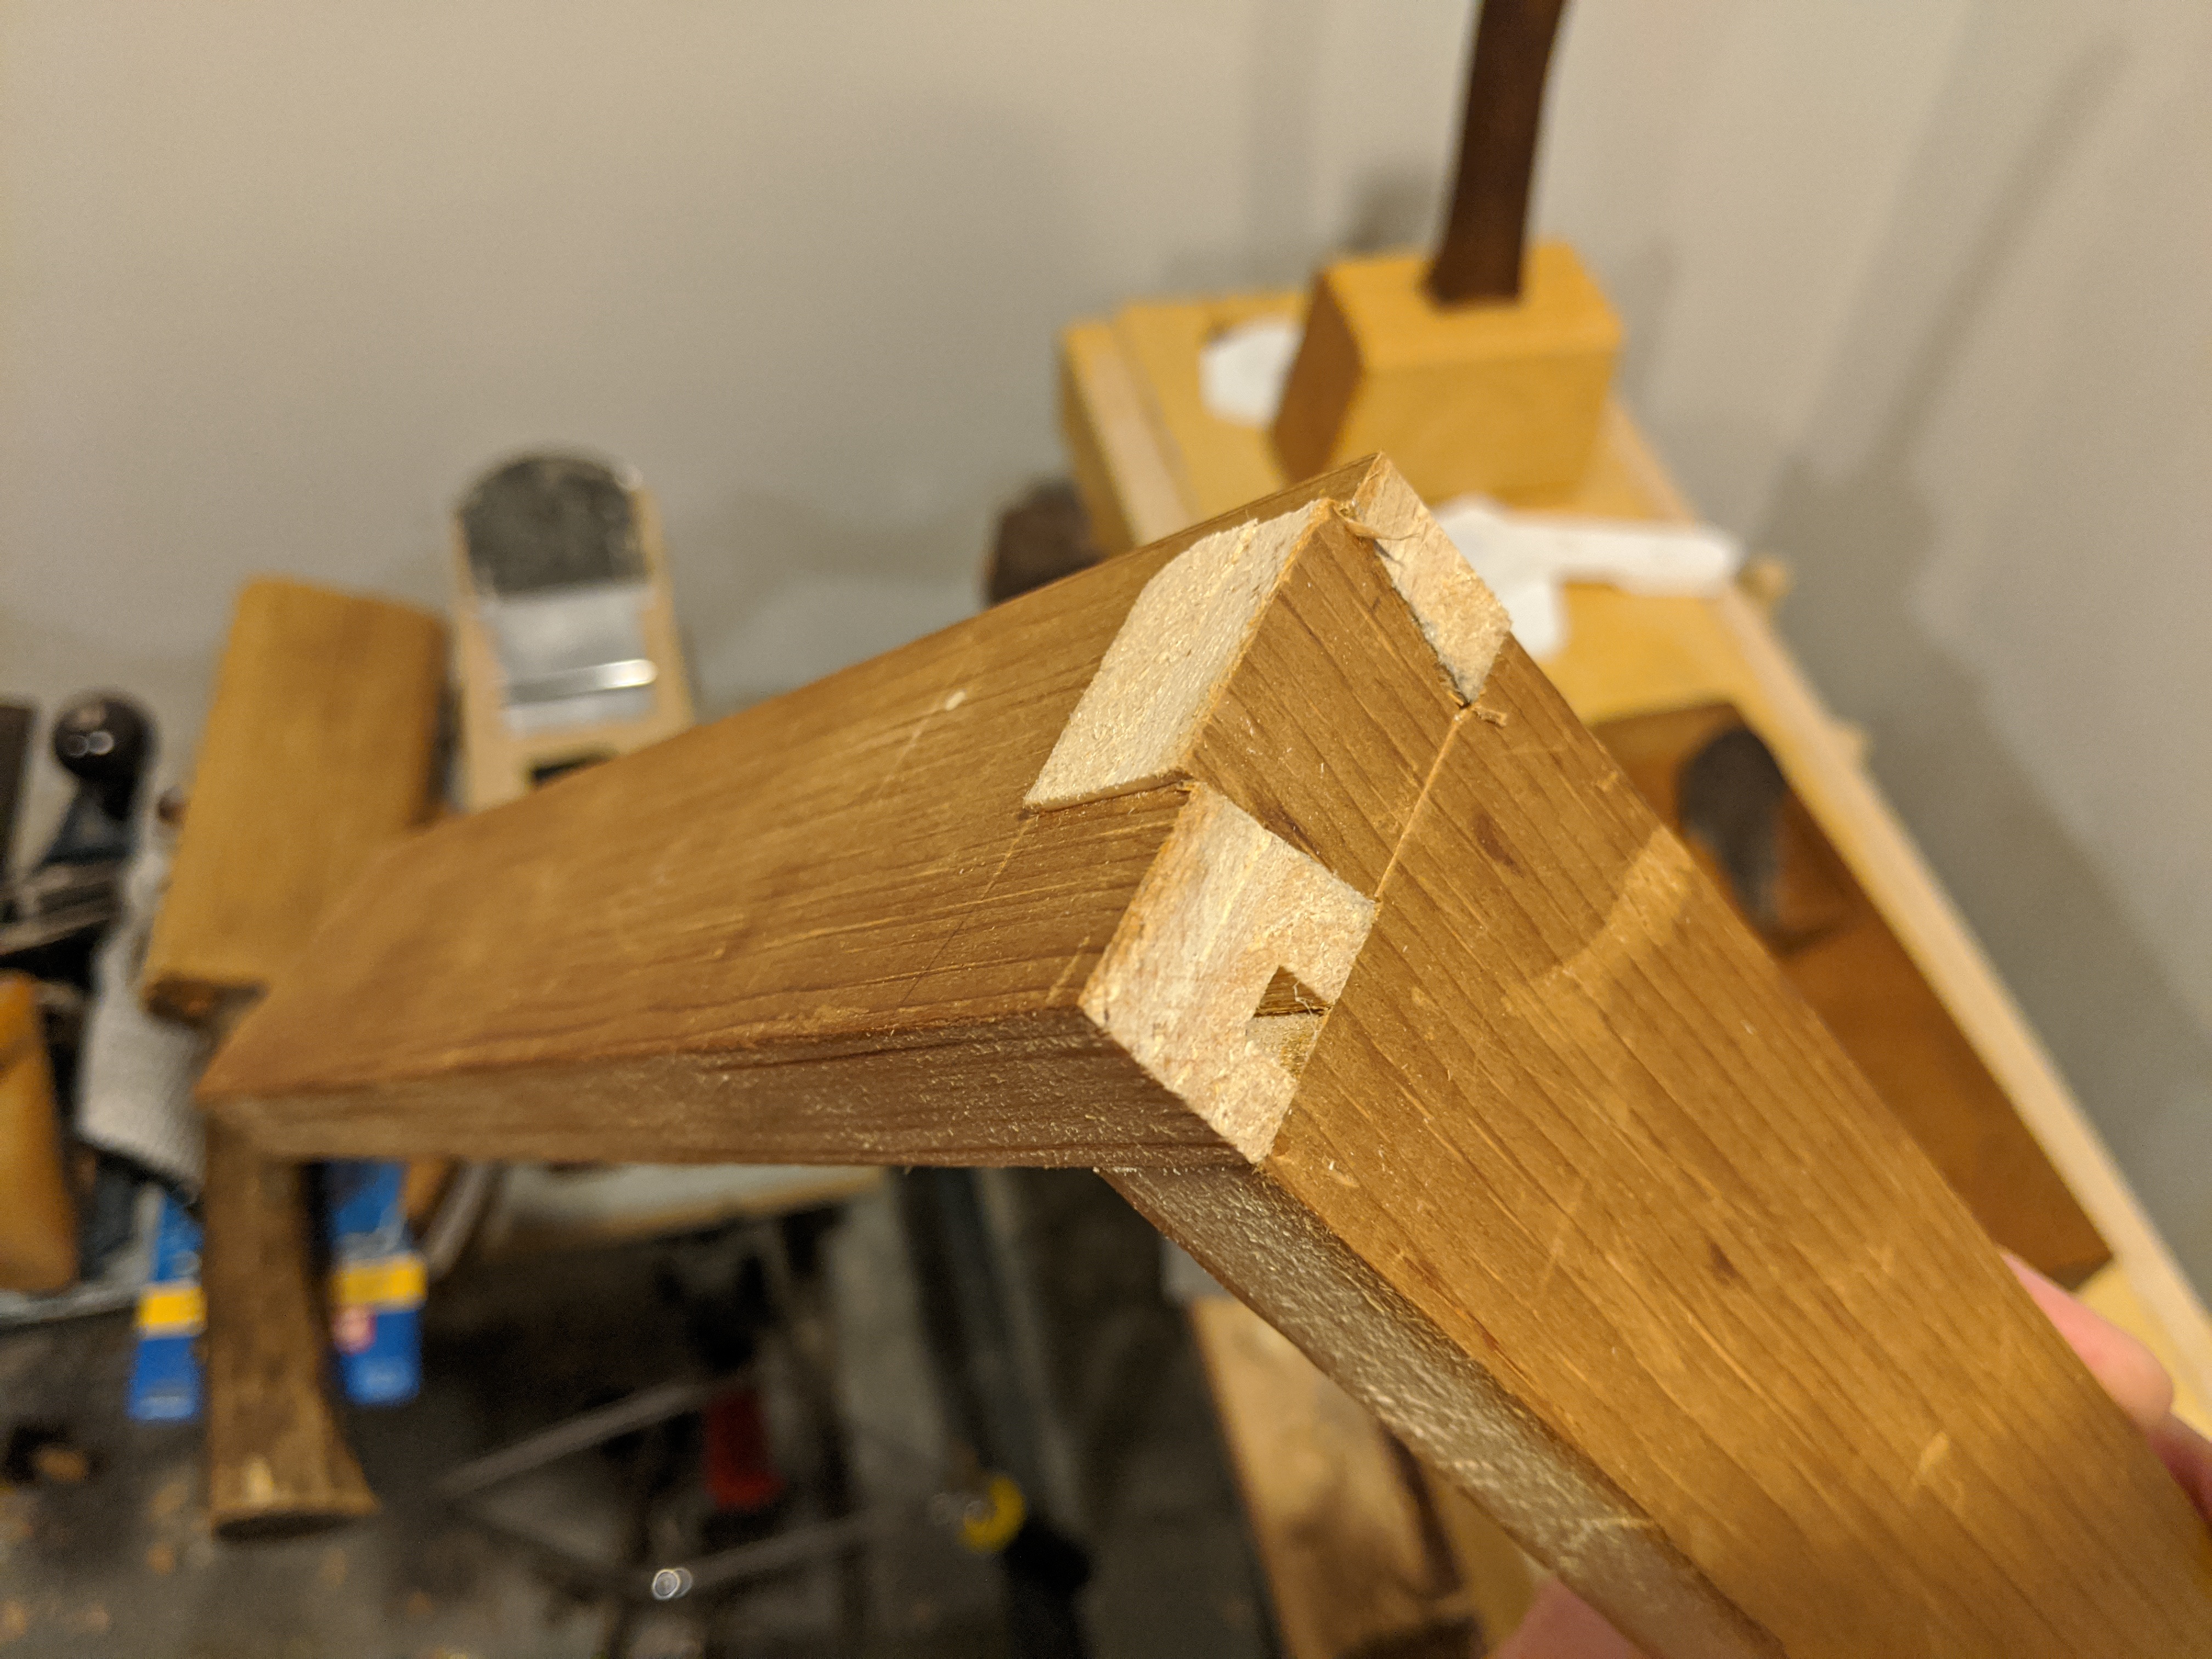
As a challenge, I decided to use dovetails to join the pieces together instead of a simpler joint. Since each piece is white pine and only 5cm tall I decided to only make one dovetail per joint. As suggested in The Essential Woodworker, I offset the dovetail from the bottom to allow for a groove for the drawer bottom, and made the tails larger than the pins for aesthetics.

Before starting on the tails, I decided to cut in the groove to capture the drawer bottom. The Essential Woodworker had several good suggestions on how best to capture a drawer bottom and create this groove. Since I wasn't that concerned about the strength of the trays (like I was going to make an heirloom on my first attempt), I decided to simply cut the groove in place, rather than create a lamination or something more complex.
For this, I had a Stanley #50 plow plane. It's kinda like a cheaper version of a #45, but my #50s were in much, much better condition...or so I thought. While the groove was successfully cut, it was no where near as crisp as I like, and was frustrating to get to a proper depth. In essence, I was fighting the tool. It was rather upsetting.
I had hoped to use a Japanese style plow plane I had purchased online. This was shipped from Japan the same day international post to the US was suspended due to COVID-19 (to say nothing of politicians frothing with glee over an opportunity to kill the US Post Office). Even though I had ordered the plane well in advance, I had made and finished three entire trays by the time it arrived.
Even so, I have to wonder if it was worth using a dedicated tool at all to make this groove. I could have used a marking gauge to scribe it out, sawed it down carefully with a fine saw such as a douzuki or even a small ryoba, and then chiseled out the groove by hand. The result would have been crisper and more accurate, but it would have taken longer.
I have to remind myself that not every problem needs a new tool, just your existing tools, time and patience to learn to use them more flexibly.

The tails are the easier part to cut of a dovetail joint, and unquestioningly the part of the joint you always want to cut first.
- Set the marking gauge to be the width of the pin board plus some extra, usually 1-2mm. This will mark the shoulder of the tail boards.
- Ensure the end of the tail board is square to the length. Using a shooting board can help with this.
- Mark all around the end of the tail board. You can choose to omit the portions where the tails are, but that's an aesthetic call.
- Using a bevel gauge or dovetail jig (Katz-moses makes a simple one which is useful for more than just dovetails) saw down from the end of the board to the shoulder line.
- Saw out the shoulder lines, taking care not to cut the tail off!
If you're still building up your sawing skills like me, you'll want to tune the tail boards at this point.
- Using a clamp or double-sided tape, carefully place the tail boards side by side. The goal is to get a good average match in the shoulders, not the tails!
- Now, using a sharp chisel, or anything abrasive and flat like a stick with sandpaper or a file, match all the shoulder lines together. Again, ignore the tails! Those can be the wild individuals they are.
The above tuning was something I discovered when I dry-fitted the first tray together. It was out of square because the shoulder lines didn't match. Tuning them like this prior to cutting the pin boards will save you a lot of headache later.

The pin boards are the opposite of the tail boards. We need to cut a cavity to receive the tail. By cutting and tuning the tail boards first, we can use them as templates to individually match them to the pin boards.
- Square the end of the pin board using a shooting board.
- Use a marking gauge to mark the bottom of the cavity to cut. Ideally, this is the same depth as you cut the shoulders on the tail board.
- This sounds weird, but place a spacer on your workbench behind the vise. This can be a block of wood, or even another tool like a plane.
- Place the pin board in the vise, with the end to cut facing up. The groove should be away from you when you do this. Line up top of your board with the top of your spacer. Lock down the pin board in the vise.
- Place the tail board over the end of the pin board, using the spacer to support it.
- Using a fine pen, pencil, or marking knife, scribe the tail into the pin board using the actual tail it will receive as a template.
- When sawing out the waste, cut just inside the scribed lines to make the opening narrower than marked. We can always shave away the excess later for a tight fit.
- Label the tail and the pin with the same letter, number, or symbol so you can match them later.
- Use a chisel or coping saw to remove the waste.
Removing the waste can be done either way. I did start with the coping saw simply because I felt I had more control and accuracy. You may feel the same. Later, I did chisel out the waste instead, and found this to not only be more satisfying, but it allowed for the cavity bottom to be cut very accurately and require less post work.
Like the tail boards, you need to tune the pin boards too. As you might guess, the process is the same. Clamp or tape the pin boards together, then true the bottom of each cavity to be the same.

This is by far, the most fiddly part of the process. Even though we matched each tail with it's own set of pins, we deliberately undercut the pins so we could tighten them up. Ideally, we leave the tails be, and instead focus on widening the pins.
Why? The only reason is that it's easier. While the pins are angled with respect to the face of the pin boards, the cavity is straight up and down in-line with the board. This makes it easier to use a chisel, file, or sandpaper. to tune. Cut a little, test the fit. Cut a little more, test the fit. When it slides together with non-trivial but not forceful amount of hand pressure, you got it right.

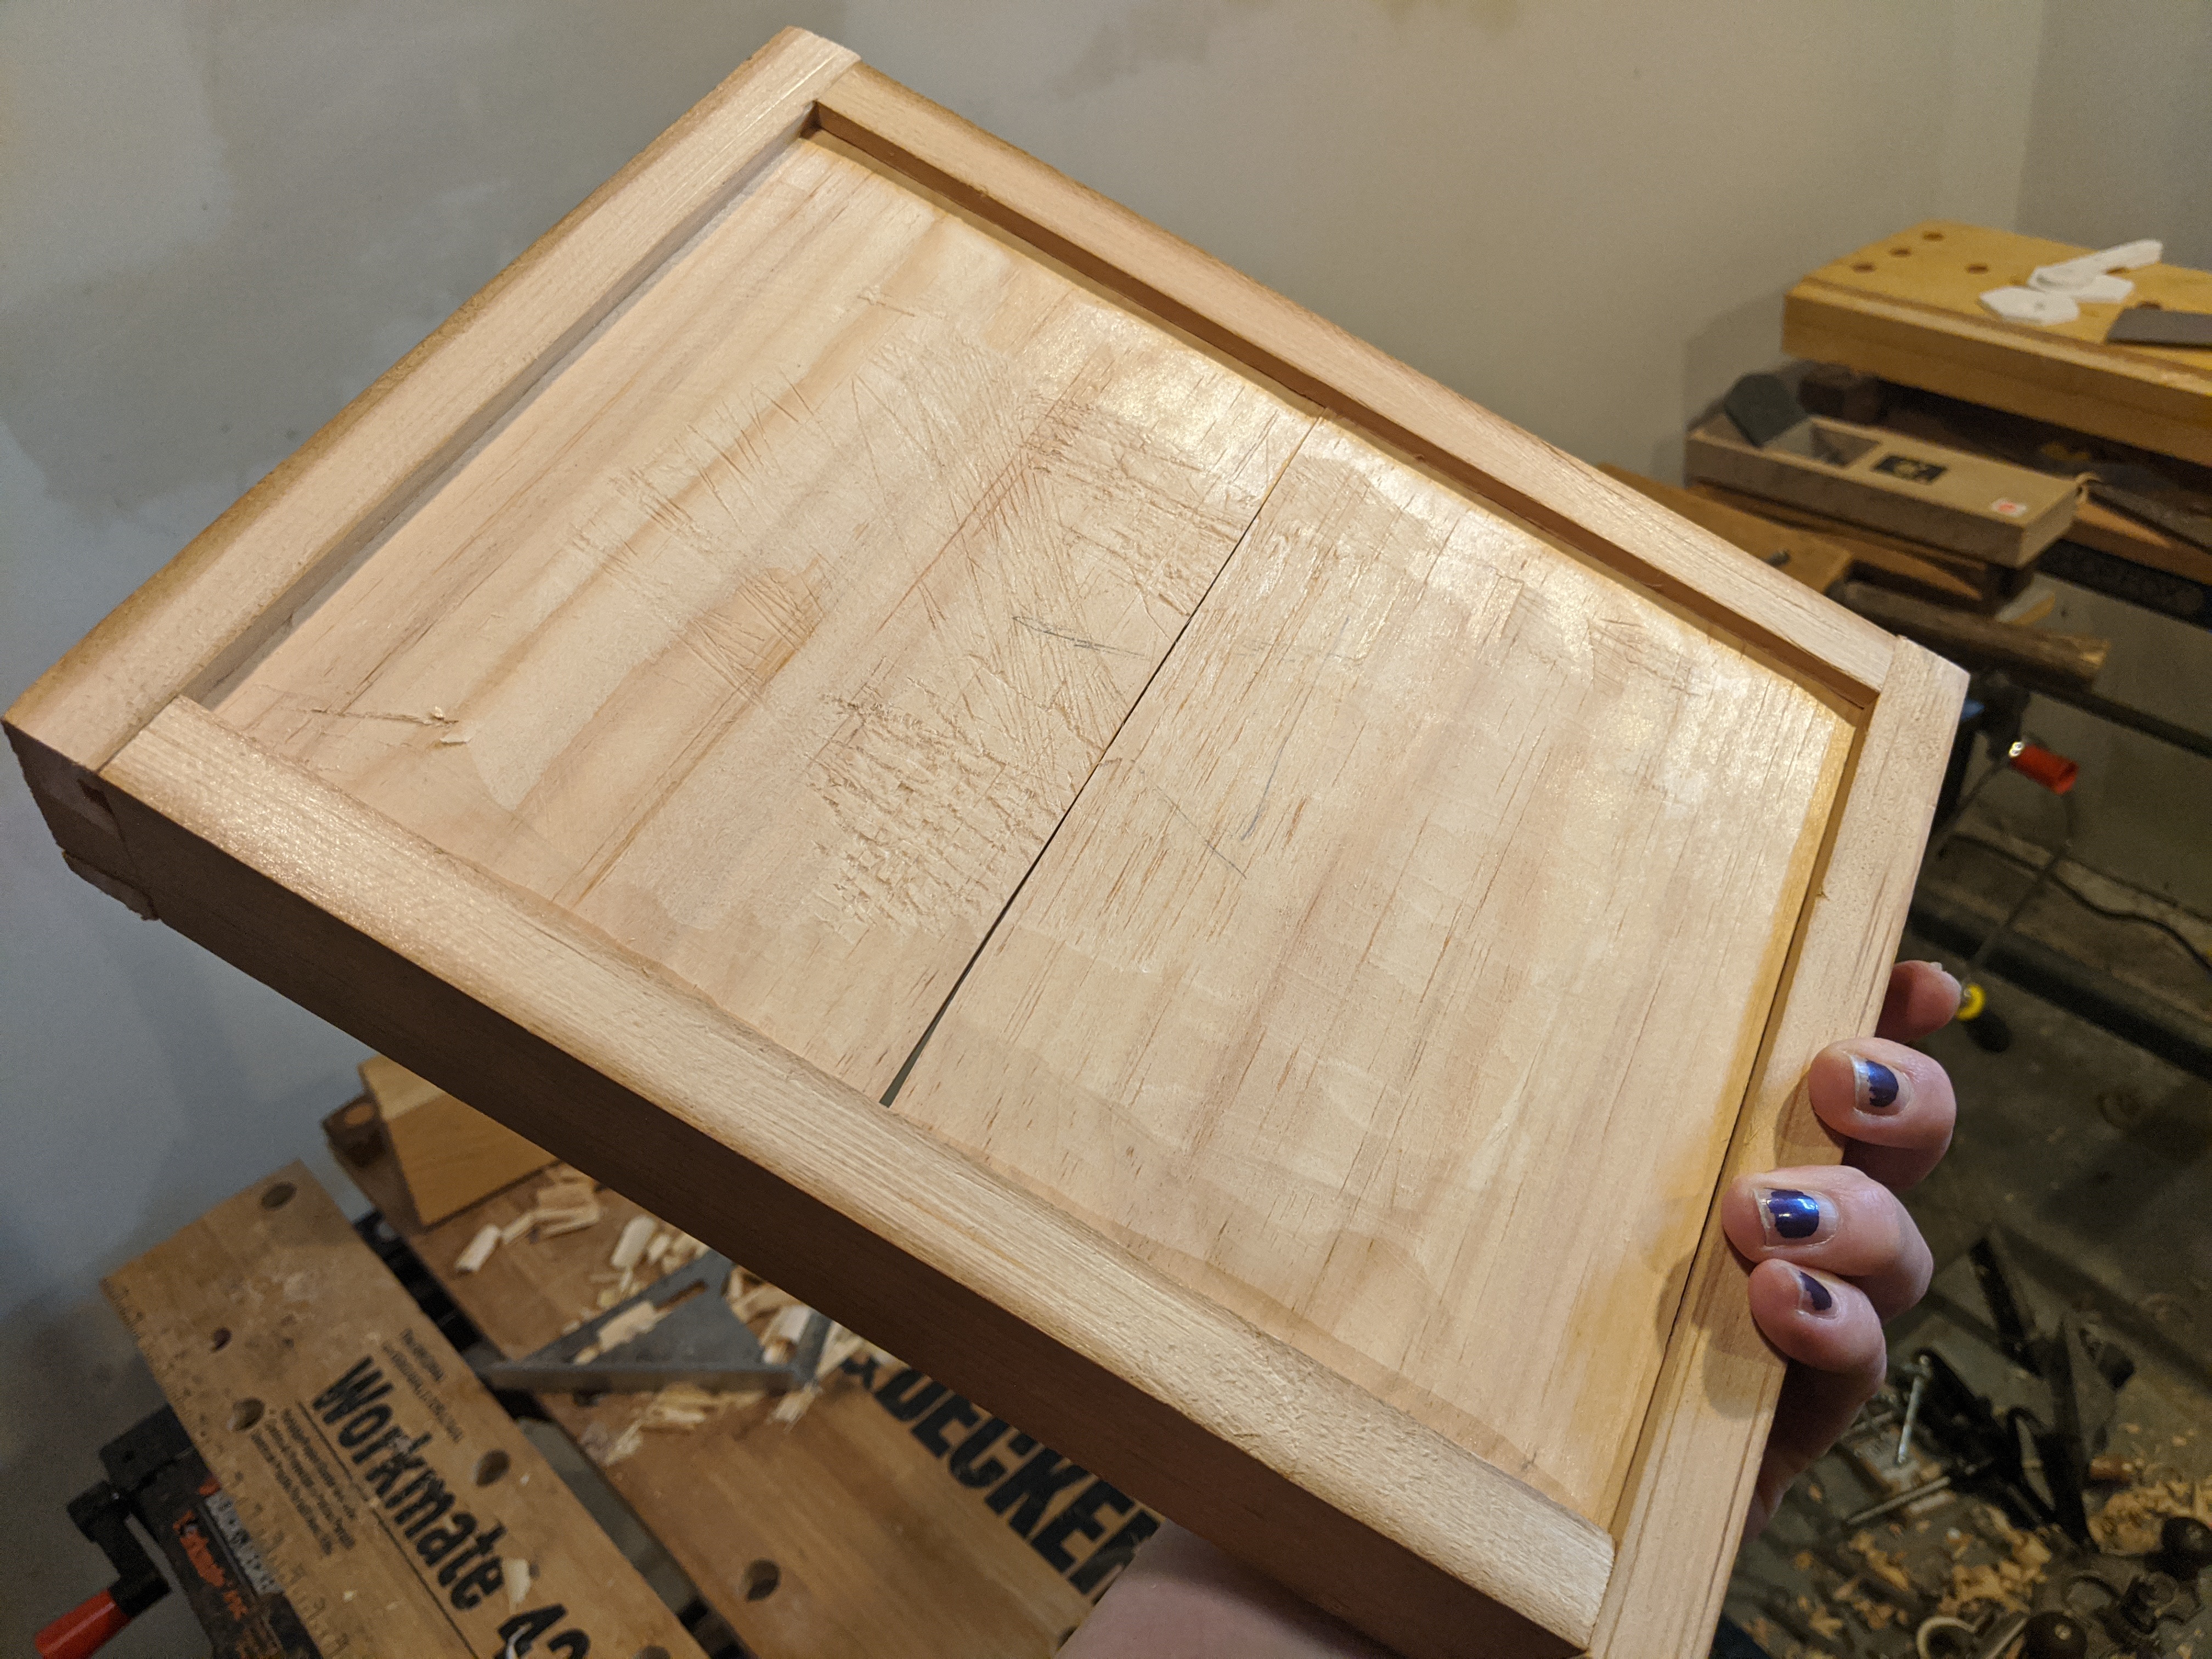
Usually, it's a good idea to use something like thin plywood for drawer bottoms. These are engineered so as to minimize and seasonal size changes, cheap, and available in any hardware store.
Which...can be a problem during a pandemic.
So, I decided to just make my own bottoms out of more solid wood. To keep them thin and light, I would resaw them like I did the tray rails. To make larger panels, I glued them together with 5 minute epoxy. Some blue painter's tape acted as a clamp.

Even resawn, the tray bottoms I made were just a bit too thick for the grooves. The Essential Woodworker also had easy solution here, pillowing.
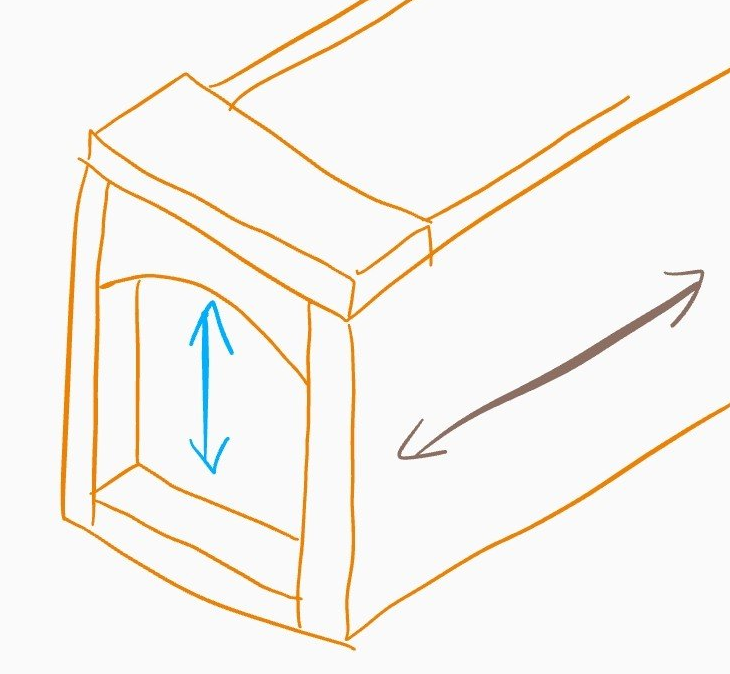
Pillowing a panel just means making a large, but shallow chamfer all around each edge. This makes the edges thinner, but leaves the middle the original thickness. Usually, pillowing is done on the part of the tray bottom that is not visible and is often left rough cut to save time and effort.
I did this with all the tray bottoms freehand. I set a kanna for a shallow cut, then used my non-dominant hand to hold down the panel, and used my other hand to slide the plane down the edges. There was more variation in my grooves than I liked, so I had to sneak up on the final thickness and tested the fit repeatedly.

With the fitting all done, the pieces could be glued together. Apply glue to the tails and the cavity of the pin board. Avoid applying any to the groove so the tray bottom can "float". This way, it can expand and contract with the seasons. I used a strap clamp (the kind used or picture frames) to keep each tray together while the glue dried.
With the trays assembled, we can finally finish things up. Remember how all the tails and pins were cut just a little bit longer? Now is the time to deal with those. Use a flush trim saw or a chisel to flatten them out. Then, use a plane to make sure that transition between each board is smooth.
For finish, I used a single step wipe on oil and wax. It's not a durable finish at all, but again, this is destined for the shop. Something quick and easy was all that it needed.

The trays really helped make better use of the internal space of the toolbox. The nested, sliding rail approach was not only simple, the result is elegant and effective. I can easily pull out each tray and set them out while working, or push them aside in the toolbox to get at exactly the tool I need.
While the dovetails were challenging, I found them much less imposing than others have said. I suspect the difference is that I'm doing this all with hand tools, and treating every tail uniquely, rather than assuming they're all uniform as one would do with power tools.
This post was created with the support of my wonderful supporters on Patreon.
If you like this post, consider becoming a supporter at:
Thank you!!!


