
Toolbox build #3: If it works, it works
It's been over an entire month since I last wrote about the toolbox project. I wanted to put it down for a while so that I could have a few posts that weren't about woodworking, but it's not that there hasn't been any activity in the interim. Once I finally made a decision about just how big the toolbox was going to be, the rest of the project turned out to be relatively straightforward.


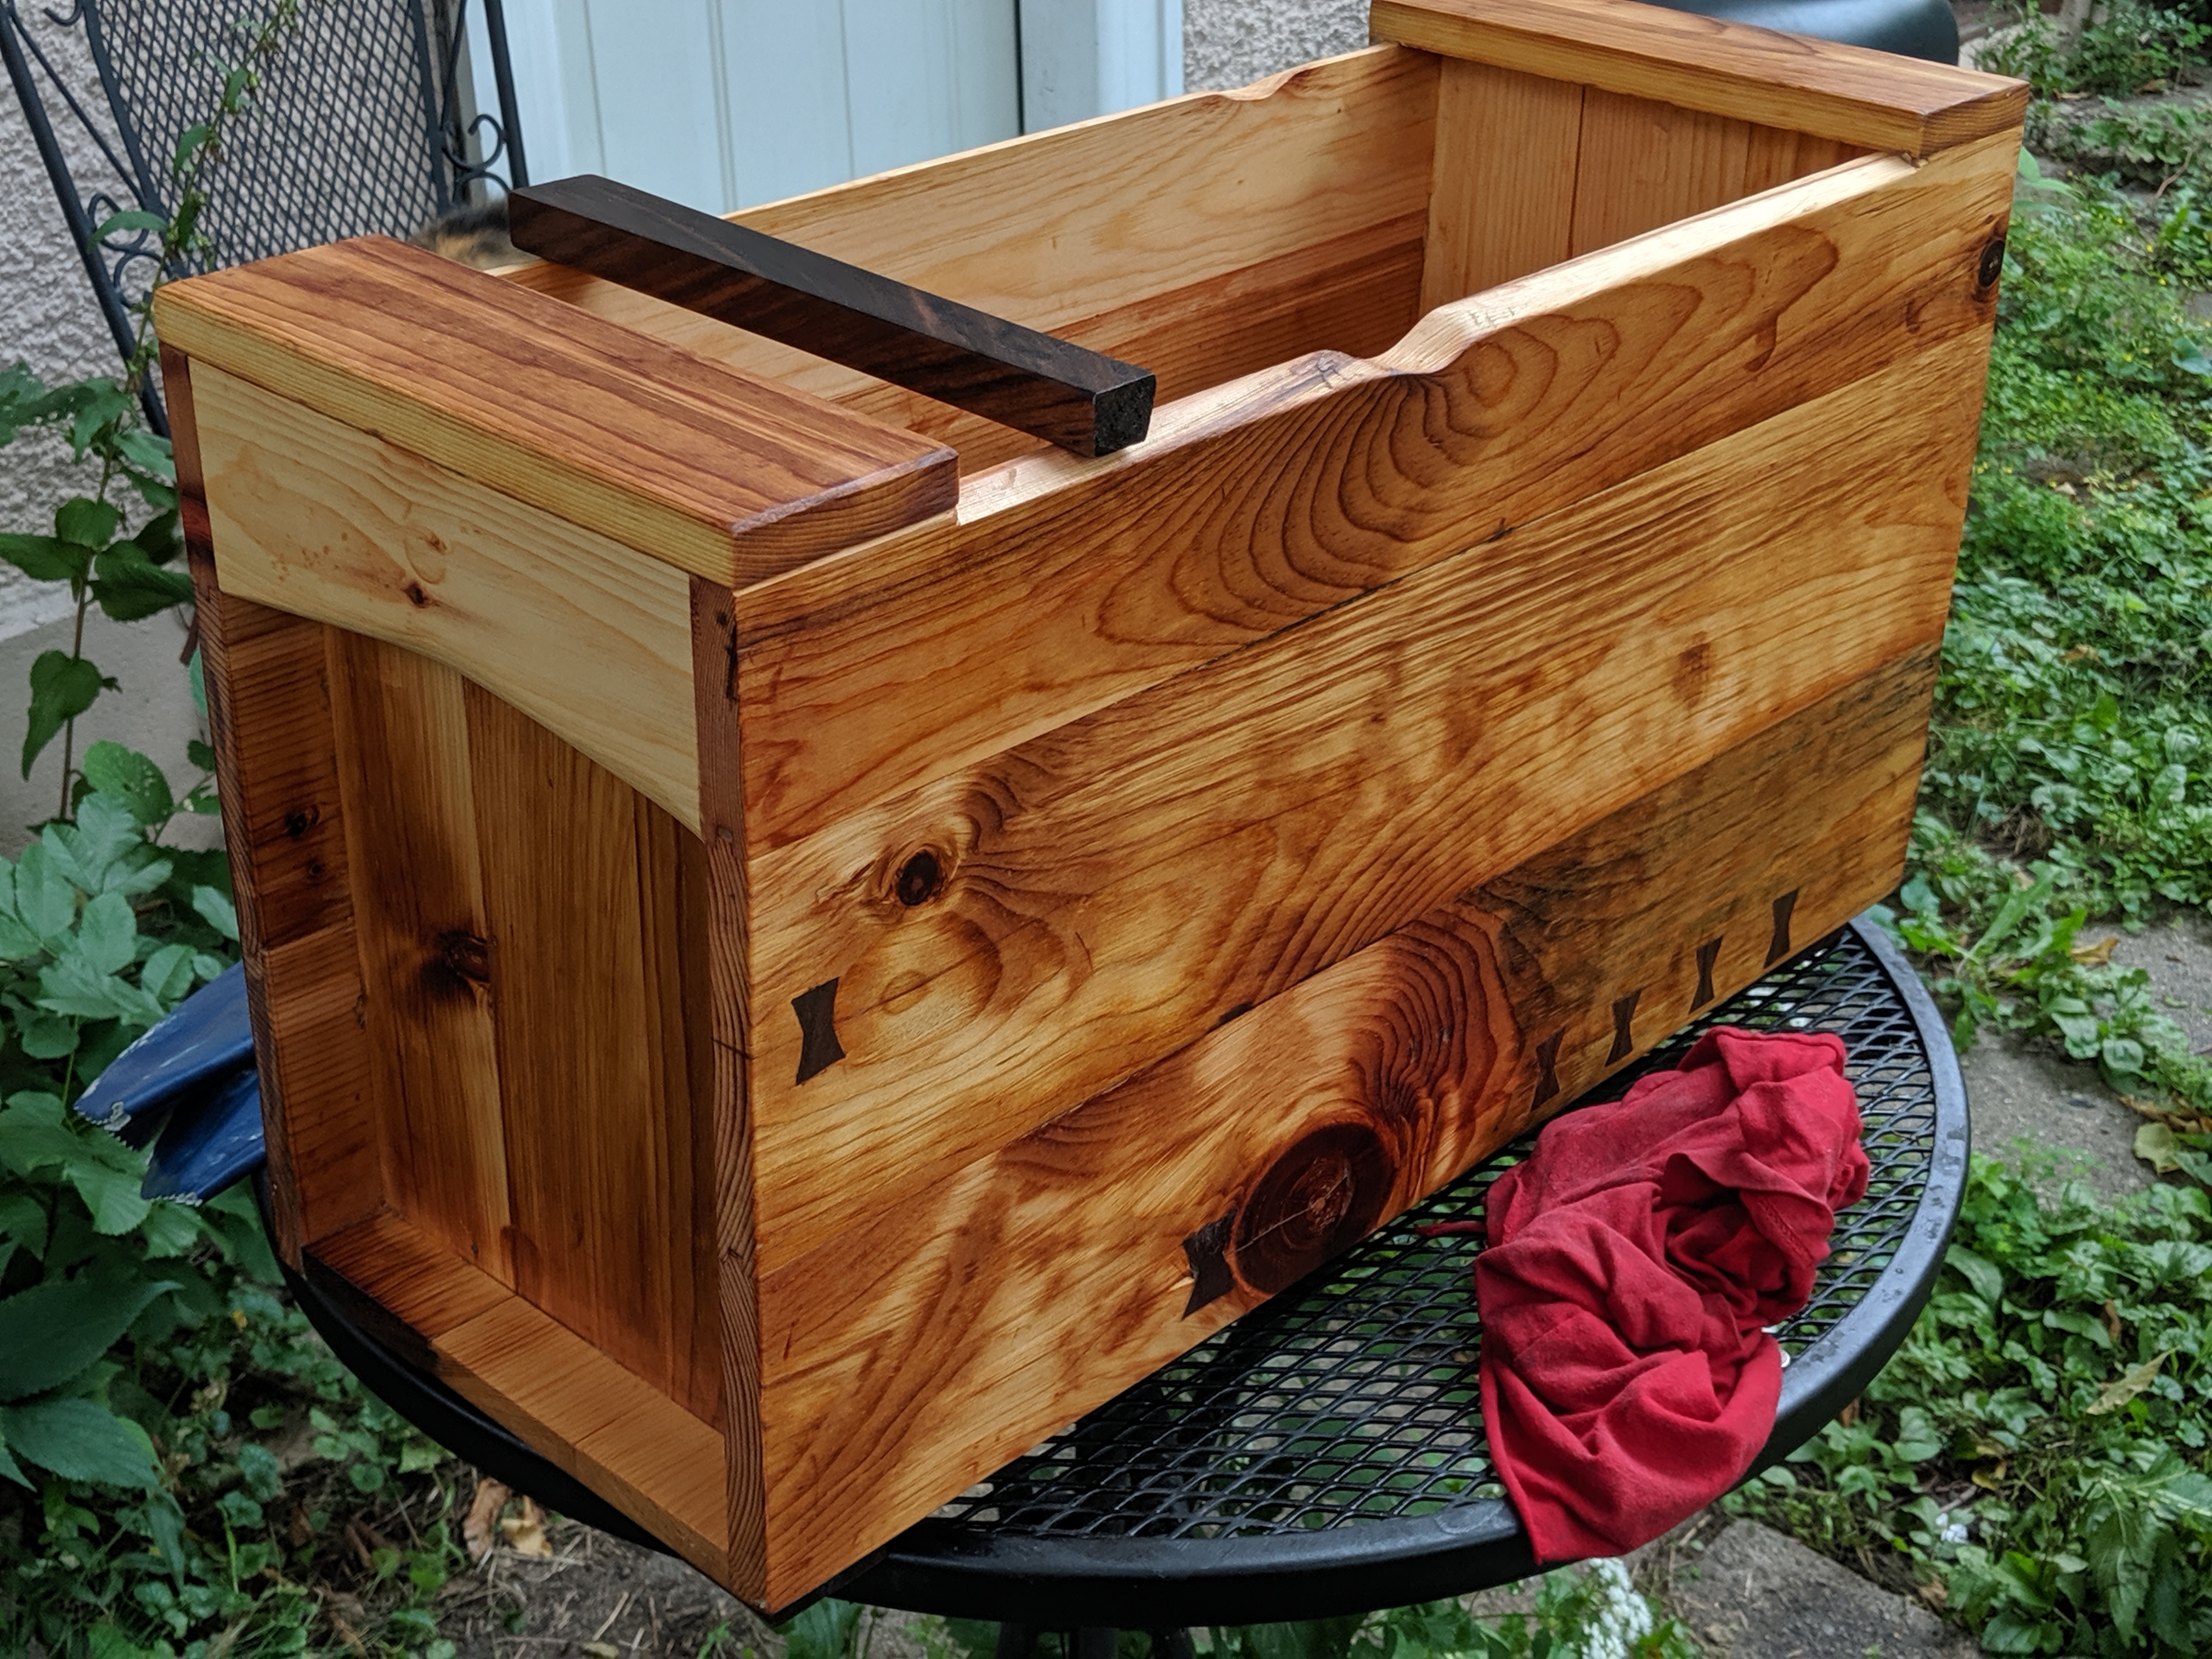
A unique feature of Japanese-pattern toolboxes is how the handles are not simply screwed to the sides as a separate piece of hardware, but an integral component of the design. The sides of the box are inset to allow for the handles to be installed. The handles are also surprisingly simple -- it's just a piece of wood that spans the front to the back, with a slight concavity to allow for a better grip.
Since my fingers are are rather long (I never learned to play piano, I swear!), I decided to make the handles deeper than is typical. I sandwiched two pieces of my reclaimed, 70-year old white pine and shaped them using a saw rasp. This worked, although a better tool would have been to use a sori kanna, or a compass plane. Unlike a regular wood plane, a compass plane has a curved bottom for hollowing out bowls, and creating just this sort of concavity. I didn't have one at the time, so I shaped it by hand.
Once that was finished, I also needed to apply another unique feature of a Japanese-pattern toolbox. Along the top, there isn't just a lid, but two runners that create an inside lip one either side of the toolbox. The idea is that the lid slides into the box and under these lips. This also avoids needing additional hardware to keep the box closed; no hinges, no latches.
I didn't get any pictures of making the runners, but I did experiment by trying to make the runners while seated on the floor. This...was less than successful for me. Although it's traditional according to descriptions in Japanese Woodworking Tools: Their Tradition, Spirit and Use, it simply wasn't comfortable for me. It was the result I expected, but it was something I wanted to try anyways.
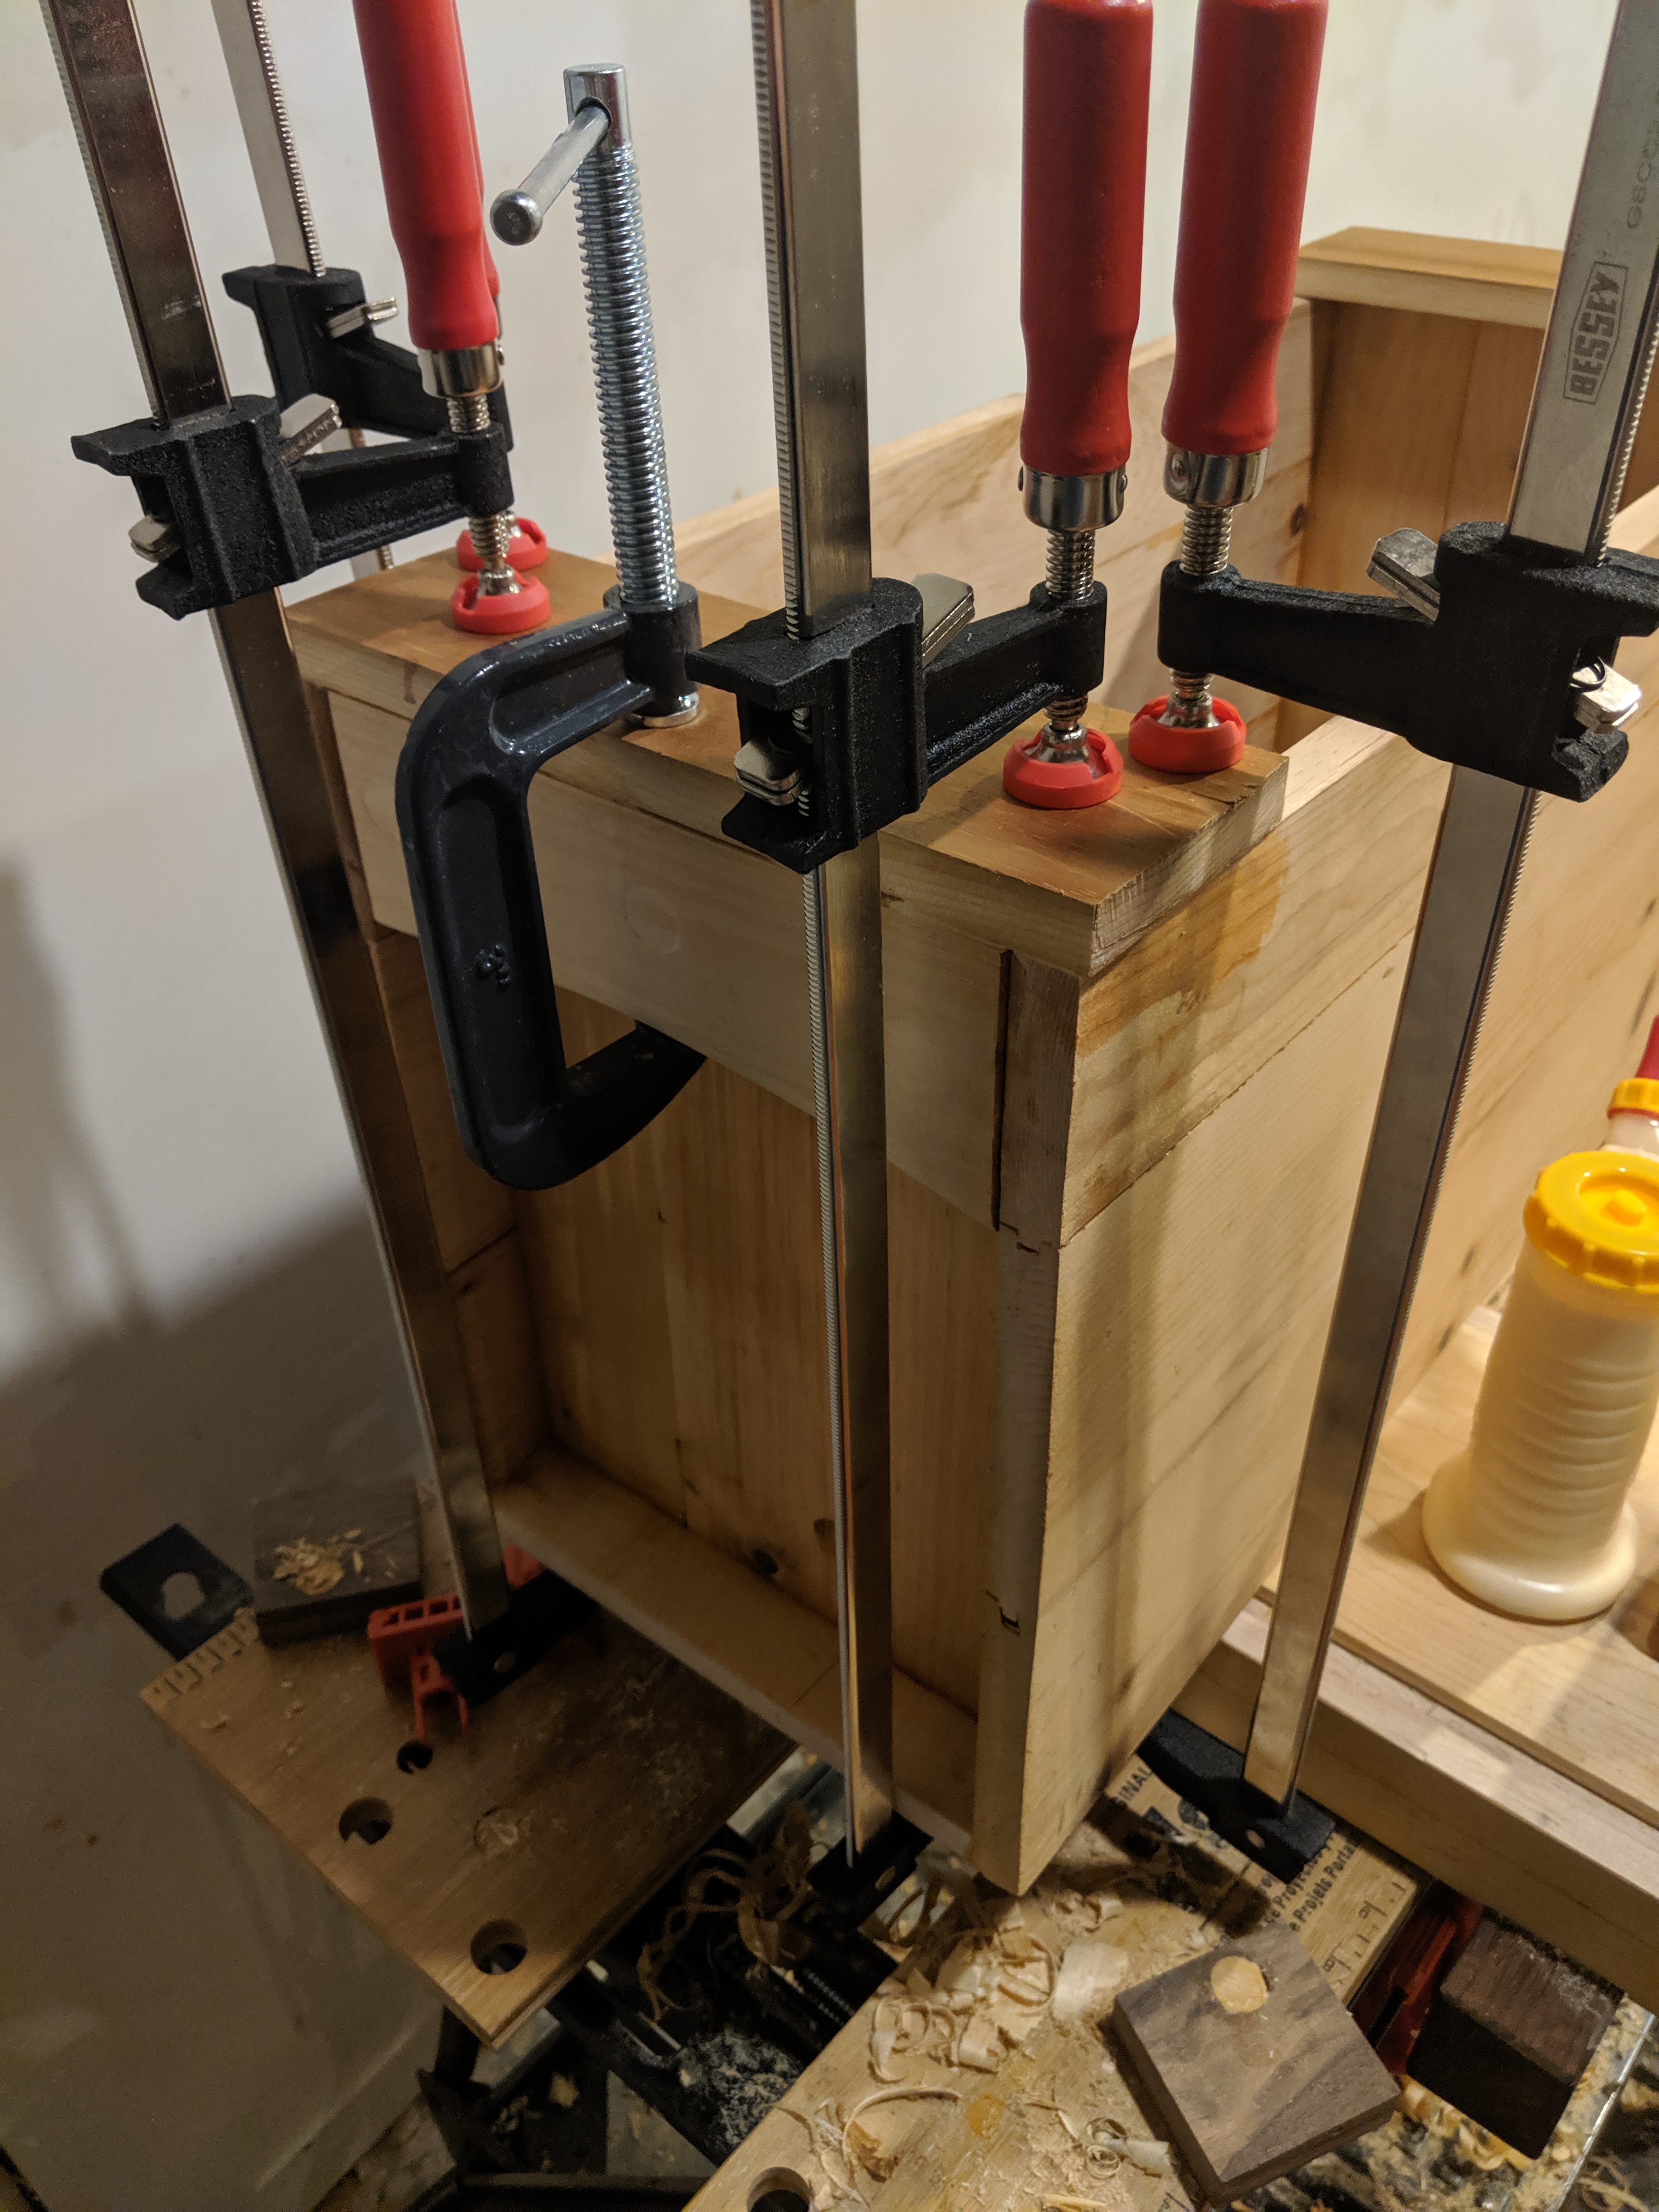
I bought two pairs of bar clams with which to glue on the runners. I could have spent a weekend making a DIY solution, but after much thought, the time and material investment just didn't seem worth it compared to buying a set outright.
Since I had abandoned creating any sort of trays, drawers, or anything of the sort for this toolbox, I was left with a bit of a problem. I couldn't simply dump all my tools into the box and be done with it. Sure, the kanna -- the planes -- would be fine as it's best to retract the blades when finished with them. The hammer and mallet would be fine, even the clamps would go in with no problem. The saws needed to be put in last since they could be damaged by being bumped around the toolbox, sure, but the real worry was the chisels.
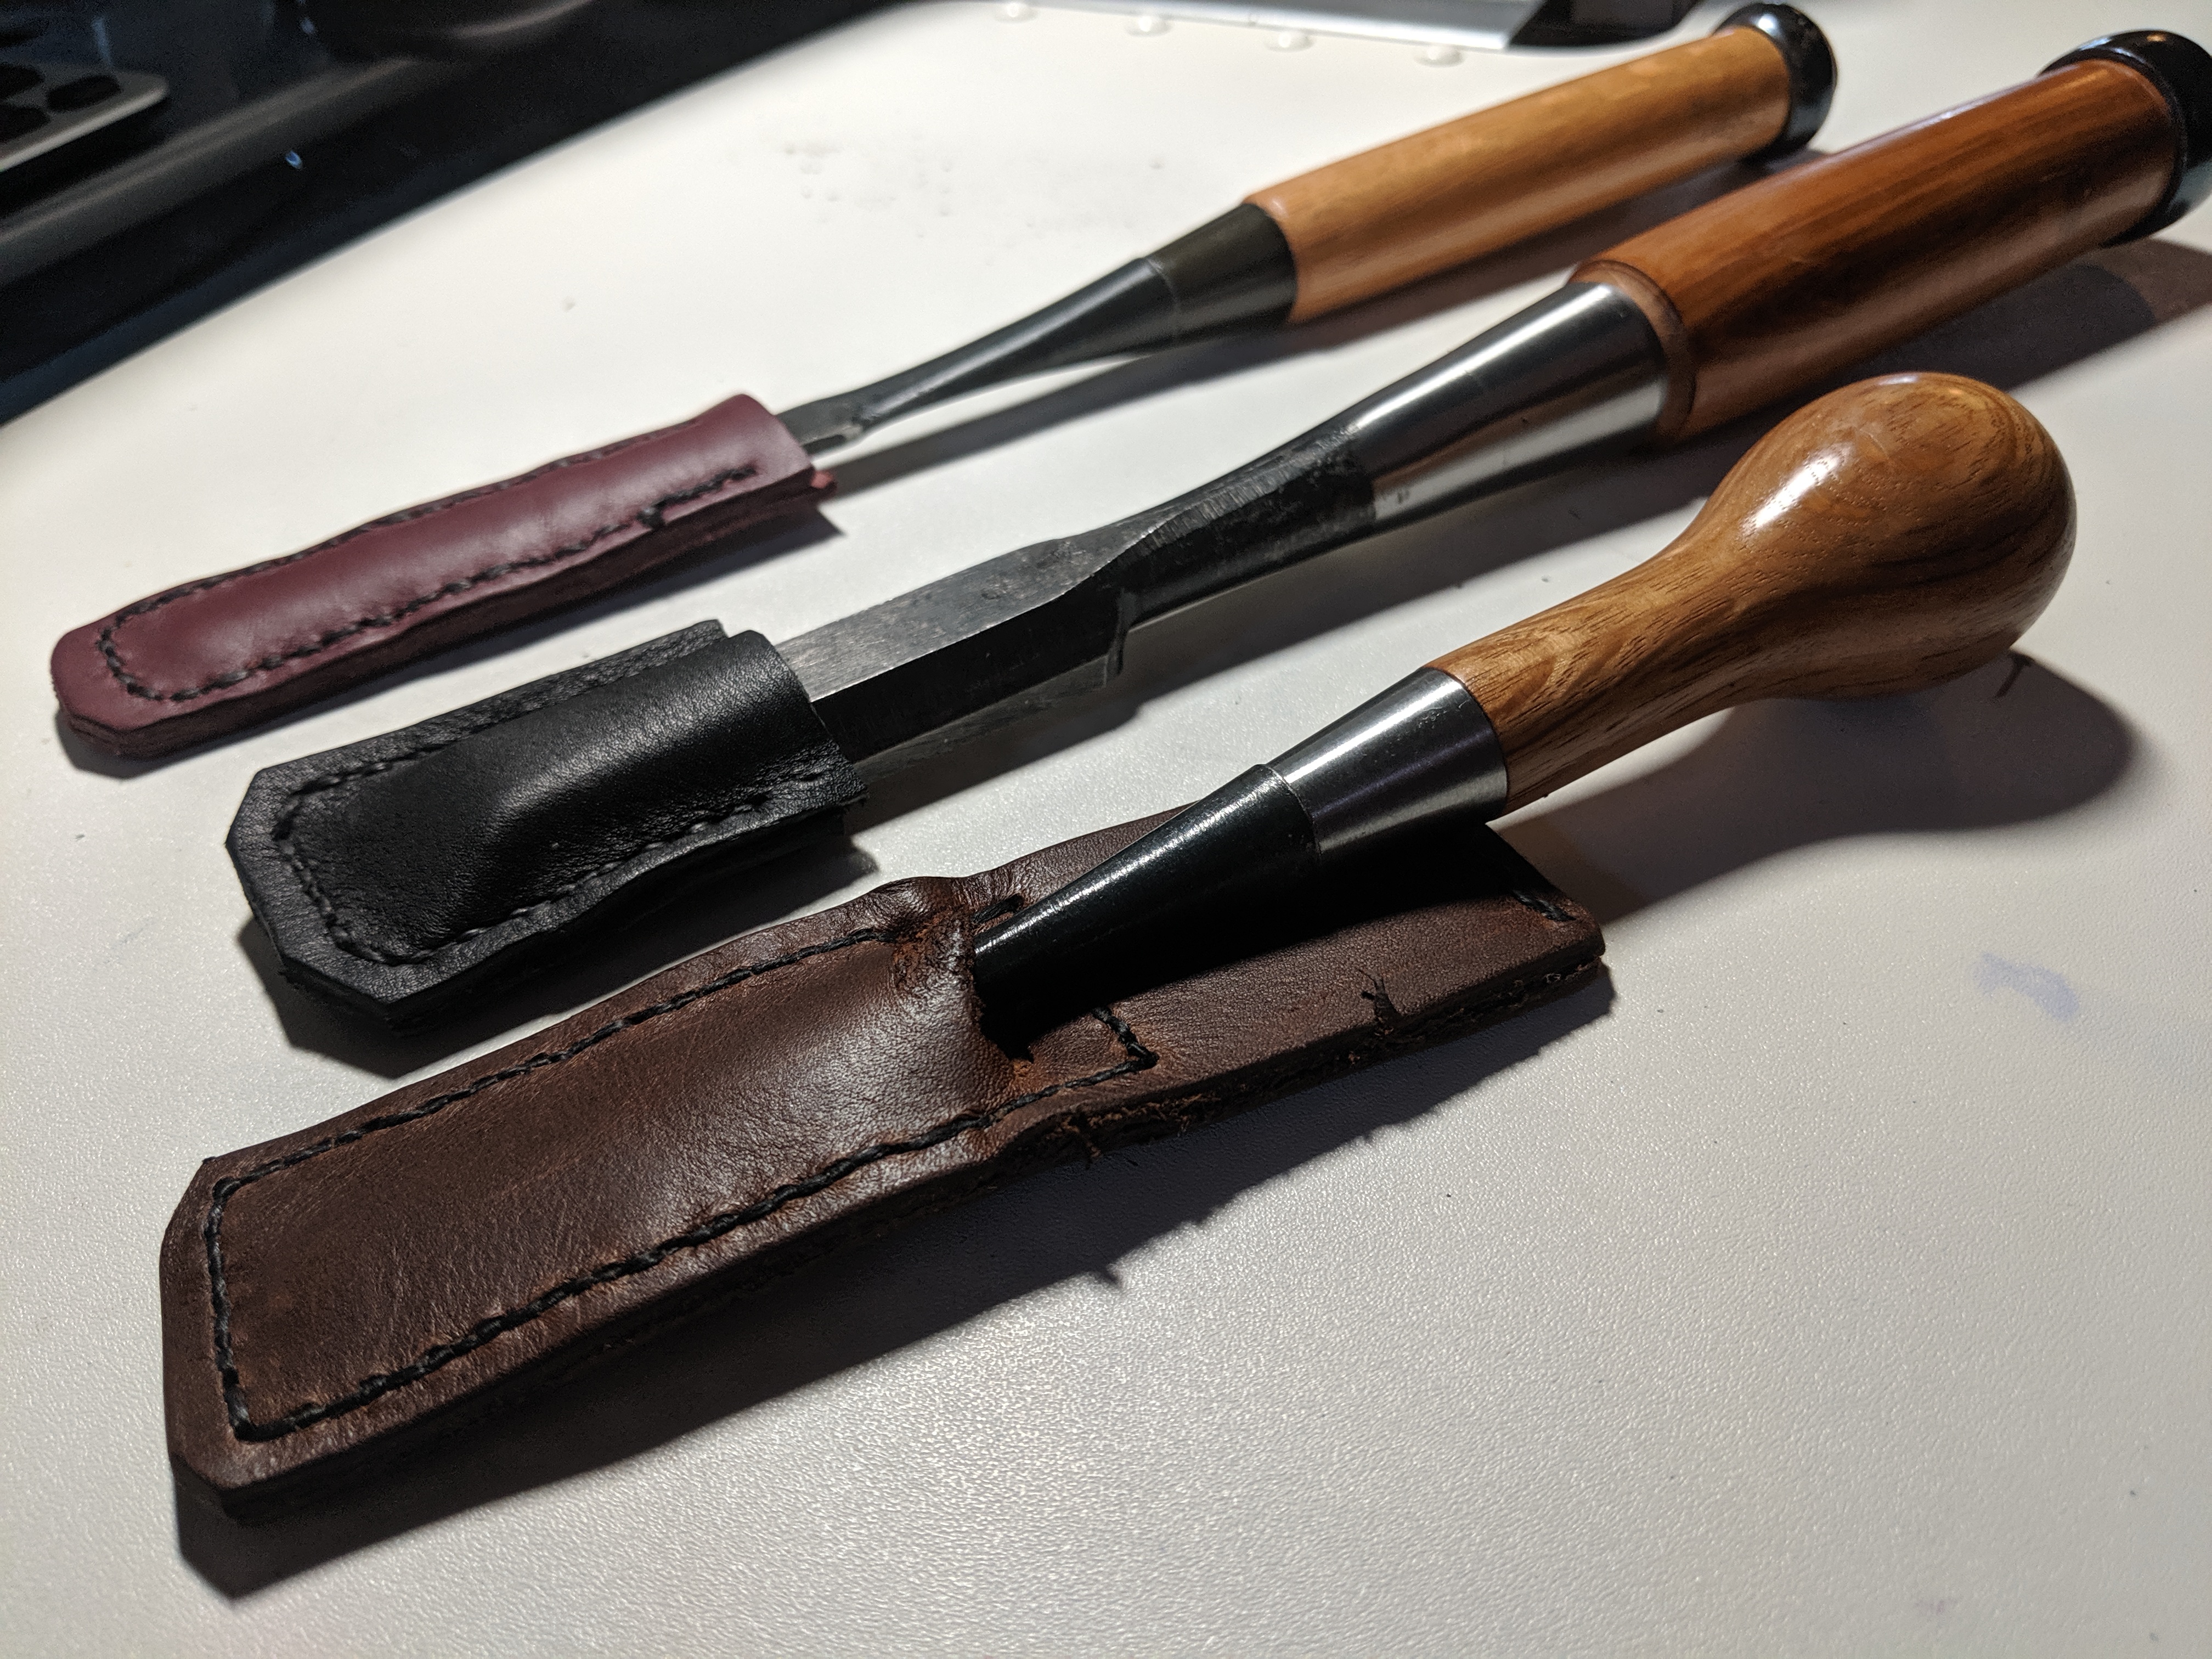
In hand tool woodworking, it's best to have your chisels sharp. Really, really sharp. That sharpness also makes the blade edges rather sensitive to being dented, bent, or otherwise damaged. Many keep their chisels in a box or on a rack to keep the edges safe, but the toolbox had no such facility. An alternative is simply to create some guards to apply to the chisel's ends to protect them. These can be made out of a lot of different things, including wood, plastic, silicone, but leather is also very commonly used.

I didn't want to spend a lot of money for a leather working kit to make the chisel guards. I already had a switching awl I used to affix patches to my jacket, so I build a minimal kit around it. In the end, a stitching awl, a block of wood, a tapered awl, scissors, and calipers were all that was needed.
Making each guard was pretty easy. Lay the chisel down on the material. Allow for comfortable excess to allow for fitting. Cut two pieces to the exact same size. Once the pieces were cut, I used the caliper to scribe a line a comfortable amount of distance from the end. Then, I used a ruler and the tapered awl to puncture both pieces. The result wasn't as perfect as with a more dedicated kit, but it worked well enough. Instead of using fresh material for the guards, I rummaged through a pile of scraps from a local discount and lost freight place. Most of the pieces where intended for wallets and purses, but plenty thick enough to protect a chisel's edge.
In the end, I made several, one for each of my chisels, so they would all be protected when I toss them into the toolbox.

Once I was done with that, the toolbox was dry and it was time to go back and finish it. And that's when I noticed a problem.
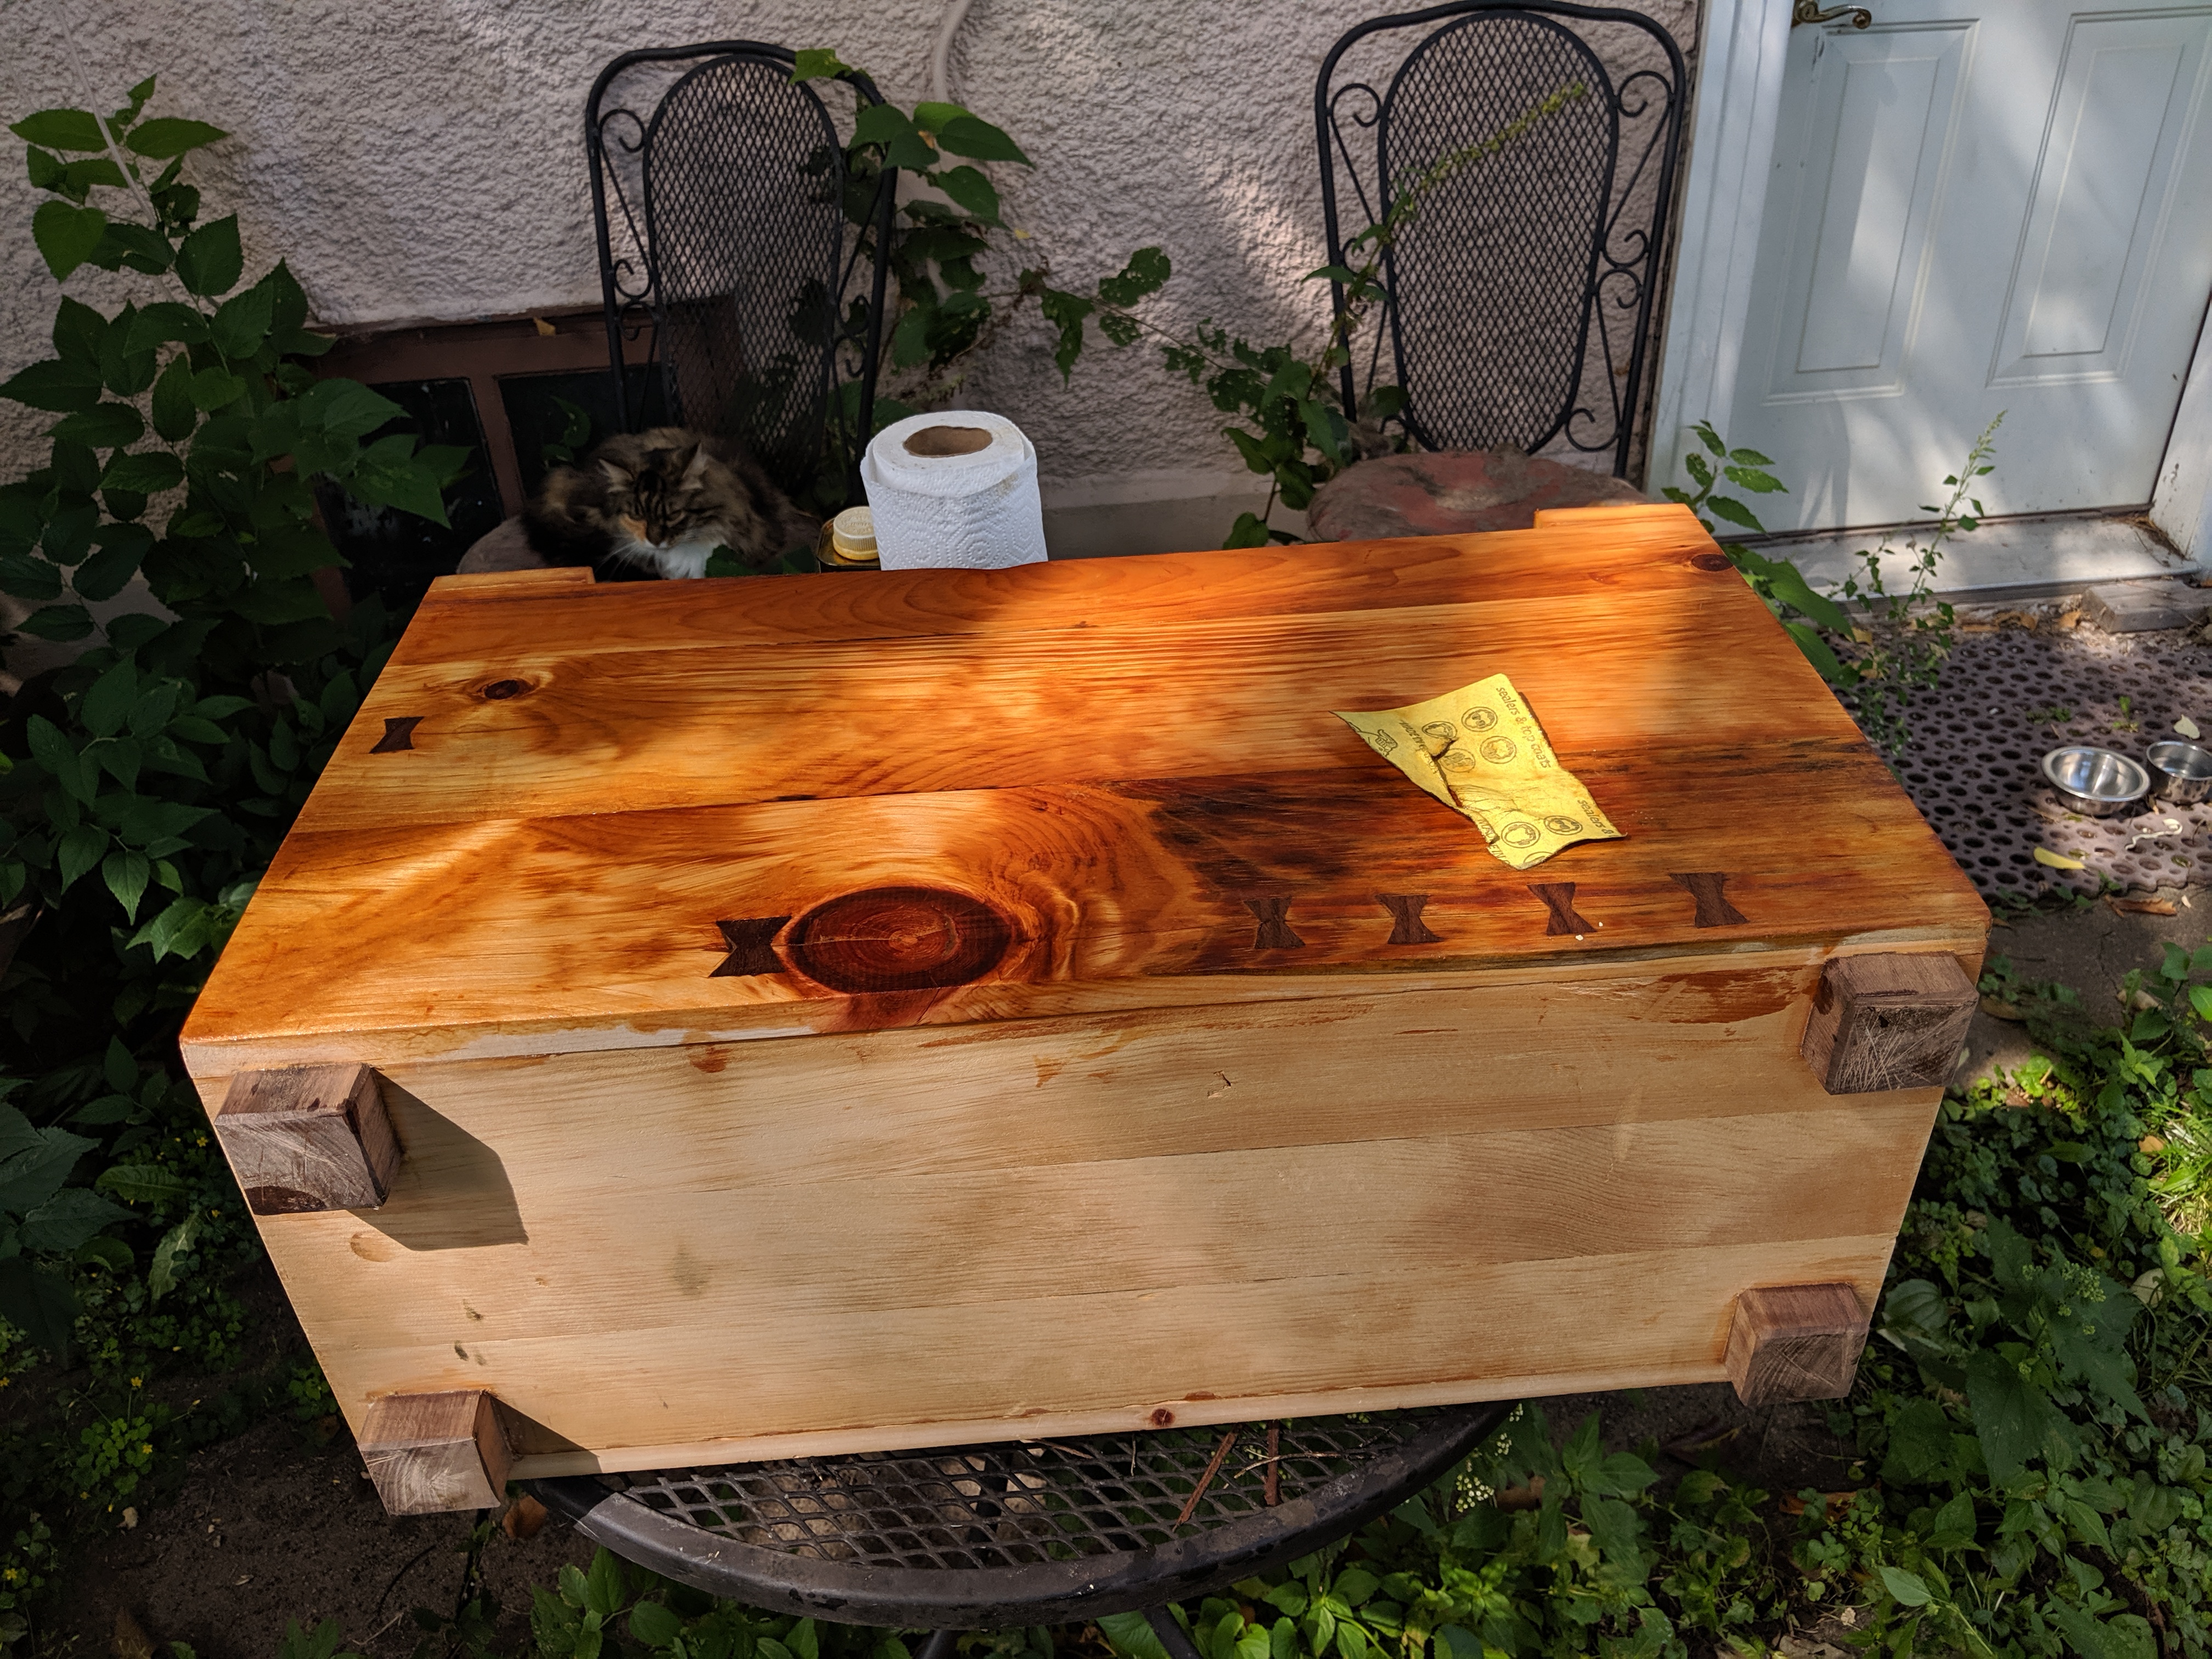
I had chosen a piece with a large knot for the front panel as I liked the look, and wanted to highlight it in the box. Unfortunately, that large knot also means that the front panel of the toolbox was littered with cracks. While the box would likely last years and years before I need to deal with them, I decided I really should try to put in a butterfly key or spline in order to prevent the cracks from getting worse. These are also called "bowties" or "Dutchmens", all are valid names.
How they work is they have grain which runs perpendicular to the piece with the crack. The key also flairs outward on the ends to create the bowtie or butterfly shape. Functionally, these flairs form two connected wedges that become tighter as the underlying piece tries to crack and spread further apart. You can make the keys out of anything, although it's popular to use a contrasting hardwood for appearance. I had some walnut scrap available to me from the winding stick project, so I used that.
While I had never made much less set a butterfly key, I found the process fairly straightforward:
- Using a chisel or saw, create the key.
- Using a finger, double-stick tape, or a clamp, place the key across a crack.
- Trace the outline of the key on the piece to which it will be inlaid (the "receiver").
- Using a chisel, start chopping down into the receiver. Do NOT chop directly on the traced line, but inwards a millimeter, this will help ensure a tight fit later.
- After chopping down, pare out the wood to remove on the receiver.
- Continue until the necessary depth is reached and the key fits snugly.
- Apply glue, hammer it in.


It's okay if the key doesn't go all the way down! That's actually what we want! Once the glue is dry, you can use a plane or a trim saw to make the key flush with the receiver. I added several more keys to counter a large crack on the opposing side, and one more higher up on the main panel.
I also decided to add feet to the toolbox. While this isn't a typical feature of the pattern, I felt it necessary due to climate. garages and basements can sometimes flood, and a little height can go a long way to saving the tools in that case.

I had moved the toolbox upstairs and was working on it there at this point. Usually, I would be working in the basement, but my housemate just had a tooth pulled and I wanted to be nearby just in case. Since I was upstairs, so was my cat, which promptly decided to explore the new box.

The lid didn't require a lot of extra work. I decided to use some walnut to act as bolsters to keep the lid from falling completely into the box. They had a curly grain pattern which I knew would make an excellent final effect.
There are two bolsters to support the lid. One is cut with a deep chamfer to form a French Cleat. This allows the lid to be balanced on the edge of the toolbox to form a kind of tool wall. The other bolster was cut into two pieces to form a wedge-like key. Instead of any complex joinery, I simply glued the bolsters on.
I ended up having to repeat this step after I discovered I erred in my positioning of the locking bolster. I sawed it off and re-applied it, although I'm still unsure how it's supposed to work. I suspect French Cleat bolster was too far away from the runner on the toolbox, allowing the lid to be moved sufficiently to be opened even with the wedge in place. Oh well, it still looks nice.

Finally, it was time to apply finish. Last summer's experimentation landed me on a combination of either Danish Oil or Boiled Lineed Oil, with some kind of paste wax as a final coat. I didn't give much thought to how the toolbox would look once the oil went on, but I was shocked as to what happened.
While I had sanded the toolbox using 60 and 120 grit using an orbital sander, I typically also wet sand the piece up to 600 while applying oil. With the exception of the handles, I didn't aggressively sand the piece until only new wood shown. I left on some of the character, since I saw no reason to take it off.
All of that character went into sharp relief as soon as the oil touched the surface. It was then I realized that this wasn't just reclaimed material, but it was nailed to someone's wall as decoration since the 50s or 60s. This was possibly 70 year old material I was working with. I wet sanded the toolbox with the oil up to a smooth 600 grit.
Then, I let that dry for a week. Before applying paste wax. The result was amazing:
So the box was finished, right? Well yes, but I wanted to try one more thing.
It's fairly common practice to add a logo or maker's mark to a project once it's complete. Some use a wood burning tool for this, others have little metal medallions made. I didn't have either, but what I did have was....buttons.
Some years ago, I bought 50 1" diameter buttons -- the kind you pin to your clothing -- with my logo on them. They were on sale by a reputable distributor, and I had ordered stickers from them previously. Since I had them, I decided, why not use those as the maker's mark? Using a matching forstner drill bit, I created a place in which to seat the button in the upper right corner of the box front. I filled the bottom with 5 minute epoxy, and placed the button on top. The pin and retaining clip on the back of the button would become embedded in the epoxy, ensuring a tight bond.
Yes, it's kinda silly, but I never marked any of my other creations before.

This series may have only come to three parts, but I've been working on this toolbox since May of this year. I've spent, virtually, the entire summer creating it. It's turned out amazingly well, and I hope to use it for a long, long time. Now that my tools actually have a home, they no longer need to occupy every horizontal surface on my basement workshop. I can keep them in a nice, compact place and carry them with me if I want to work elsewhere.
With winter approaching, I suspect I won't be attempting another large project like this for a while. That may change if an idea or need arises, but I suspect I will return to smaller woodworking projects in the interim.
This post was created with the support of my wonderful supporters on Patreon.
If you like this post, consider becoming a supporter at:
Thank you!!!


