
Toolbox build #1: Decisions, Decisions, Decisions
Eventually, in woodworking you amass enough tools that you really shouldn't have them laying all over your shop -- or basement in my case. When a power-tool woodworker reaches this point, they typically start thinking shop layout, building cabinets and stands, and generally building an entire room to facilitate the hobby. This makes sense since each piece of equipment needs clearance, power, venting, and even dust collection conduit.
Fortunately, you tend to work with a smaller set of tools when doing hand tool woodworking. Furthermore, I prefer working with a minimal set of tools to minimize the space required for storage and to maximize portability. Instead of laying out a room, I needed to lay out an entirely smaller space; a toolbox.
If time were of the essence, it would be a simple matter for me to go to my nearby hardware store and buy something suitable. A 5 gallon bucket with an apron of pockets is a cheap and effective "toolbox". I also already have two. I could also save up for one of those enormous steel monstrosities that are a fixture of American garages. Either would work, but....it's not what I wanted.
Then, probably a year ago someone donated to me a bunch of reclaimed white pine. They were doing some remodeling and decided to pull the material off of their walls. But, before chucking it, they asked if I wanted any, and I took almost the entire lot. Pine is by no means a "prestige material" in woodworking. The mental prototype is the ubiquitous 2x4. A great thing to use when framing a house, their twists and knots and imperfections are quickly hidden by drywall. Fortunately, this stuff was used as a decorative material, and is generally a little "clearer" than a 2x4.
Besides, why buy, when you can build? Building something is how I like to learn. With amble material and sufficient tools already in my possession, the only additional expense is time. I've been using woodworking as a means to take some time off from ever-present laptop and phone screens, so even time wasn't a true expense.
Most of my tools are traditional Japanese woodworking tools. While I started out buying (and restoring) some old Western tools I quickly developed an interest in Japanese tools instead. While aesthetics certainly did play a role, the big pivot point was actually an injury.
Shortly after setting up a 100 year old Stanley #5 plane as a scrub plane, I decided to give it a try on a piece of badly twisted board. The plane worked astonishingly well despite only being partially refinished, but the heaviness of the plane combined with the push stroke aggravated my right elbow. It was an injury that took over a month before the pain subsided, and far longer before the injury itself could have been considered healed. During that period, I spent a lot of time researching the mechanics of hand planes and found that I likely overstressed my tricep. It's a muscle I know from experience to be one of my weaker ones, and more prone to injury compared to my bicep.
During my research, I came across Japanese planes (kanna). Like my favorite ryoba saw, it too cuts on the pull stroke using the bicep. I eventually bought a small kanna online and quickly found it much more natural for me to use. My elbow thanked me for the change. I did more research into Japanese woodworking and found myself hooked. A year later, it's time to build them a home; so why not stick to theme?
You can readily find photos and plans for Japanese toolboxes online. Toshio Odate's book, Japanese Woodworking Tools: Their Tradition, Spirit and Use, even includes a plan that is simple and effective. That simpleness was the big part of the attraction; you only need a saw, hammer, plane, and square to build one. I knew I was likely going to depart from that formula, and already uncomfortably close to appropriation, I prefer not to think of this as anything other than a design inspired by Japanese toolboxes.


The problem was, I didn't have any boards big enough to build the box. Nearly all the plans I found assumed you will build the box out of a single, wide board some 25-30cm in width. This size determines the depth and height of the box. Most of the pieces I had on the other hand were some 7 or 8cm in width. The solution was to glue together the smaller pieces into larger panels. Then build the toolbox out of the panels.
I had never done this before. After some research, I settled on the following process:
- Two pieces to join are clamped together face-to-face.
- The edge to join is planed flush, so the two edges can be butted together minimizing gaps.
- The pieces are unclamped.
- A tongue is cut into one of the edges using a Stanley #50 I bought from a coworker.
- A groove is cut into the other edge using a second #50.
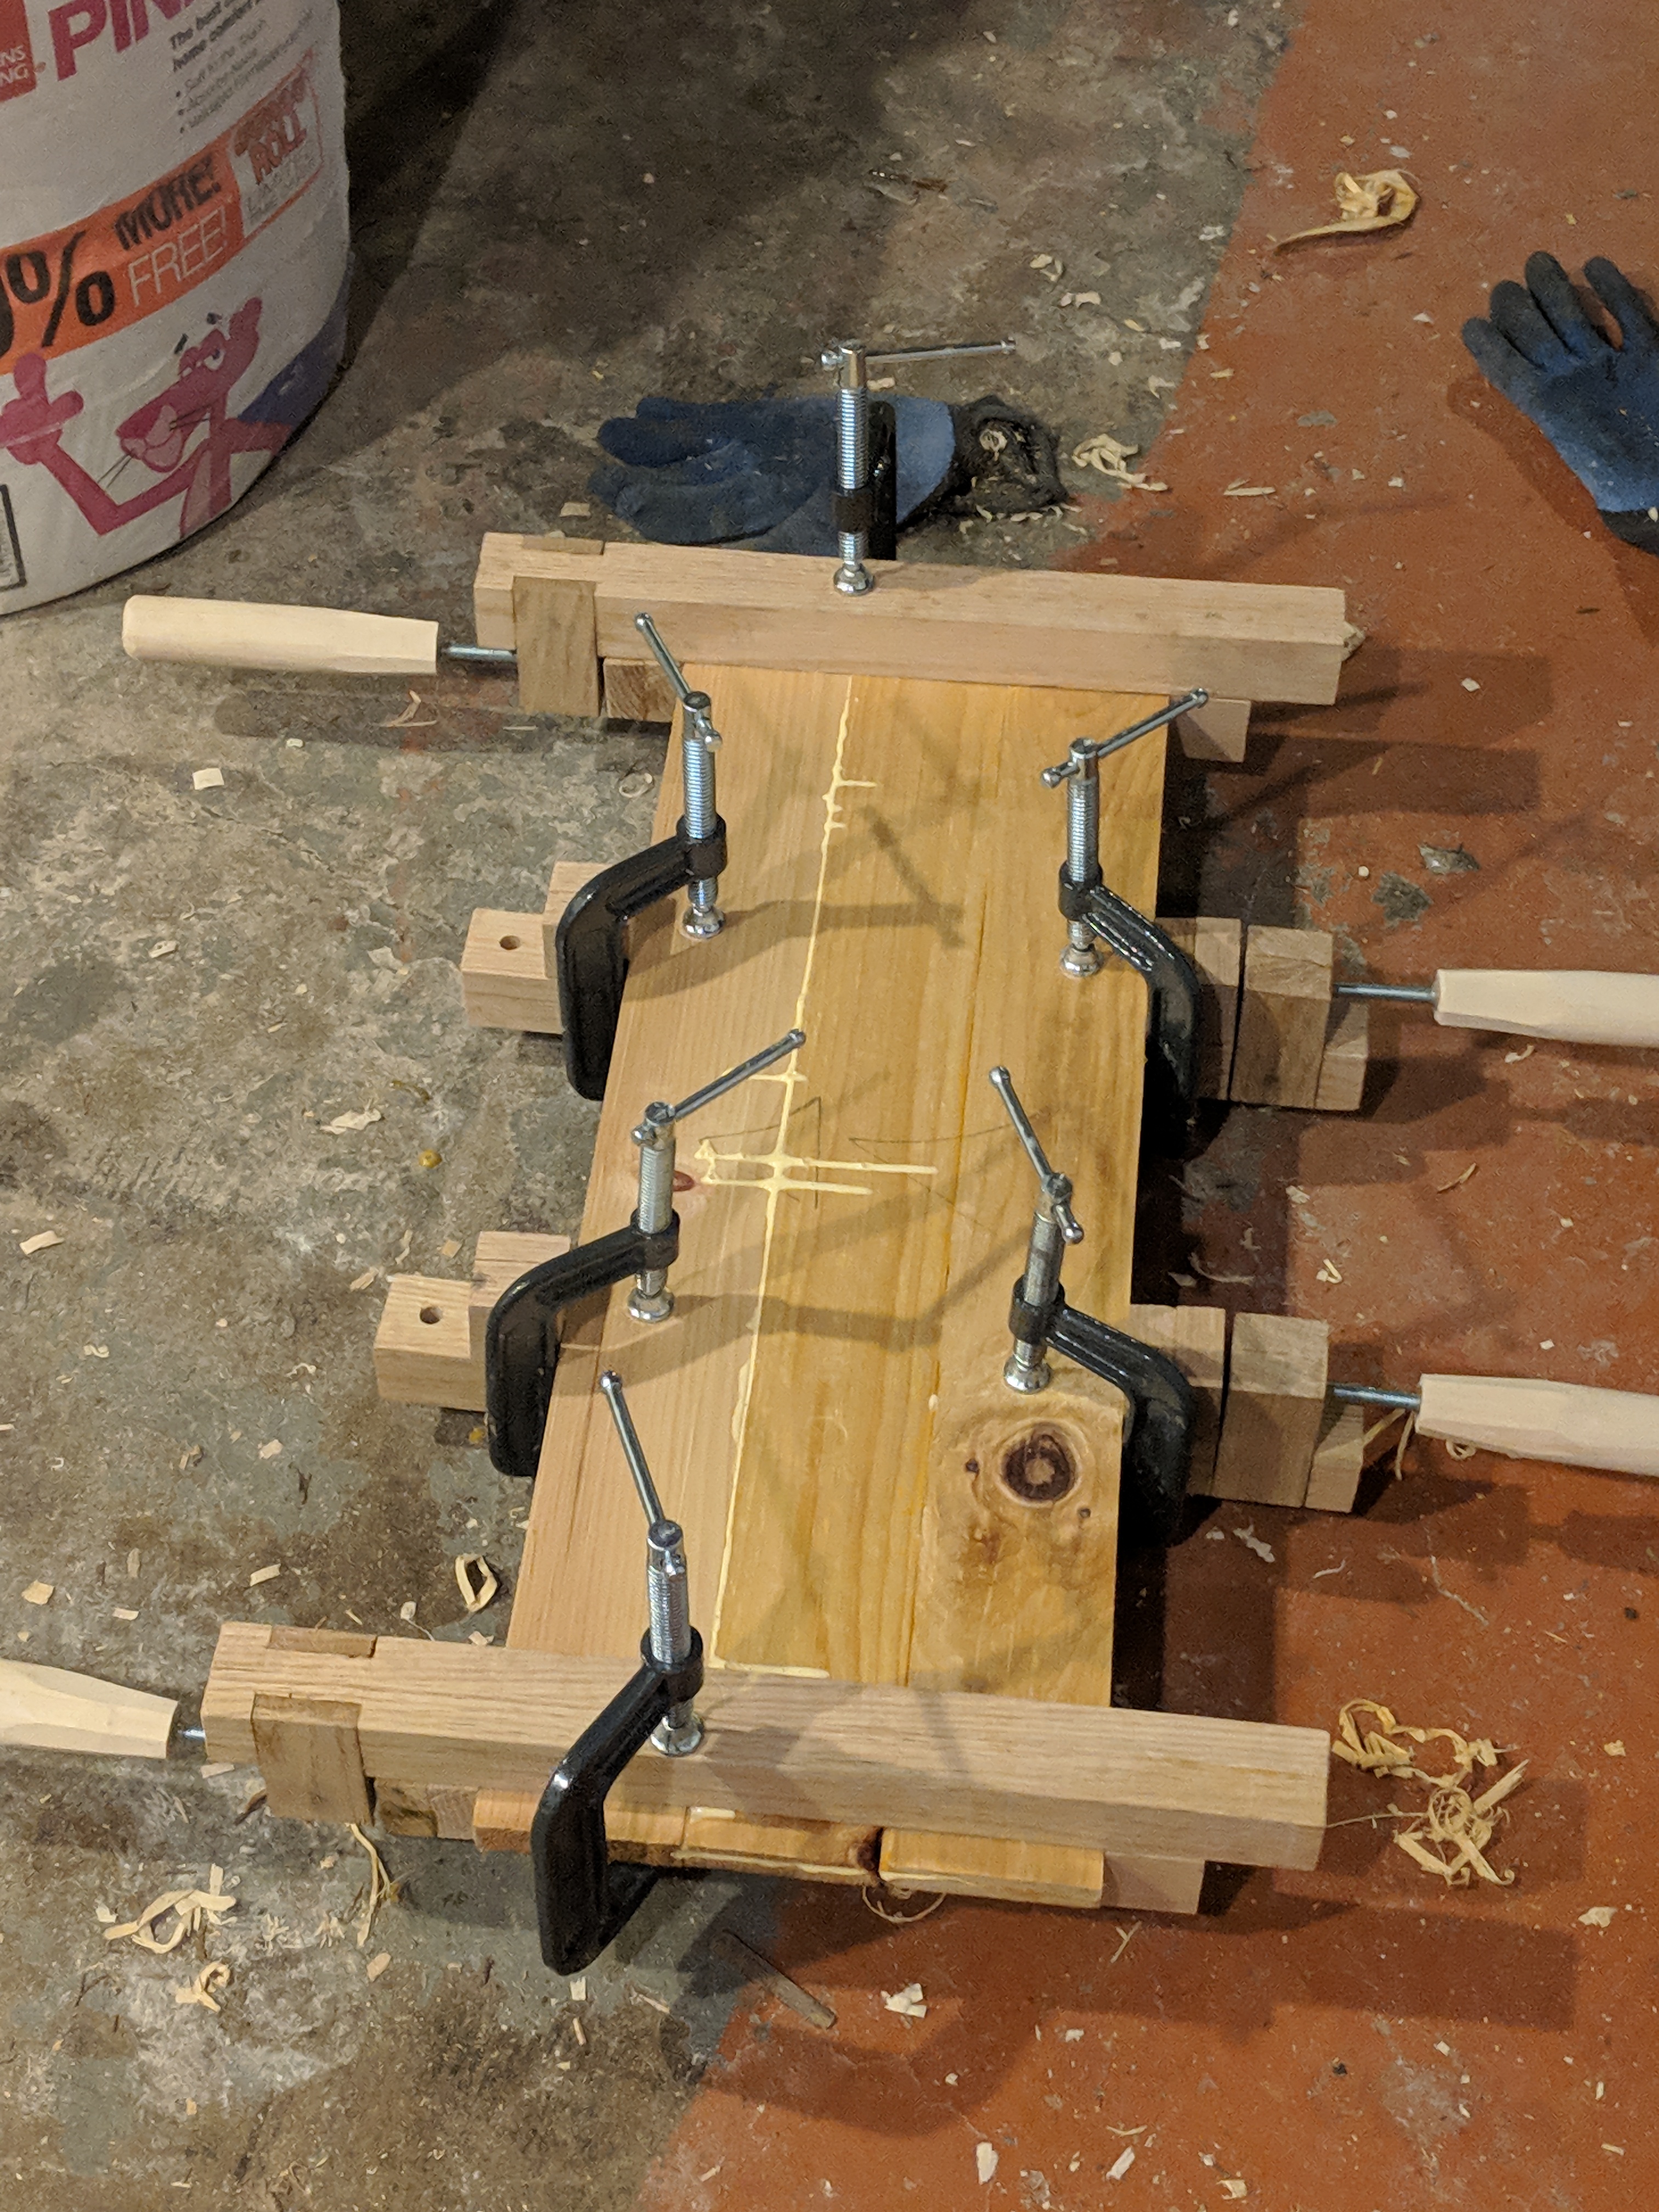
Some months prior, I had built some DIY bar clamps in preparation for this project. Now it was time to try them out. Once the two edges are submerged in glue, I used the bar clamps to squeeze the pieces together. By alternating which side the clamp was on, it minimized bowing the two pieces while the glue dries.
This worked pretty well for the lid, the ends, and the bottom, but the sides were going to be a problem. For various reasons, I wanted a taller toolbox than the traditional design. My DIY clamps, however, weren't long enough. That's when I remembered the project center upon which I was building everything was also a big clamp.
The problem with the project center, however, is that it has a tendency to bow out pieces when edge-gluing. I could clamp the sides using C-clamps, but the middle was another challenge...
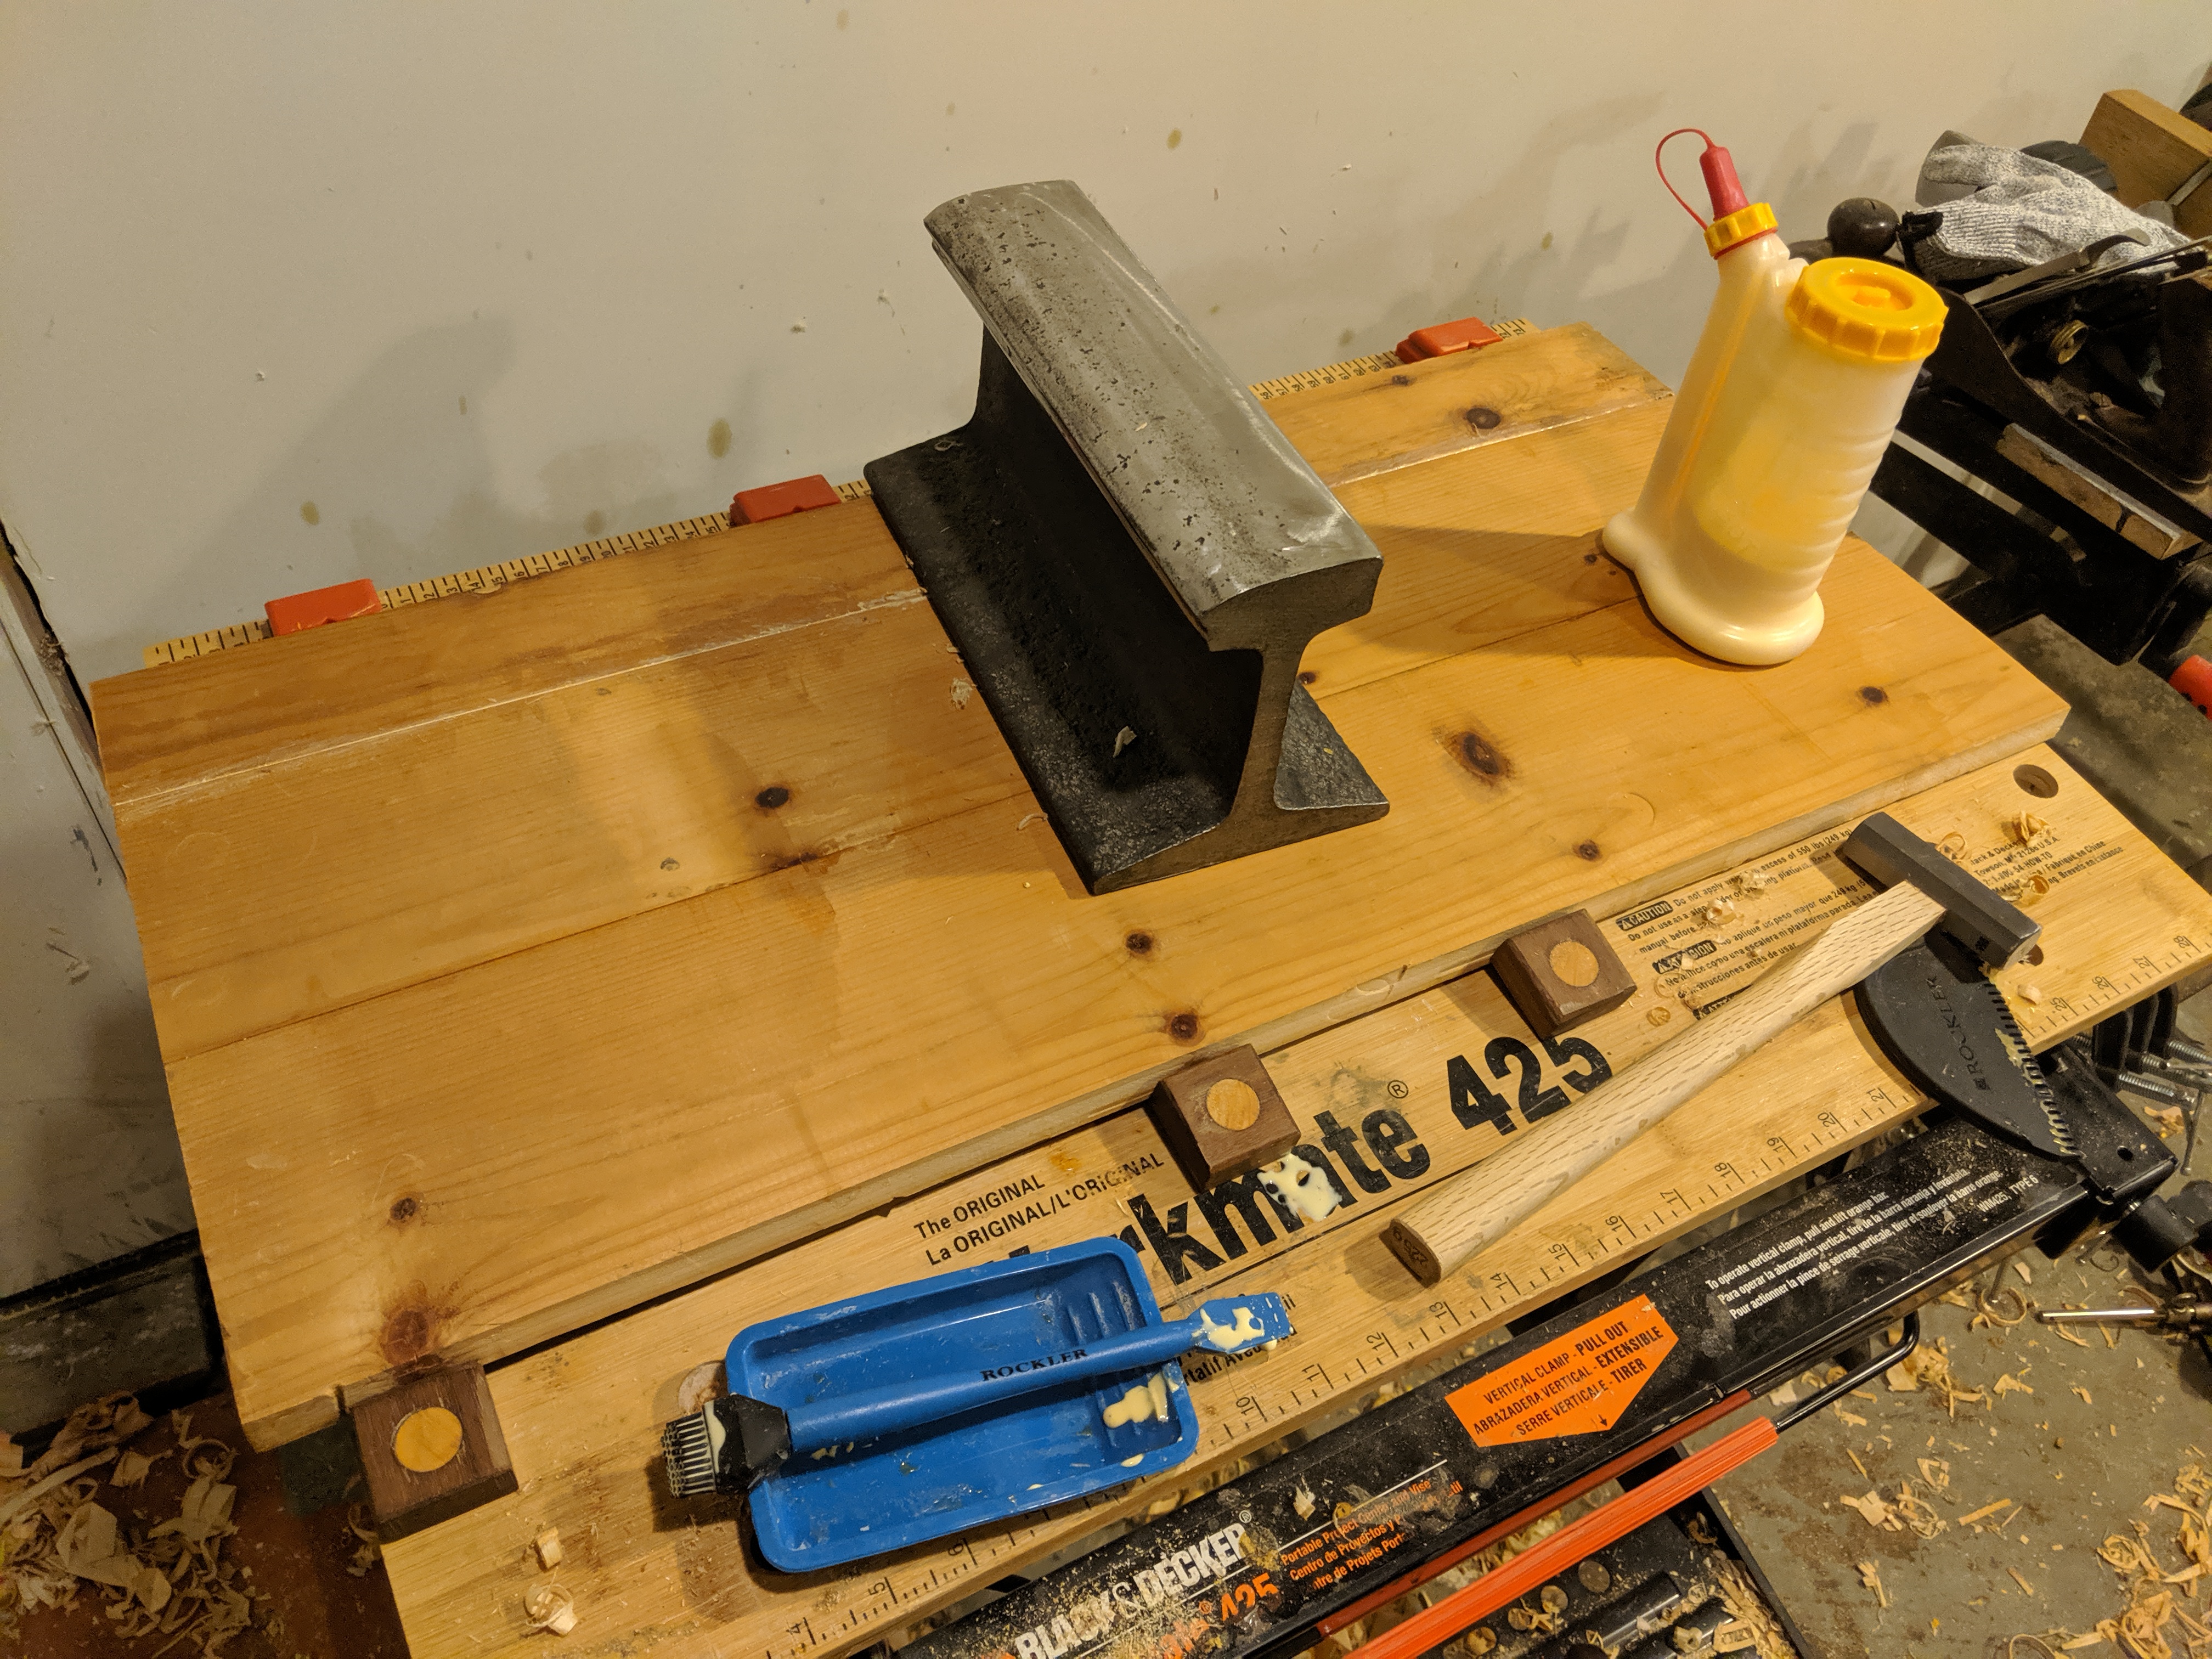
...until I looked on the floor, that is. I had bought a piece of railway track to act as an anvil when tuning the kanna blades. Later, I learned this could also be done more easily using the corner of a block of wood. The track also doesn't quite have enough mass to work for blacksmithing, but it was a perfect gravity clamp for this project. Thunk! Problem solved.
With all the panels done, I spent several hours truing and squaring each. This required a lot of tedious measuring, marking, and planing. A key focus was the end panels. These pieces had to have 90 degree corners and parallel sides -- or square, despite it being more a rectangle shape -- otherwise the box itself would be crooked.

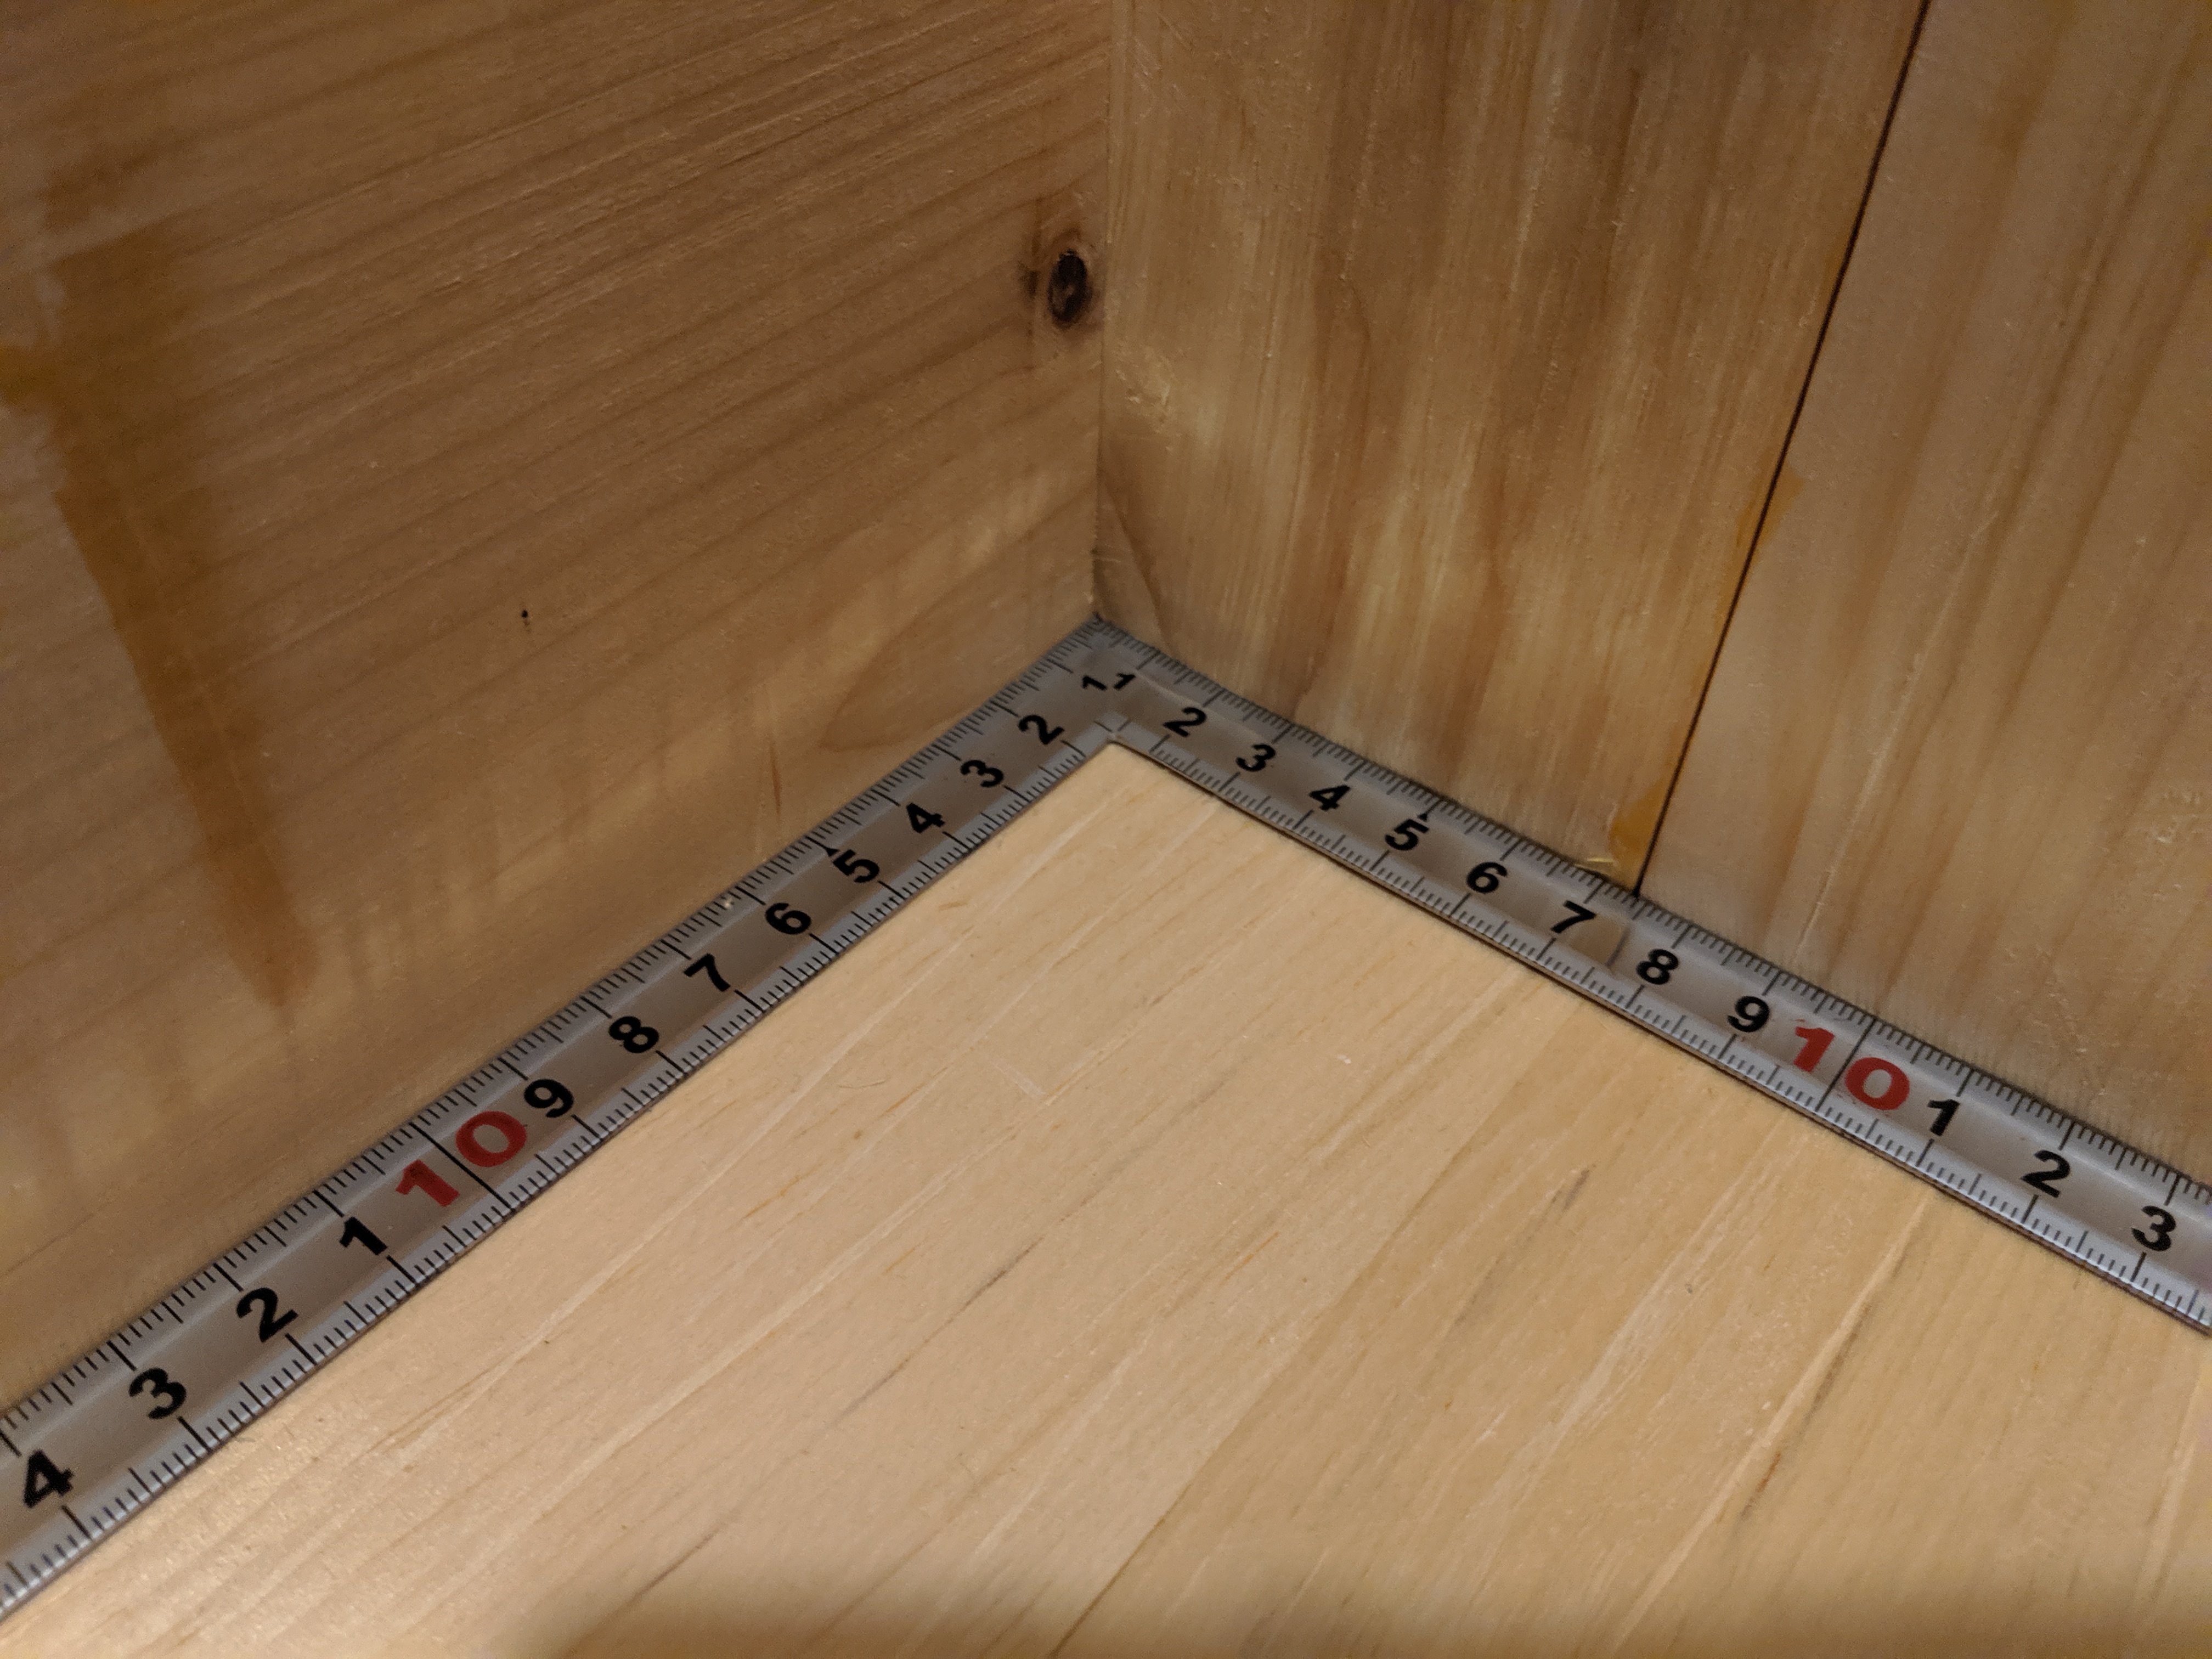
I decided to clamp the pieces of the box together to form one corner of the box as a test. This was done as a dry-fit, or without glue or fasteners, to test how the pieces work together. Surprisingly, all the work squaring the pieces paid off, and the corner was surprisingly square. I could finally start thinking about assembly.
This was the start of a fractal of decisions that needed to be made about this project.
Traditionally, most Japanese-pattern toolboxes are put together with nails. It's meant as a reliable workhorse, and not a fancy conversation piece. I could do that for my own toolbox, but this project is also an opportunity to learn. So some fancy joinery it is!
Minimally fancy joinery!


I decided to cut some shallow dadoes -- channels -- in the bottom and side panels in which the end panels would fit. This really doesn't add any strength to the box, but it does provide a registration point for the end panel during final assembly. The end panel is inset from the furthest edge of the box on purpose. Later, a handle can be glued to the face of the end panels so that the box is easier to carry around.
In order to decide where to cut that dado, I had to decide how big the handles would be. Somewhere around 3cm was comfortable for my hands, so I inset the end panel by that amount.


Until this point, I had been putting off a few decisions, and now they were all coming for me in a rush. How long should the box be? Should the interior be a-place-for-everything, or a free-form open space?
My original thought was to have a single drawer for saws as I wanted to keep them protected from damage while in the box. This drawer would exit through one of the end panels, so as not to overly compromise the design the box. I've seen a few built this way online, but I quickly found the amount of space the drawer would require an obstacle. I had thought to store the saws vertically in the drawer, yet this added considerable height to the box. Later, I decided to take advantage of the underside of the box lid to store the saw using a magnet stripe. I kept the taller box idea anyways as an aestheic choice.
I really liked the saw-storage-on-lid idea at first, and actually built the lid of the box and the magnet stripe even before any of the other panels. This idea, however, required the box be very long. 77cm long, in fact. I could still carry a toolbox that long with both hands, but it would be cumbersome.


As much as I liked the idea of using the toolbox lid for storage, I disliked the 77cm length more. I set the lid aside and tried to sort out what to do with inside space of the box. If saw storage was going to be handled elsewhere, why not make a drawer for storing chisels instead?
The idea behind the chisel drawer had appeal. It didn't need to be as high or long as the saw storage. It also created a "tool well" inside the box that could store the rectangular planes while protecting the fine blades. This also led to the box being some 70ish centimeters in length; better, but still cumbersome.
In an attempt to squeeze things down further, I thought of making the shelf the drawer would naturally form in the box a place in which to store the planes. This freed the length constriant even further, until I hit the problem of the saw once more. My longest tool is my ryoba saw, which is some 60cm long. Combined with the inset end-panels, the smallest I could expect the box to be was 66cm. At that length, the saw would either need to be stored diagonally within the box cavity, or disassembled into two pieces.
I still haven't sorted out what the final box would look like. It's easy enough to bat ideas about, but implementing them runs into some serious implications and limitations that cannot be easily ignored. It's becoming clear what I really want is toolbox where everything has a dedicated home, rather than just an open space with all the tools bouncing off of each other. Knowing that, I may have approached this toolbox project differently.
It's also a surprising amount of hand-wringing for something most would just pull off of a store shelf. This isn't likely to be the only toolbox I will ever build. I've even had the idea of ditching the idea of drawers entirely, opting instead for building trays that must be pulled out from the top of the box rather than the side.
I would like to say that the lesson here is to finalize your design first, but that too proved impossible. Having the pieces in front of me and the tools with which to get the feel of each consequence has been essential.
This post was created with the support of my wonderful supporters on Patreon.
If you like this post, consider becoming a supporter at:
Thank you!!!


