
Handheld Raspberry Pi, part 1: If at first you don't succeed
One thing I've discovered in the last few years is the value of "learning projects". The goal isn't the thing you're building, necessarily, but what you learn from the problems encountered while trying to build the project. When working with programming, writing, or digital artwork, it's pretty easy to create a learning project as the important resource involved is time.
Electronics, however, requires consumable materials. As such, the cost of learning projects is significantly higher. For most of my life, this stymied my ability to learn more about electronics by doing. Most of what I know of it is from a few kits, and lots and lots of reading. With my college loans behind me -- not to mention patrons supporting me -- finances have allowed me a little more budget for experimentation.
One of my projects involves reusing a keyboard on a retrotech device I've modded with a modern touchscreen and a Raspberry Pi. This has been the most complex part of the build, and I've been stuck on how to approach it off and on for years now. Half a year ago, it occurred to me that a possible solution was to use an Arduino alternative called a Teensy as the sole component between the keyboard matrix and USB. The Teensy's key advantage is a large number of I/O pins, necessary to drive the keyboard matrix. This means that sorting out how to drive the keyboard becomes primarily a software problem.
But, I really needed to get some practice in first.
Smartphones are an impressive integration of components that we carry with us every day. They are all portable supercomputers connected wirelessly through a global network. They are also massively patent-encumbered, for-profit wedges for surveillance capitalism. To this day, I cannot install any generic Linux on my phone. Instead, I have to due with whatever the OEM decreed, or mod it with a community supported version of Android that will restrict my ability to run certain apps.
What I wouldn't give for Firefox OS to still be a thing.
If I can't install the OS of my choice on my phone, I thought, Can I build a phone that runs my choice of OS instead? Creating a smartphone out of a single-board-computer (SBC) isn't a new idea. For more pioneering, clever, and experienced people than I have done that before. Still, it sounded fun. And more importantly, it sounded like there could be something I could learn from the attempt.
But what should it look like?
The two trains of thought combined recently when I ran across the Teensy Thumb Keyboard on Hackaday. As you can guess, it's a mini keyboard that relies on a Teensy microcontroller to drive the keyboard matrix and provide a USB interface for use. That sounded like just what I wanted to build for my not-so-super-secret project! I ordered the board from Tindie, as well as an order for the Hyperpixel screen, and the remaining components from Adafruit.
The goal is to make something not unlike a Pocket C.H.I.P., or an overgrown Blackberry phone. A touchscreen, but also a keyboard put together into a handheld form-factor. It would be a fun device to build, and might be useful if and when supporting iOS or Android becomes untenable. Fortunately for me, I already had a spare LiPo battery, power board, and a Raspberry Pi 3.
What I didn't have was a case. The Hackaday page provides links to 3D printer files for one, but I don't own a 3D printer, or any experience with 3D printing. For the moment, I put that concern aside and started working on the pieces.


For whatever reason, I wanted a keyboard with rainbow colored keys. Each key of the Thumb Board is a 6mm tactile switch; plain black keys would have been cheaper, but a lot less fun. The Thumb Board is also not a kit, but only a PCB. While source files are available for it, I don't have the necessary software to open them, so I had to rely on the board layout and photos on the Hackaday page to lay out the parts.
I also decided now was a good time to try lead-free solder. I've used leaded solder since I was little, but it does come with health hazards. After doing some research, I found out that it's better to start over with new tooling when switching to lead-free solder, rather than continuing with your existing iron. In addition to the parts, I also ordered a new soldering kit. I could have gone the extra mile and bought a new Hakko, but I balked at the price. I simply don't do enough electronics to warrant such an expensive tool. Instead, I bought a Atten pencil iron. It still can use Hakko tips, but also has a basic temperature control.
Working with lead-free solder was a learning experience in of itself. Leaded solder melts readily, and is generally considered easier because of it's broader working temperature range. Lead-free solder requires a higher temperature iron, and is best if you have some kind of temperature control to facilitate that. When teaching others to solder, I usually say, "heat the area to solder for two seconds, then add the solder". It can actually be done faster than that with leaded solder, but it's a good rule of thumb for beginners. I found out that this was nearly a requisite for lead-free solder. Sometimes, I had to wait almost three seconds before applying the solder, and I was worried about damaging the components or the PCB. Eventually, though, I got the hang of it and progress was swift.
The Teensy Thumb Board also comes with a source code repository, eliminating all the programming necessary to use the board. You still had to compile and flash it onto the board, however...
My main system uses Arch Linux. Arch isn't...the friendliest of distributions. The last time I tried to program an Arduino with it, I had all sorts of driver and permission problems. I told myself I'd try for about an hour before giving up and pulling out my nearly dead MacBook Air. Surprisingly, getting the programming environment together was a lot easier than it used to be. Someone else who uses Arch must be a Teensy fan, because I found everything I needed in the Arch User Repository (AUR).
While the source code for the Thumb Board is well commented, there were no instructions on how to set up the build environment. I spent most of my time trying to compile it in a Teensy compatible Arduino IDE, before falling back to the makefile included with the repo. After fiddling with the options, I eventually managed to make the driver compile and upload to my assembled Thumb Board.
Astonishingly, it all worked the first time. There were no problems with the soldering or any defective tactile switches. I could plug it into my laptop or a Raspberry Pi and be ready to type. The Thumb Board also includes a mouse emulation mode by holding down the fn key and using the directional pad. This would prove very useful soon...
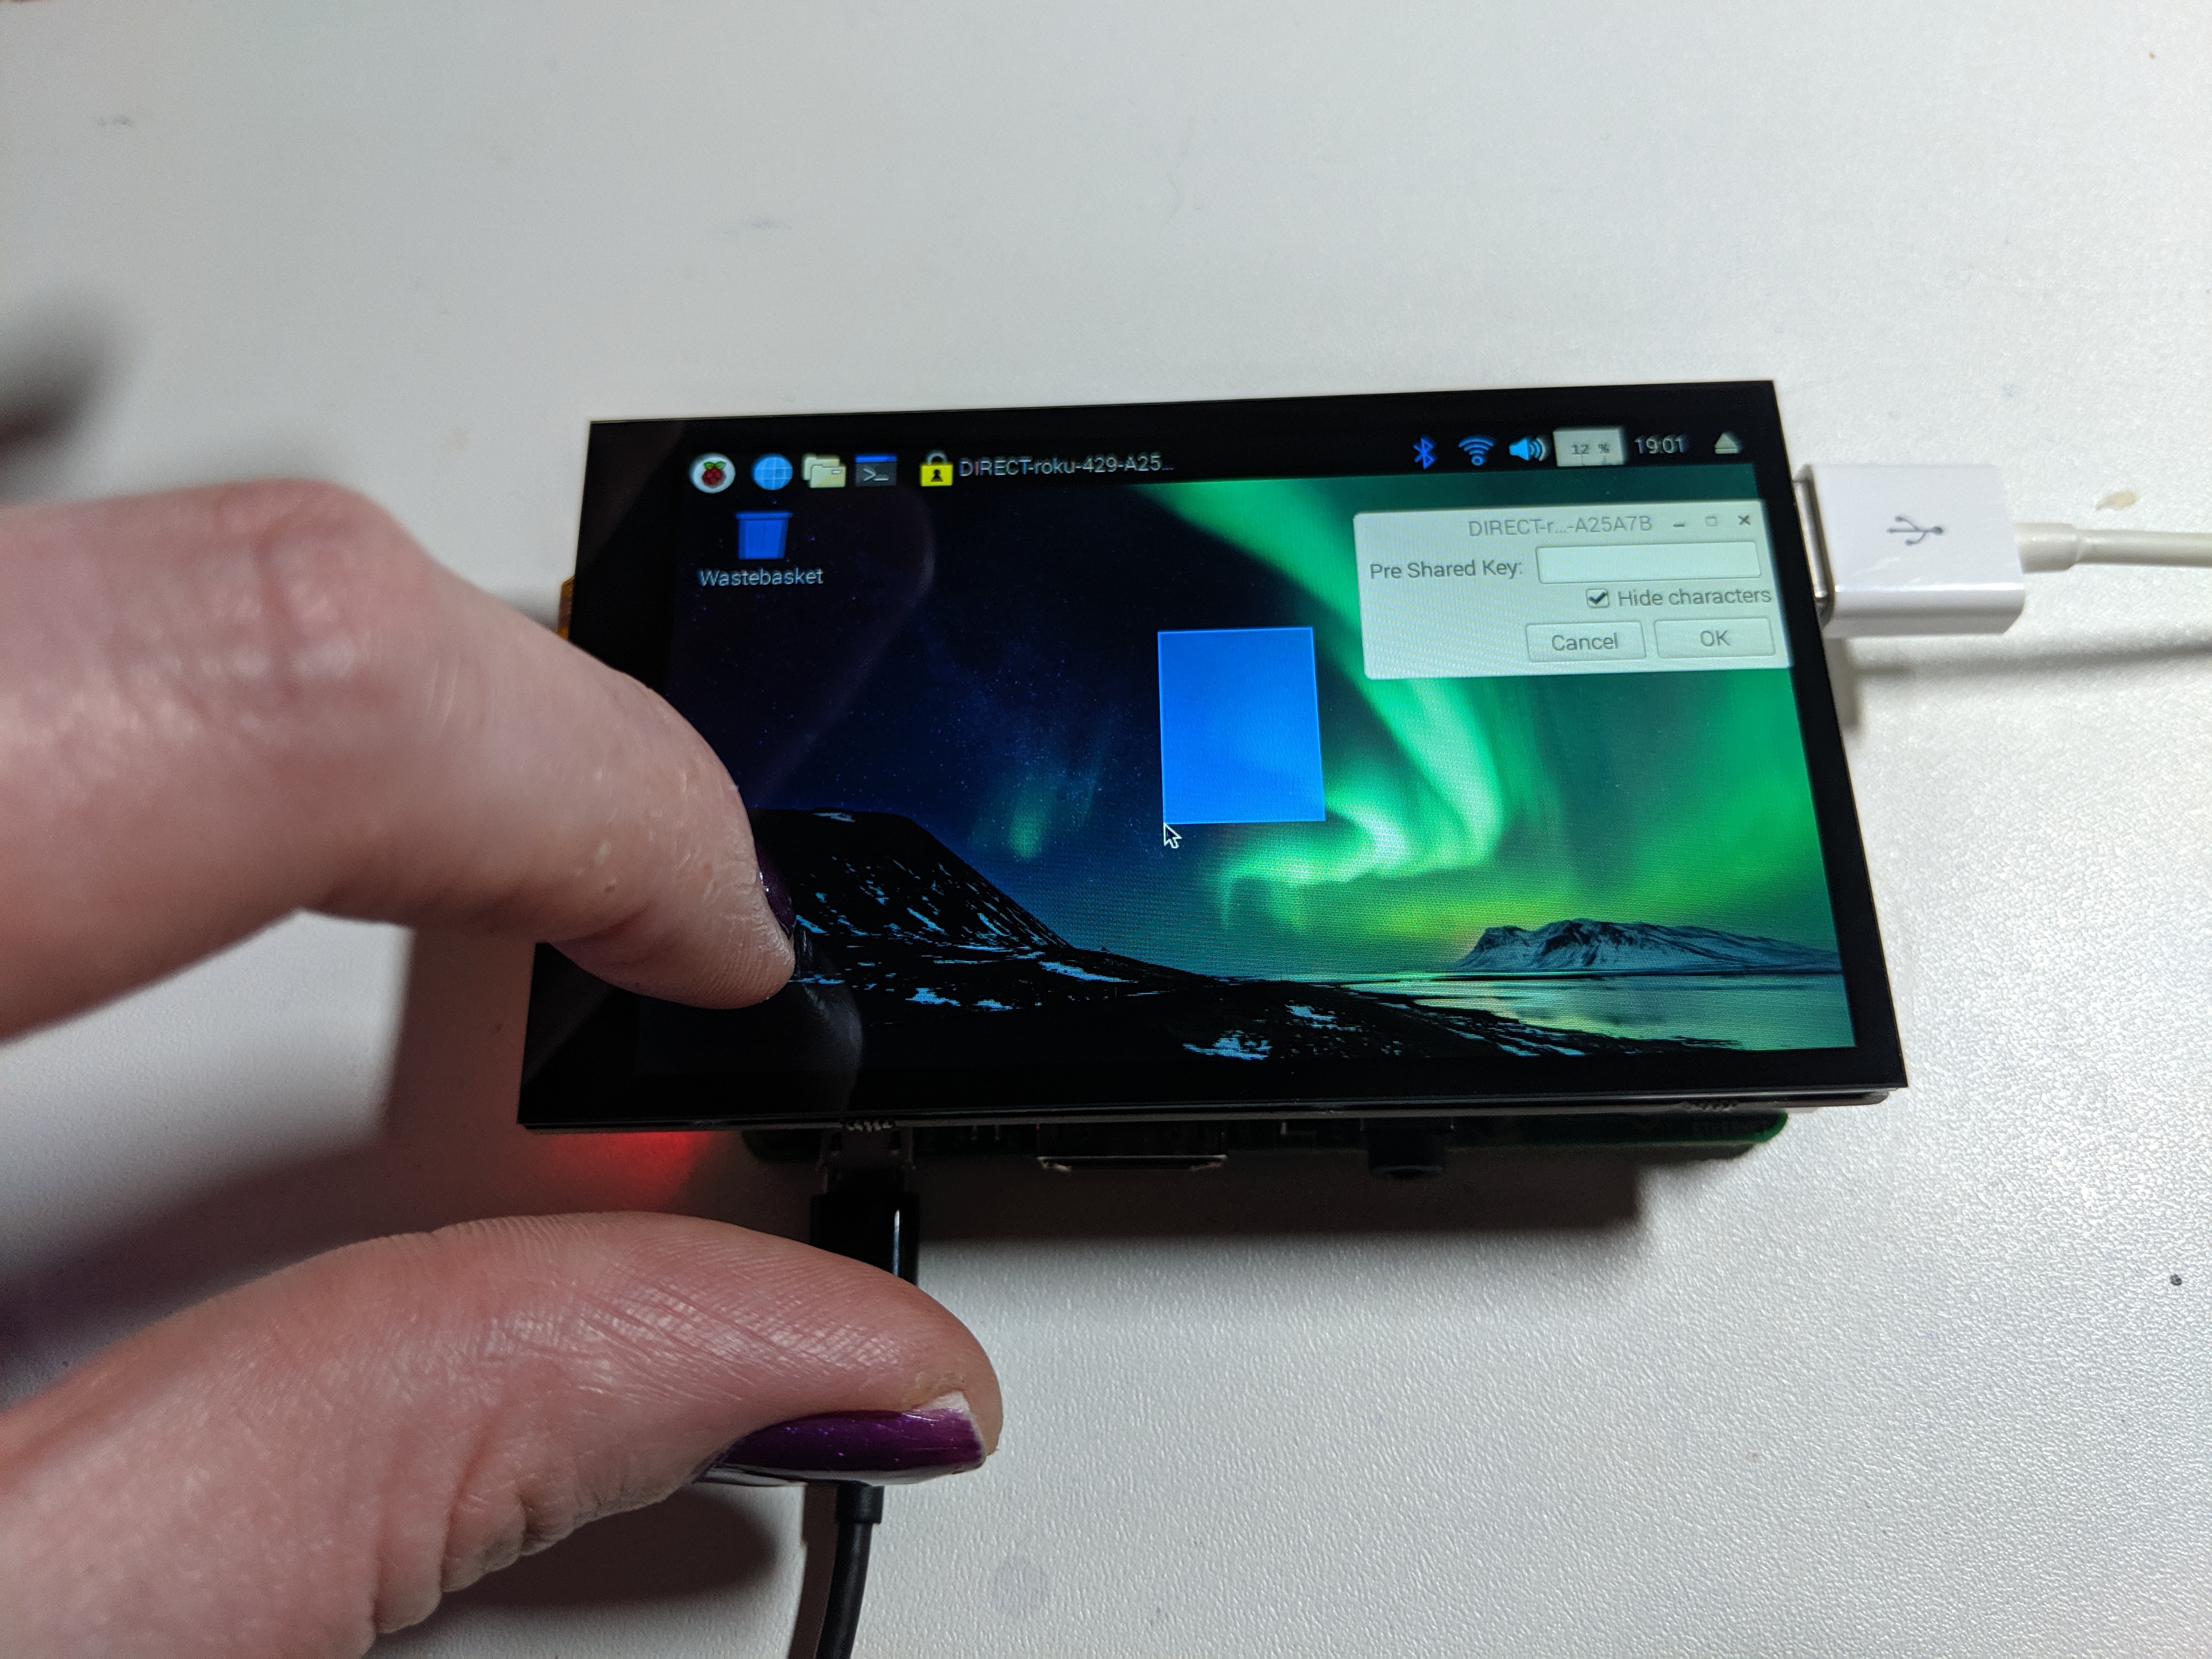
The next thing in the project was to get the Hyperpixel display to work. I had a Raspberry Pi extension board -- a "hat" -- that included a resistive touch screen. It was designed for an earlier model of Pi, and the resolution was abysmal. The Hyperpixel is a high-density display with a capacitive touch screen integrated on it, making it similar to many smartphones.
It seemed fairly straightforward to install the Hyperpixel on the Pi. Even installing the drivers wasn't difficult, as Pimoroni provided an all-in-one script that installed the necessary drivers and did the system configuration.
Seconds after rebooting, I could tell something was wrong. The display was "streaky". There were noisy, vertical lines running up and down the display. Worse, the touchscreen was completely non-responsive.
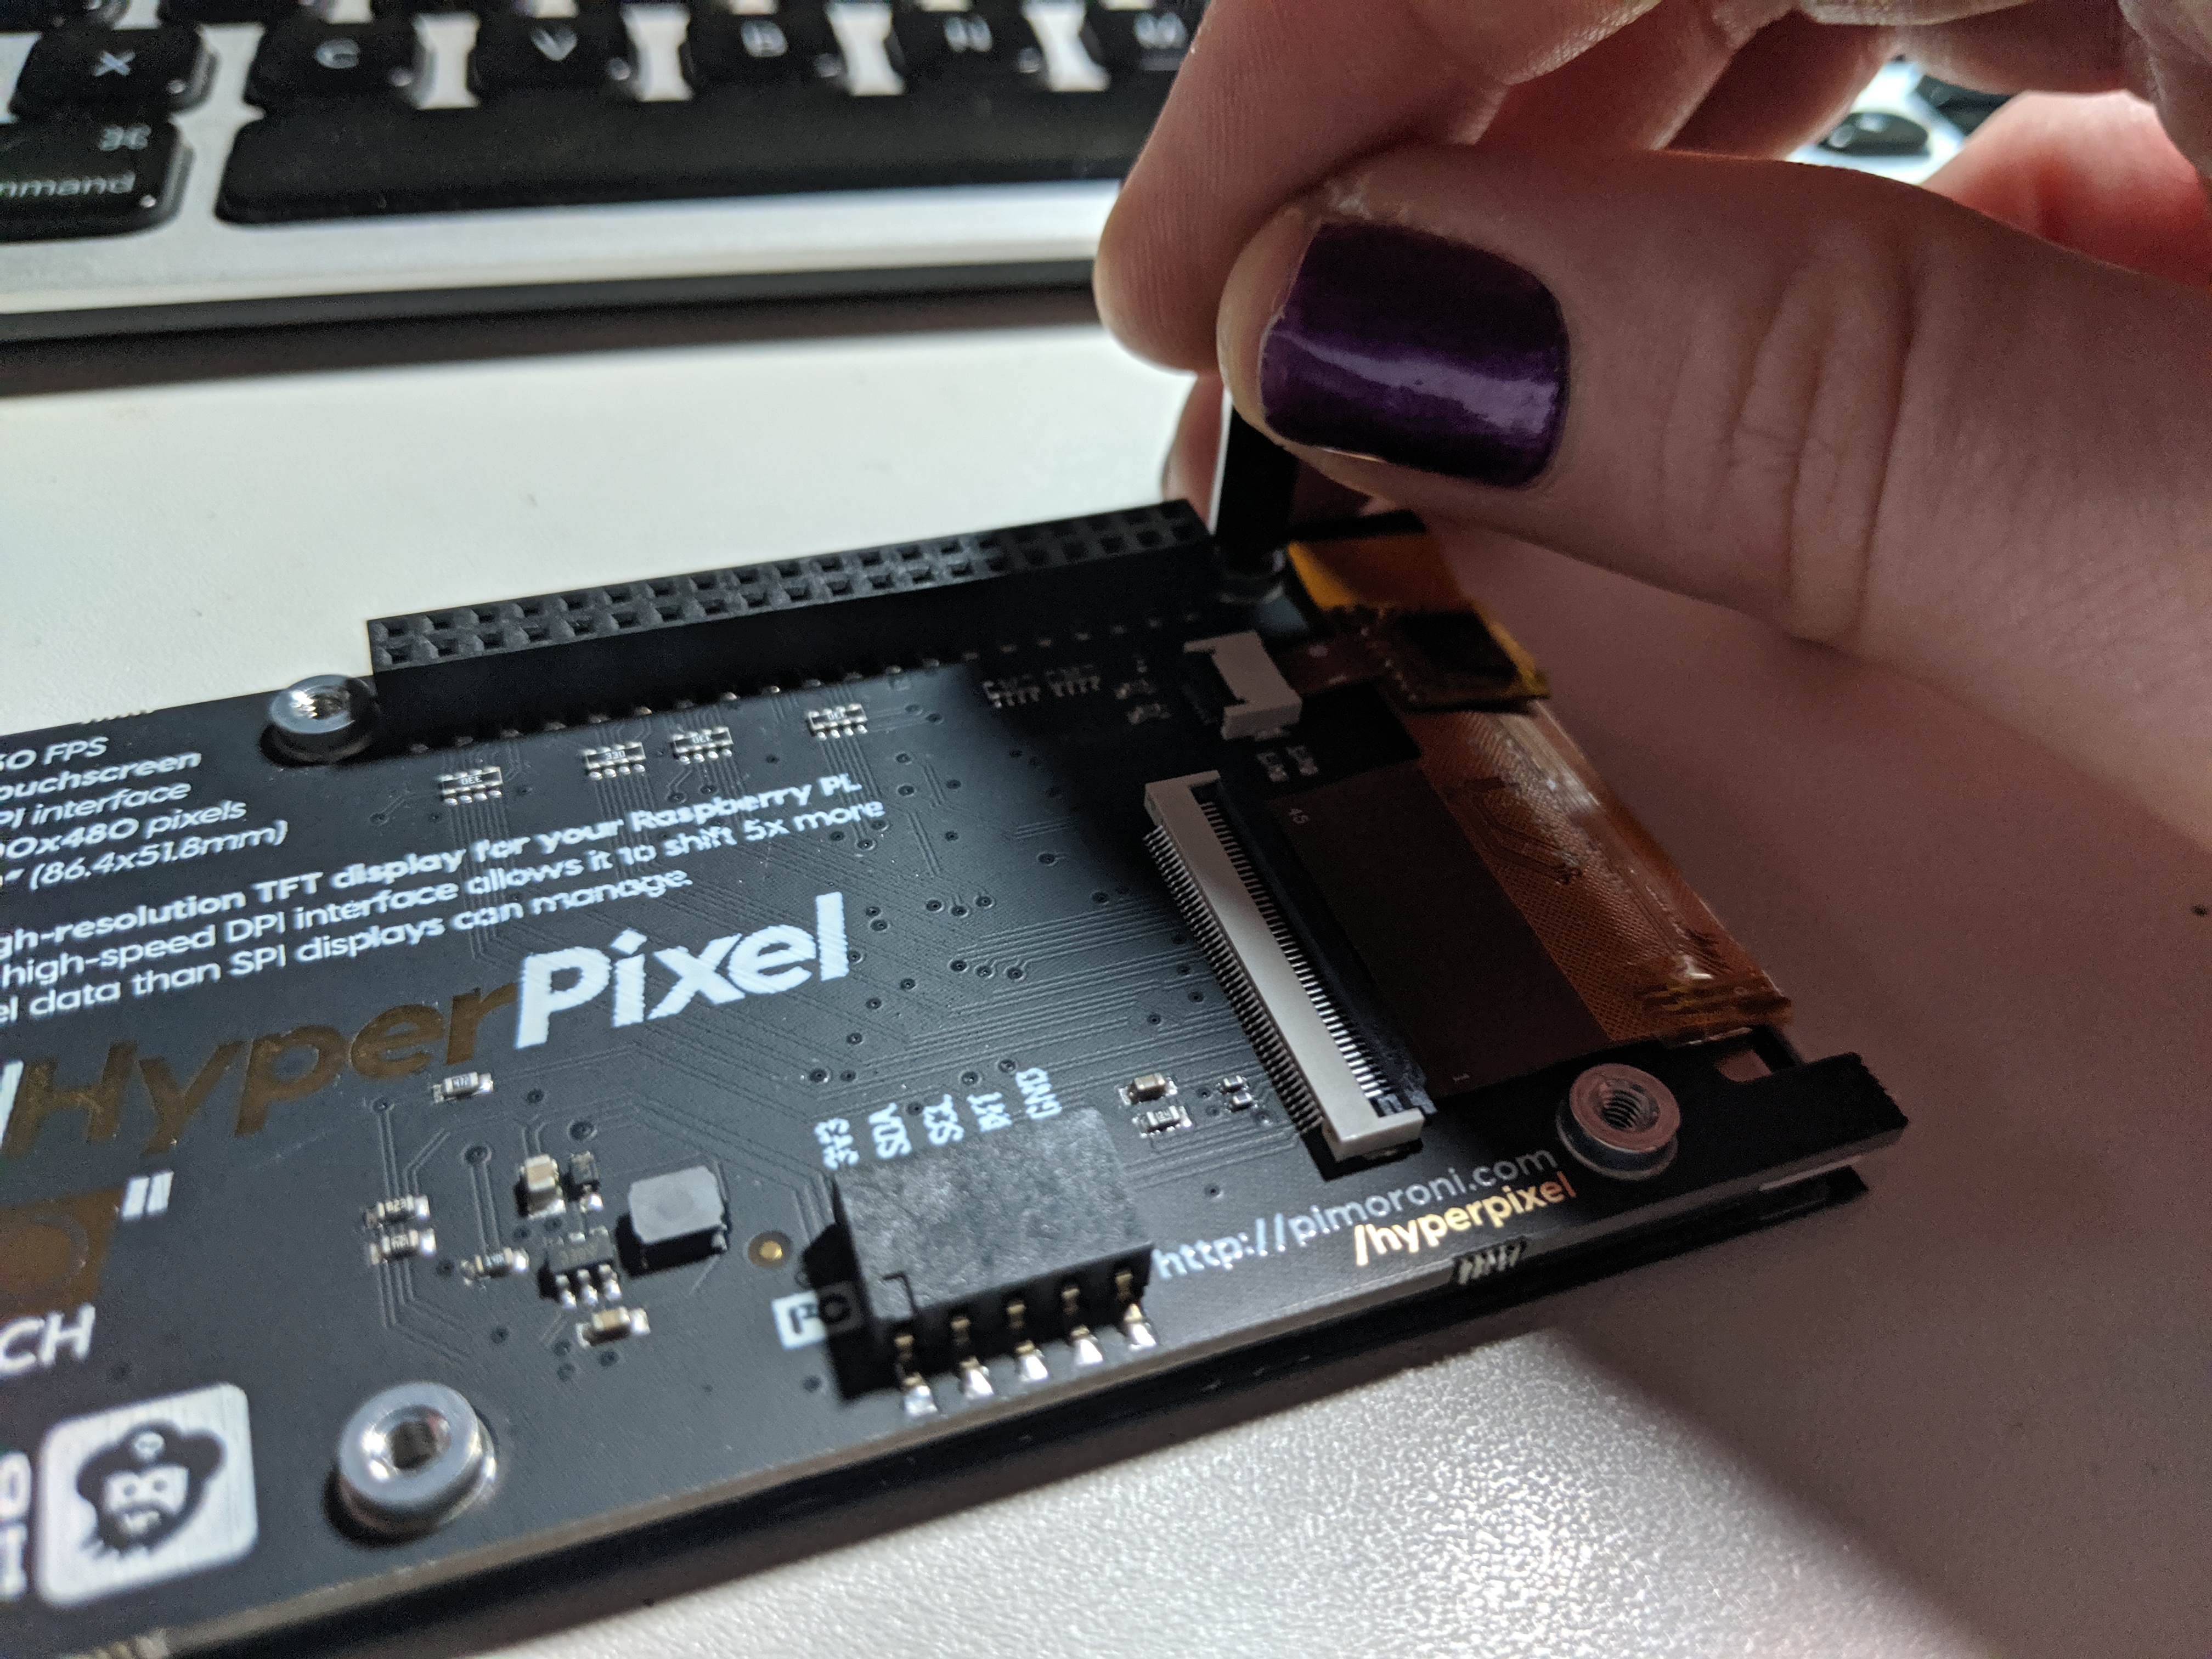
Oh no, I thought, did I break something? The Hyperpixel has a large flat-flex connector along one side, which is prone to damage if you press it against the side of the display. Both the display and the touch screen run through that side, and I was having problems with each. My heart sank.
I tried to fiddle with it a little more, but quickly ran to the end of my electronic troubleshooting abilities. So I posted some pictures on Twitter, and asked Pimoroni if something obvious was wrong.


Pimoroni directed me to a support email address where we continued troubleshooting. They asked me to reseat the flat flex and the board interconnect to see if that would solve the issue. That made perfect sense, so I tried it.
Immediately, the tiny plastic wedge for the touch screen cable came flying off. Lucky for me, I was able to find it again, but past experience suggested This Wasn't Right. After more fiddling with an electronics-safe tweezer, I manged to reseat it and the display connector. I reexamined the board interconnect, finding nothing wrong or bent, then reassembled the whole thing.
The display still came back up with the same streaks.
But the touch screen was responding!
Badly!
No matter what I did, the display thought I was tapping a little up and to the right of where my finger was on the display. Using a stylus meant for capacitive touchscreens yielded the same results. I rebooted the system, the touchscreen failed again.
Reading up on some forum posts, I decided to reinstall the OS completely. It was possible that I had installed something previously that was blocking or partially blocking one of the General Purpose Input-Output (GPIO) pins on the Pi. After following all the instructions for installing the drivers again, the display still had the same problems.
Crestfallen, I admitted defeat. Pimoroni was gracious enough to send me a replacement.
I set the project down and waited.
About a week later, the new display arrived. This time, I was really hoping that things would go flawlessly and I could get back to learning about how that keyboard worked. When I opened the package, I noticed the board from Pimoroni directly was slightly different than the one I bought from Adafruit.

The newer board had a matte solder mask and a different I2C connector compared to the one I got from Adafruit. This isn't a complaint in the slightest. OEMs often swap out components or manufacturers as demand and availability dictates. I was simply surprised that the two boards seemed so different, yet the same.
I went about seating the new screen onto the Pi, taking extra care to never touch the side with the flat-flex.
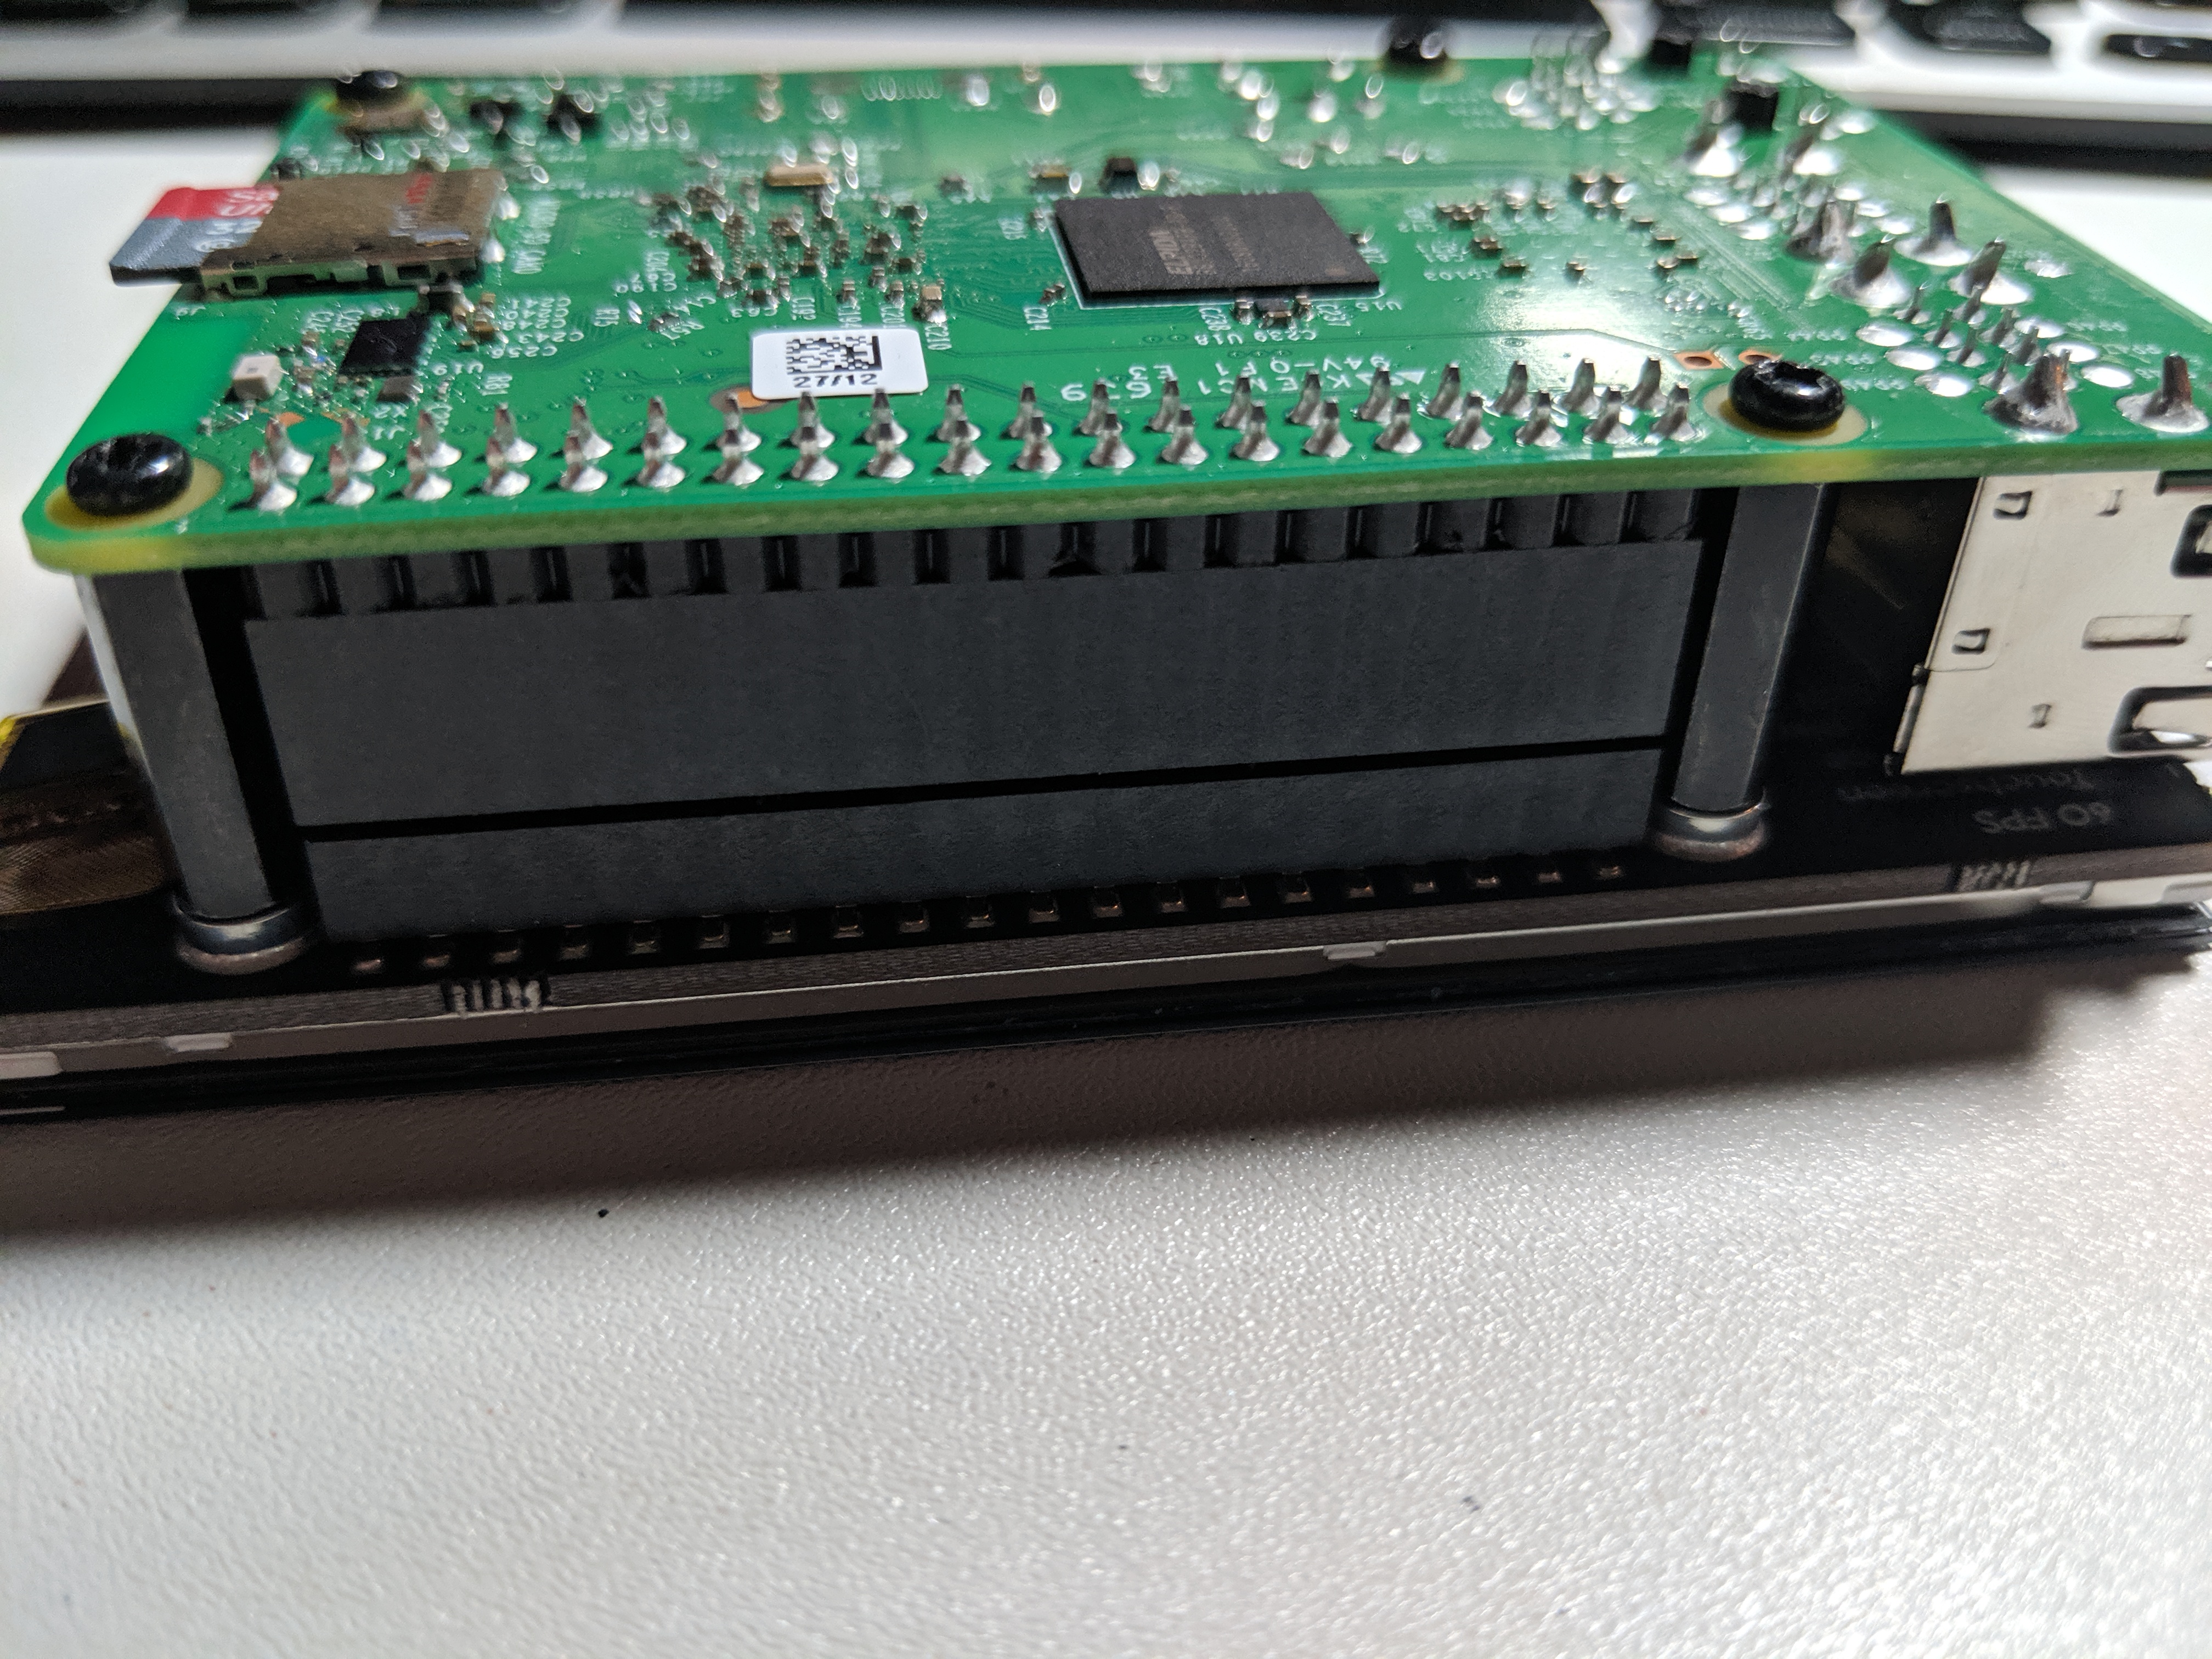
This time, I noticed something. When installing the board interconnect, I had additional difficulty and found the Pi board itself was bending outward. It was as if the pin header of the Pi was slight longer than the interconnect, causing the board to flex slightly. I thought it strange, but it didn't seem to more than a different manufacturing tolerance, so I ignored it.


After all that work, I crossed my fingers, and rebooted the Pi.
Things looked promising through the boot screen.
Then the desktop came up.
With the same streaks.
I could live with the streaks, I told myself, as long as the touchscreen worked. So I peeled off the protective film and took a tentative tap, and exactly the same miscalibration was present.
What the heck!? The chance that two displays with slightly different manufacturing sources having the same exact problem and behavior were highly unlikely. I would have expected some difference, especially with how carefully I assembled the second, newer display. I reexamined everything again, but found no obvious problems.
Then I remembered that "bulge"...
See, the board interconnect was particularly difficult to seat on the Pi. The pins on my Pi were spaced slightly further apart, leading to a noticeable gap in the middle between the two connectors. Now that both displays were having the same problem, I strongly suspected that the displays were never the issue, but rather the Pi itself. Something was wrong with the GPIO connector. And since the Hyperpixel was so heavily dependent on it to function, it was no wonder that both displays had the same exact problem.
Building this handheld computer was still a lot of fun despite the difficulties. Even though I haven't gotten a working version of this project, it's goal as a learning experience as already succeeded. Building the Mini Thumb Board with lead-free solder taught me a new skill, and the keyboard itself is in perfect working order.
The obvious solution for the display problems is to get another Pi, and see if the problem resolves itself. Unfortunately, I ran out budget once more, and will have to wait until I can order a replacement. Complicating this is the release of the Raspberry Pi 4, which has a lot of appeal for a portable device. I don't even know if the Hyperpixel supports it, and I worry I'd buy the newer SBC only to find I need to wait for the drivers to be updated.
I also still need a case. While I could order the 3D print, it would be cheaper if I were to buy an existing molded enclosure, or fashion one myself using that woodshop in my basement.
This post was created with the support of my wonderful supporters on Patreon.
If you like this post, consider becoming a supporter at:
Thank you!!!


